If there are no eggs or chicks yet, you can remove the nesting material today, clean the area with the right precautions, and install deterrents or exclusion before the birds commit. If eggs or chicks are already present, you legally cannot remove the nest in most cases under the Migratory Bird Treaty Act (MBTA), you'll need to wait it out, then act fast once the birds have fledged. Either way, the fix is the same two-stage process: handle what's there now, then proof the balcony so it never becomes an attractive nesting site again.
How to Stop Bird Nesting on a Balcony: Step-by-Step

Maya Carver
1 Jun 2026
Quick emergency steps for active nesting
The moment you spot a nest forming, your window to act without legal complications is narrow. Here's what to do immediately, before anything else.
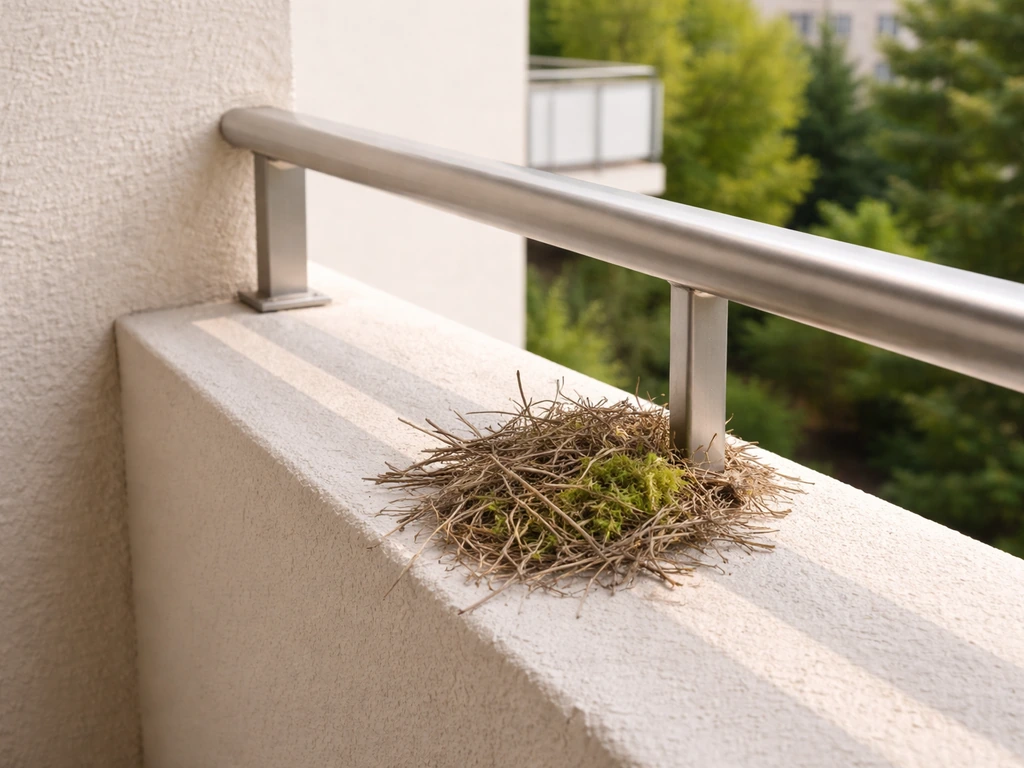
- Stop and look before you touch anything. Check the nest closely — is it just twigs and fluff (no eggs yet), or are there eggs or chicks present?
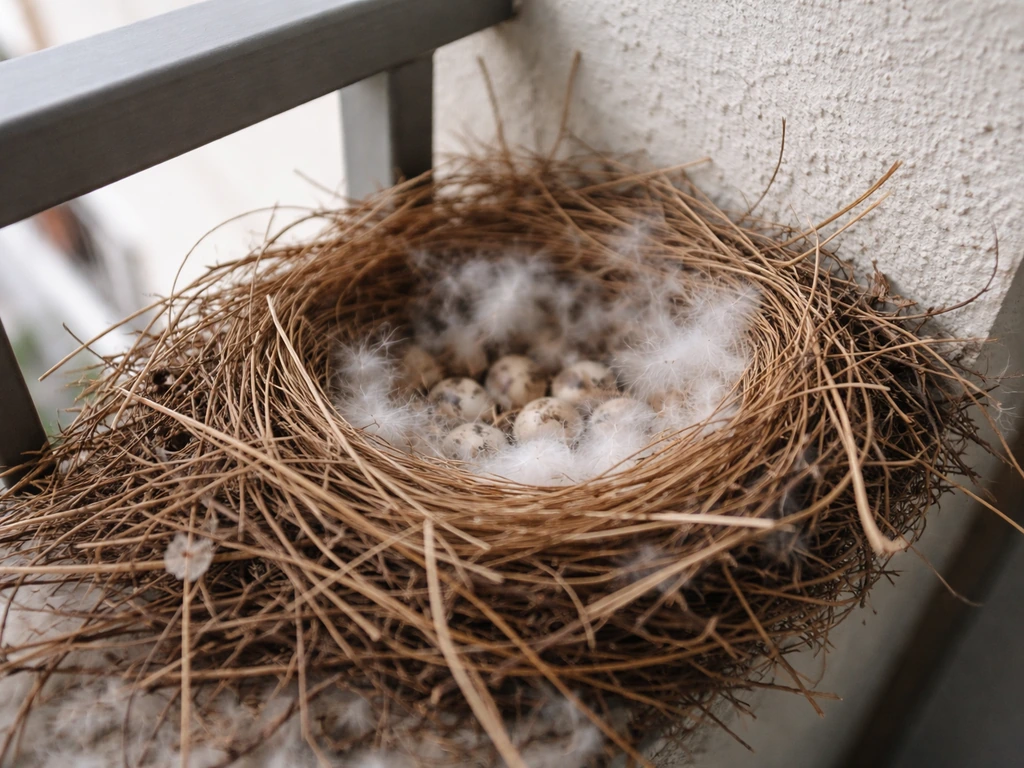
- If there are eggs or chicks, do not remove the nest. Under the MBTA, destroying or removing an active nest with eggs or young birds is illegal without a federal permit. Mark the area and come back after the chicks have fledged.
- If the nest is incomplete and there are no eggs, you can remove the nesting material now. Act quickly — once a bird lays eggs, you lose this option.
- Put on gloves and a dust mask before handling any nesting material, droppings, or feathers. More on PPE in the cleaning section below.
- After removal, immediately block or deter the spot so the bird doesn't start again within 24–48 hours.
If you discover the nest mid-season and eggs are present, the waiting period is shorter than most people expect. Pigeons, for example, typically fledge within about 4 weeks of hatching. Robins and sparrows are similar. Note the date you first see eggs or hatchlings, and plan your full cleanup and proofing for right after the young birds leave.
Identify the bird and confirm nesting status
Knowing what species you're dealing with changes your timeline and approach. Not all birds have the same breeding season, nest structure, or legal protections, and some carry more pathogen risk than others.
Common balcony nesters and their timing
| Bird | Typical nesting season | Nest type | MBTA protected? |
|---|---|---|---|
| Pigeon (Rock Dove) | Year-round (peak spring/summer) | Loose twigs, flat surfaces | No (not native migratory) |
| House Sparrow | Late February to August (peak May–July) | Messy grass/feather clumps | No (introduced species) |
| American Robin | Early April to mid-July (peak mid-May to mid-June) | Neat mud-cup nest | Yes |
| Herring/Laughing Gull | April to July | Grass/debris mound | Yes |
| Swift (Chimney Swift) | May to August | Tiny twig bracket | Yes |
Pigeons and house sparrows are not protected under the MBTA because they are non-native, introduced species. This means you have more flexibility to remove their nests even with eggs present, though humane handling is still strongly recommended. All other common balcony nesters (robins, gulls, swifts, swallows) are federally protected, and active nest removal requires a permit issued only in specific health or safety scenarios.
How to confirm nesting status
- No eggs, no chicks: Just nesting material (twigs, grass, feathers, string). Safe to remove now.
- Eggs present: One or more eggs visible in the cup of the nest. Do not disturb if the species is MBTA-protected.
- Chicks present: Small, often featherless or downy birds visible. Leave completely alone.
- Fledglings: Feathered but not yet flying well. They may be on or near the balcony but independent. You can proceed with cleanup once they are clearly gone.
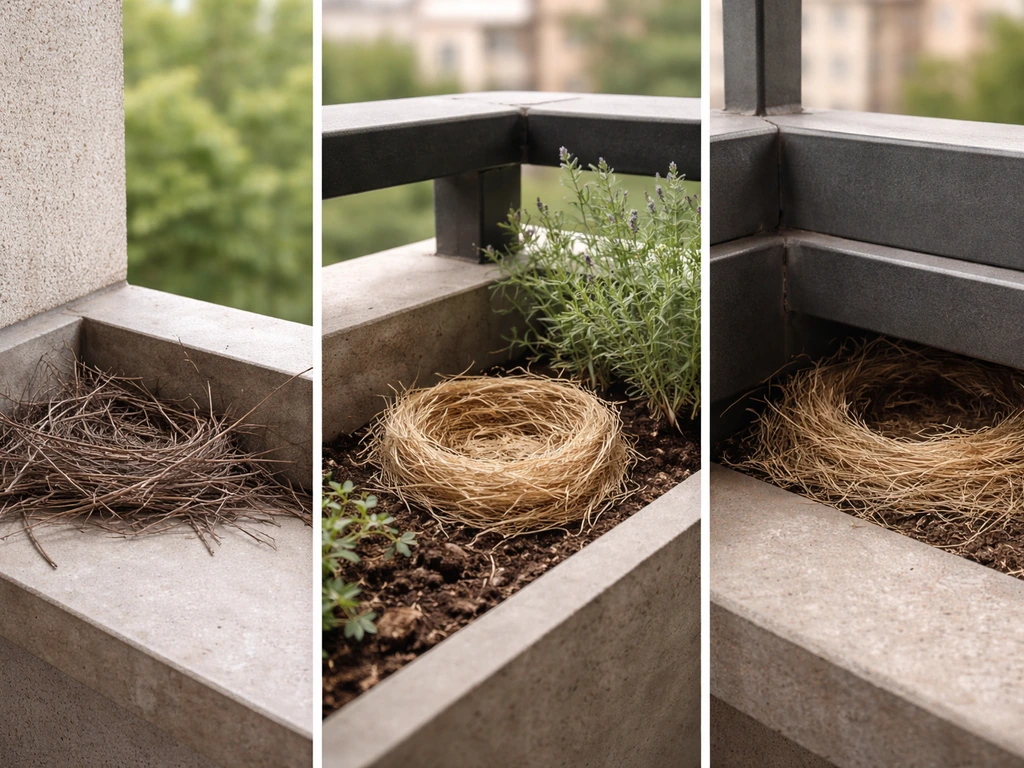
- Abandoned nest: No adult activity for 48–72 hours and no live eggs/chicks. Safe to remove regardless of species.
Remove attractants: food, water, nesting materials, and surfaces
Birds don't choose a balcony randomly. They're drawn by something specific: a ledge that feels sheltered, a water source, food scraps, or loose materials they can weave into a nest. Remove those things and the balcony immediately becomes less appealing.
- Food: Remove bird feeders, pet food bowls, and any food scraps. Even small crumbs from outdoor dining can attract sparrows and pigeons daily.
- Water: Empty and store plant saucers, decorative bowls, and anything that collects rainwater. Change pet water bowls frequently if you keep them outside.
- Loose nesting materials: Remove any stored fibrous materials — twine, rope, burlap, packing materials, dried plant matter. Birds actively gather these.
- Overgrown plants: Dense potted shrubs or vines on a balcony create covered nesting spots. Trim them back or move them indoors temporarily during peak nesting season.
- Flat sheltered surfaces: Air conditioning units, cable boxes, storage bins with recessed lids, and the tops of outdoor furniture all create ideal nest platforms. Cover or move them.
The best long-term deterrent is elimination and control, preventing the conditions that attract birds in the first place. This is especially true for droppings accumulation, which not only draws birds back (they follow scent and visual cues to previous nesting sites) but also creates a health hazard. If you have repeat visits from birds, address the attractants too, since droll and lock bird behavior often comes back to consistent nesting cues droppings accumulation.
Clean safely and reset the area
Bird droppings, feathers, and nesting debris carry real health risks, most notably Histoplasma, a fungal spore found in soil and surfaces contaminated by bird and bat droppings. Breathing in those spores can cause histoplasmosis, a respiratory illness that ranges from mild to serious. Avian influenza (bird flu) is another concern, the CDC recommends avoiding contact with droppings, feathers, and contaminated surfaces without proper protection, and specifically warns against stirring up dust or waste in a way that disperses particles into the air. If your goal is control bird population on a balcony, focus on long-term exclusion and removal of nesting attractants, not temporary scare tactics.
PPE before you start
- N95 or P100 respirator (not just a cloth mask — you need filtration for fungal spores)
- Disposable gloves (nitrile or rubber)
- Safety glasses or goggles
- Disposable coveralls or old clothes you can wash immediately at high temperature
- Closed-toe shoes
Step-by-step cleaning process
- Wet down droppings and nesting debris before disturbing them. Use a spray bottle or hose to dampen surfaces — this prevents spores and dust from becoming airborne.
- Scoop up solid debris with a disposable tool (old trowel, plastic scraper) and seal it in a plastic bag before disposal.
- Wipe surfaces with a disinfectant solution. A diluted bleach solution (1 part bleach to 10 parts water) works well on hard surfaces. Let it sit for several minutes before wiping.
- Rinse thoroughly if using bleach near plants.
- Bag and dispose of all cleaning materials — don't shake out cloths or tools in place.
- Wash hands thoroughly and shower if there was heavy exposure.
- Inspect the area for remaining odor attractants. Birds use scent memory to return to previous nest sites, so thorough deodorizing matters.
For small, occasional droppings the full PPE setup is less critical, but for a site that's been actively used for weeks, especially if there's a significant accumulation, treat it as a biohazard task.
Short-term deterrents that can work immediately
After cleaning, you want to discourage re-nesting before permanent exclusion is in place. These options work quickly and require no installation time, but they all have limitations, treat them as a bridge, not a permanent fix.
Reflective tape and visual deterrents
Mylar or reflective tape hung from railings creates flashing light and some movement and noise in the wind. It genuinely startles birds initially. The catch is habituation, birds figure out within days to a few weeks that the tape poses no real threat, and they stop reacting to it. Use it as a short-term measure while you organize something more permanent, and rotate or change it frequently to slow down habituation.
Bird gel repellents
Gel repellents applied to ledges and railings create a sticky, uncomfortable surface that birds dislike landing on. They work by making contact with the bird's feet, not by trapping them. They're best suited to narrow ledges and railings where spikes aren't practical. Downsides: they collect dust and debris over time and lose effectiveness, they can affect birds' feathers if applied too thickly, and they need reapplication. In hot climates they can liquefy.
Physical presence and decoys
Predator decoys (plastic owls, hawk silhouettes) and wind-activated spinners can work briefly. Again, birds habituate fast, typically within a week or two if the decoy doesn't move convincingly. Moving the decoy every day or two extends its usefulness somewhat. These are not reliable long-term solutions on their own.
Long-term balcony proofing and exclusion
Exclusion is the only approach that reliably stops birds from re-nesting. Everything else is a deterrent that birds can eventually work around. The goal is to physically prevent them from landing, roosting, or building in the first place.
Bird netting: the most complete solution
A properly installed net enclosure around the balcony is the gold standard for total exclusion. The net runs from the top of the balcony ceiling to the railing, fully enclosing the open face of the space. When done right, no bird can get in. Mesh size matters: a 1/2-inch square mesh will stop virtually all bird species including small sparrows. StealthNet’s architectural specifications list mesh sizes such as 3/4 inch, 1-1/8 inch, and 2 inch, matching the idea that the chosen mesh size determines which birds can be excluded mesh size matters. For larger birds like pigeons and gulls only, a 1-1/8 inch or 2-inch mesh is sufficient. If you're unsure of species, go smaller. Most systems use stainless steel cable or an anchor track system around the perimeter, with the netting tensioned between cables. This is a job most homeowners can do themselves on a simple rectangular balcony, but for multi-story buildings or complex geometry, a professional installer is worth it for both safety and effectiveness.
Bird spikes on ledges and railings
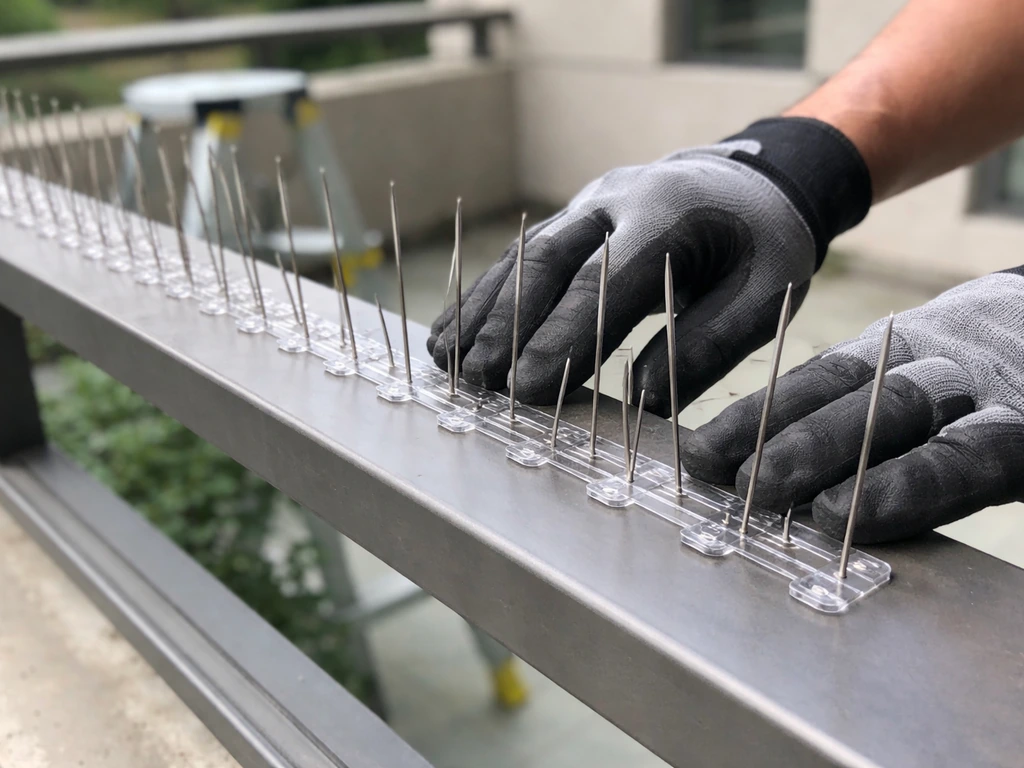
Stainless steel or polycarbonate spike strips attached to the top of railings, ledges, and flat surfaces prevent birds from landing and roosting in those spots. They don't harm birds, they just make landing uncomfortable. Installation typically involves pressing or gluing the base strip to the surface, or screwing it down. For maximum effectiveness, cover every horizontal surface the bird has been using, not just the most obvious one. Gaps between spike sections wider than about 2 inches give birds exactly the foothold they need.
Sealing gaps and blocking access points
Check for any gaps, recesses, or sheltered cavities where birds can tuck a nest out of sight: behind air conditioning units, under equipment housings, in the junction between the balcony ceiling and wall, inside open drainage pipes, and above light fixtures. Seal gaps with hardware cloth (galvanized wire mesh), expanding foam (for small gaps only, birds can dislodge soft foam), or purpose-made bird exclusion mesh. Always confirm there are no birds, eggs, or chicks inside before sealing an enclosed space.
Wire systems for ledges
Stainless steel wire strung in parallel lines about 2–3 inches above ledges and railings creates an unstable landing surface. It's less visible than spikes and works well on wider architectural ledges. The wires need to be tensioned correctly and spaced no more than 4 inches apart for smaller birds. This is a lower-profile option popular in buildings where aesthetics matter.
Choosing the right exclusion method
| Method | Best for | Limitations | DIY-friendly? |
|---|---|---|---|
| Bird netting (full enclosure) | Total exclusion, all species | Requires careful installation; alters look of balcony | Yes, for simple layouts |
| Spike strips | Railings, ledges, flat surfaces | Doesn't stop birds from accessing open balcony floor | Yes |
| Parallel wire systems | Architectural ledges, wider surfaces | Requires tensioning; less effective in gaps | Moderate |
| Hardware cloth/mesh sealing | Gaps, cavities, vents | Only works on specific entry points | Yes |
| Gel repellent | Narrow ledges where spikes won't fit | Degrades over time; needs reapplication | Yes |
Seasonal timing for installation
The best time to install exclusion measures is late winter, before the nesting season starts. For most of the U.S., that means getting everything in place by late February. House sparrows can start scouting nesting sites as early as late February or March. Robins get going in early April, with peak nesting from mid-May to mid-June. For American robins, eBird’s breeding-status check window is 17 May, 26 Jul peak nesting from mid-May to mid-June. If you missed the pre-season window and it's currently spring or summer, your best move is to wait for any active nest to clear, do a full clean, and install exclusion immediately after, so the site is protected before any new attempt begins.
When birds keep coming back: troubleshooting and when to call a pro
If birds are returning despite deterrents, or if you're seeing repeated nesting attempts season after season, something in your setup isn't working. Here's how to diagnose the problem.
Troubleshooting repeat nesting
- Deterrents without exclusion: Visual and sound deterrents alone rarely stop determined birds. If you're relying on reflective tape or decoys and birds are still nesting, layer in physical exclusion — spikes, netting, or mesh.
- Incomplete coverage: Birds will simply move 6 inches down the railing to an unprotected section. Go back and find the specific spot they're using and make sure every landing surface in that zone is covered.
- Habituation to non-physical deterrents: If you've been using the same tape, decoy, or sound device for more than a few weeks, rotate or replace it. Birds learn quickly.
- Scent and visual memory: Birds return to previous nesting sites using scent and memory. If the area wasn't thoroughly cleaned and deodorized after the last nest, they'll come right back. Re-clean and use an enzyme-based odor neutralizer.
- New attractants: Check if anything new has appeared — a neighbor started a bird feeder nearby, new plant growth is providing cover, or new clutter is offering shelter.
When to stop DIY and call a professional
There are situations where the right call is to hand this off to a licensed wildlife professional or pest control company that specializes in birds. Don't try to handle these yourself:
- You've found a nest with eggs or chicks belonging to a protected species (robins, swifts, swallows, gulls) and it's in a location creating a genuine health or safety risk. A licensed wildlife professional can assess whether a permit removal is possible.
- You find an injured or sick bird on or near the nest. Contact your local wildlife rehabilitator, not pest control.
- The nest or droppings accumulation is large enough to require professional biohazard cleaning (more than a few square feet of dense droppings, or any sign of respiratory symptoms after exposure).
- The balcony is on an upper floor and safe installation of netting requires working at height beyond your comfort or equipment.
- You're a facility manager dealing with a large-scale infestation across multiple units — this needs a coordinated building-wide exclusion plan, not individual balcony patches.
- You've installed exclusion measures and birds are still getting in and you can't find the entry point.
When you call a professional, be ready to tell them the species if you know it, when nesting activity started, what you've already tried, and whether eggs or chicks are present. That information helps them assess the legal situation and come with the right tools.
What not to do
- Don't block a gap, vent, or cavity without first confirming there are no birds, eggs, or chicks inside — trapping a bird inside a sealed space is cruel and creates a worse problem.
- Don't use poison or harmful chemicals to deter or kill birds. Most species are federally protected, and poisoning them is a federal violation.
- Don't touch eggs or chicks — even for a protected species that you're waiting on, minimal disturbance is important. Approaching an active nest repeatedly causes stress to nesting adults and can cause abandonment.
- Don't dry-sweep or vacuum dry droppings without wetting them first — this is the primary way histoplasmosis spores become airborne.
- Don't assume a nest is abandoned after just a day or two. Wait a full 48–72 hours with no adult activity before treating it as abandoned.
Your seasonal action plan at a glance
| Time of year | What to do |
|---|---|
| Late January to mid-February | Inspect balcony for damage, gaps, and leftover nest debris from last year. Order exclusion materials. |
| Late February to March | Install netting, spikes, and wire before house sparrows and early nesters begin scouting. Remove all attractants. |
| April to July (peak nesting season) | Monitor regularly. If you find a new nest forming with no eggs, remove it immediately. If eggs are present, identify the species and follow legal guidance. |
| August to September | Once all nesting activity has ended, do a full clean with PPE. Repair or reinforce any exclusion that was damaged or bypassed. |
| October to January | Maintain exclusion hardware. Check netting tension and spike adhesion. Remove any loose materials that have accumulated on the balcony. |
FAQ
Can I move the nest to another spot on my balcony to avoid waiting?
Usually no. If the birds are protected, relocating a nest can still be illegal and it also risks harming eggs or chicks. The safer approach is to wait until the birds have fledged (in the active period) and then remove remaining material and install exclusion right after, so they cannot restart.
What if I find a nest that looks abandoned, but I am not sure whether eggs or chicks are still there?
Treat it as active until you can confirm it is not. If you cannot verify there are no eggs or live chicks, delay cleanup and sealing of enclosed spaces. Confirm visually from a safe distance, then wait the recommended buffer, clean thoroughly, and only then install proofing.
How do I safely clean after birds leave without stirring contaminated dust into the air?
Before wiping or sweeping, mist droppings and debris lightly with water so particles do not become airborne. Use gloves and an appropriate face protection mask, avoid dry brushing, and double-bag waste. Pay special attention to ledges under vents and near railings where buildup accumulates.
Do I need PPE if there are only a few droppings?
If it is truly minor and the area has not been used heavily for weeks, you may be able to reduce risk with gloves plus basic respiratory protection, but still avoid sweeping dry debris. If you see a buildup layer, feathers, or nesting debris, treat it as a higher-risk cleanup and use full PPE.
How can I tell whether the birds are protected or not (pigeons and house sparrows vs other species)?
Start with identification by appearance and nest type, for example pigeons often nest on sheltered ledges and house sparrows commonly use cavities. If you are unsure, assume the conservative rule: federally protected until you can confirm. Species uncertainty affects whether you can remove an active nest.
What are the most common “missed” spots where birds keep nesting even after exclusion is installed?
Check the concealed zones you cannot see from normal standing positions, behind HVAC units, under equipment housings, inside or around drainage pipe openings, at the balcony ceiling-to-wall junction, and above light fixtures. Many failures come from one small gap that allows birds to tuck a nest out of sight.
Will bird spikes or netting stop pigeons if they are landing on the rail top only?
Often yes, but you must cover every horizontal landing surface, including the rail top, the adjacent ledge edge, and any flat trim where they can get footing. Also ensure there are no gaps wider than about 2 inches between spike sections, since pigeons will exploit small footholds.
How long should I wait after birds fledge before I clean and remove the nest material?
Wait until you have a clear confirmation that no birds remain. Once the area is inactive, remove nesting material promptly and then sanitize the surface before installing or completing exclusion, so scent and residual cues do not encourage a quick restart.
Are reflective tape, decoys, or gel repellents worth using if I plan to install exclusion?
Yes as a short-term bridge, but do not rely on them as the final solution. Birds habituate quickly to flashing tape and decoys, and gel repellents require reapplication and can lose effectiveness. Use them to reduce pressure while you schedule permanent proofing.
Is it safe to seal gaps with expanding foam near nests?
Use foam only for small gaps you can fully address, and be cautious because birds can dislodge soft foam. Always verify there are no eggs or chicks inside the cavity before sealing, then use hardware cloth or purpose-made exclusion mesh for areas that could be reopened.
What should I do if birds keep coming back year after year despite my deterrents?
That pattern usually means the attractants and landing opportunities still exist, droppings are accumulating somewhere, or exclusion coverage has a weak point. Re-evaluate for repeated buildup sites, hidden cavities, and any horizontal surfaces that remain uncovered, then correct the weakest link.
When is it time to hire a wildlife professional instead of handling it myself?
Hire help when the situation is high-risk (multi-story access issues, complex balcony geometry), the species is uncertain and legal constraints may apply, you see ongoing nesting despite recent changes, or there is substantial droppings buildup that makes safe cleanup difficult. Provide them timing, species if known, what you tried, and whether eggs or chicks were present.
If I install netting, what mesh size should I choose when I do not know the species?
Choose the smaller mesh option to be safe if identification is uncertain. Smaller mesh stops more species, including small sparrows, and it reduces the odds of a bird squeezing through after the enclosure is installed.