Birds nesting inside a wall cavity is a problem you can fix, but you have to do it in the right order or you risk breaking federal law, trapping animals inside, or making the smell and damage ten times worse. The short version: confirm the nest is inactive (no eggs, no chicks), then open the wall or access point, remove the nest with proper PPE, clean and disinfect the cavity, seal every entry gap, and install hardware to prevent a return. If the nest is active with eggs or young birds, you generally cannot legally disturb it until the birds have fledged. This guide walks you through every step.
How to Get Rid of a Bird Nest in a Wall Safely

Maya Carver
20 May 2026
Do these things first (same day emergency steps)
Before you do anything else, focus on safety and avoiding accidental legal violations. A bird in a wall cavity can seem like a minor nuisance, but the wrong first move can result in a fined offense, a dead animal rotting inside your wall, or a contaminated debris cloud in your HVAC system.
- Do not seal the entry point right now. If birds are still inside, sealing them in means they die in the wall, which creates odor, insect infestation, and a much bigger cleanup job.
- Turn off any HVAC intake vents that connect to the affected wall cavity to stop droppings, feathers, or debris from circulating through your air system.
- Listen carefully at the wall surface for chirping, scratching, or fluttering. This tells you whether birds or chicks are actively present.
- Do not spray any chemical repellents or pesticides into or near an occupied nest cavity. This can kill protected migratory birds, which carries federal penalties.
- Keep pets and children away from the area until you have confirmed what species is present and whether the nest is active.
- If you can see an obvious entry gap on the exterior, mark it with tape for now but leave it open until you complete your assessment.
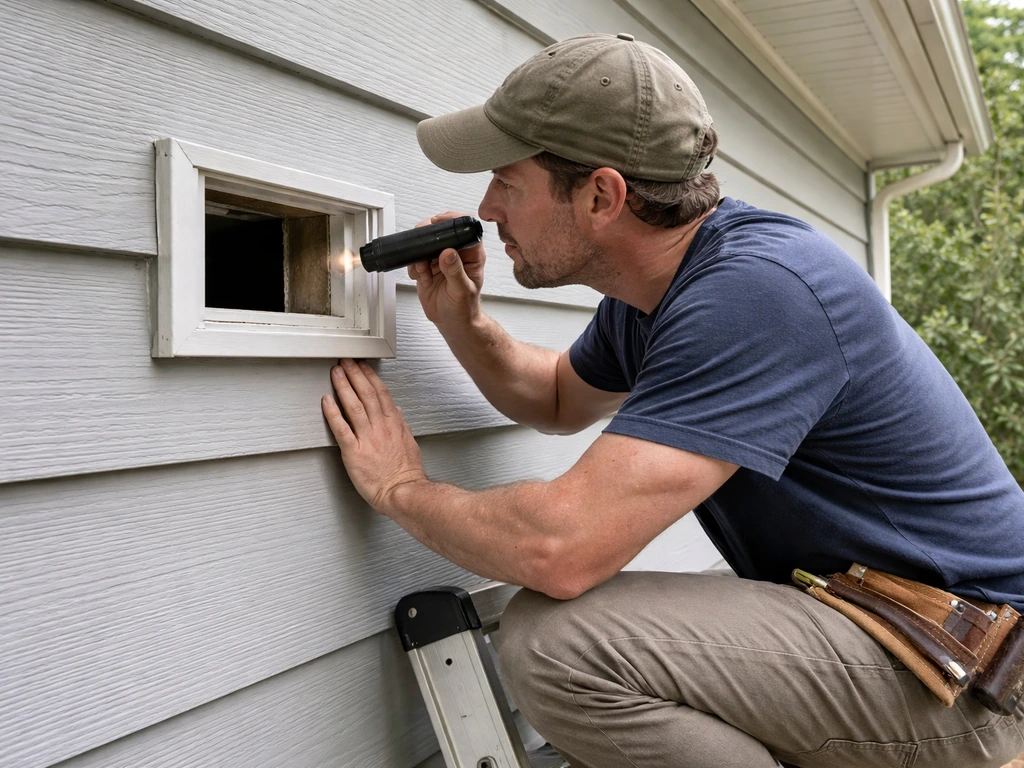
Figure out what bird you're dealing with and whether the nest is active
This step is not optional. What bird is using your wall and whether eggs or young are present determines what you are legally allowed to do and when. In the US, almost every wild bird species is protected under the Migratory Bird Treaty Act (MBTA). In the UK, the blank" rel="noopener noreferrer">Wildlife and Countryside Act 1981 protects all wild birds, their nests, and their eggs. Misidentifying the species or the nest status is the most common reason people end up in legal trouble.
Common birds found in wall cavities
| Bird | Typical entry point | Nest season (Northern Hemisphere) | Key identifiers |
|---|---|---|---|
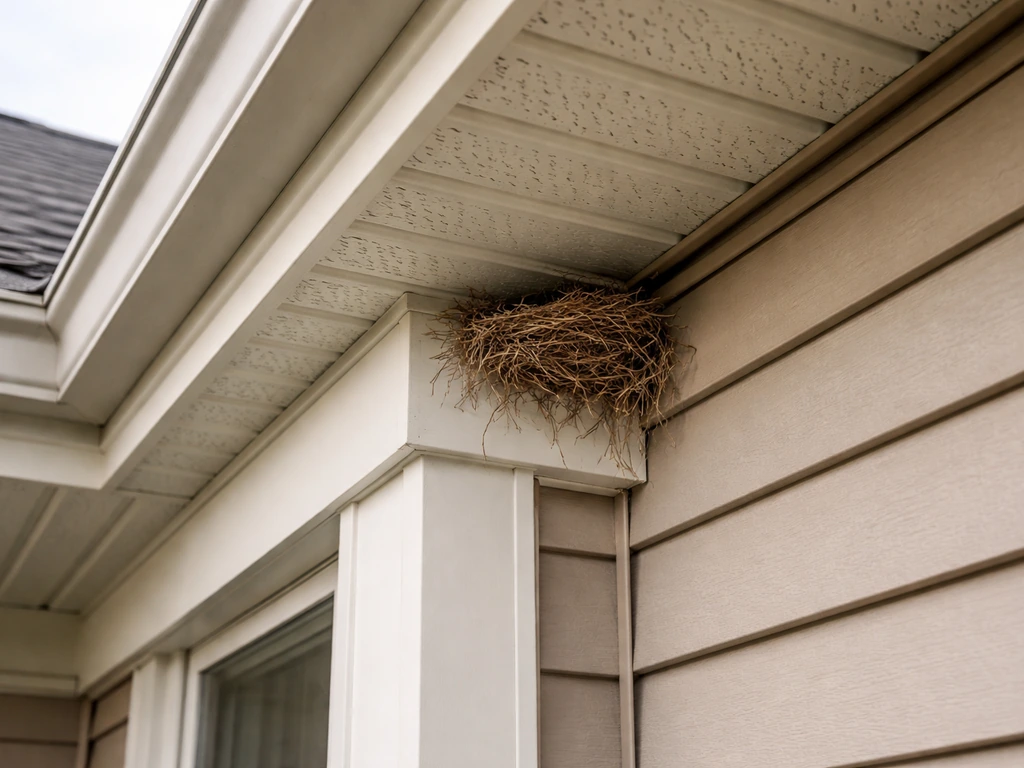
| European Starling | Gaps in soffits, eaves, broken vent covers | March to July | Noisy, chattering calls; yellow bill in spring; black iridescent feathers |
| House Sparrow | Weep holes, gaps behind shutters, wall vents | April to August | Constant chirping; small brown/gray bird; nests made of straw and feathers |
| European Starling or House Sparrow (feral) | Utility entry gaps, cracked mortar | Year-round in mild climates | Similar to above; no legal protection under MBTA (non-native species) |
| Chimney Swift | Wall cavities near chimneys, vertical shafts | May to August | Rapid wingbeats, twittering call; torpedo-shaped body; protected under MBTA |
| Various wrens/finches | Small gaps in siding or vents | April to July | Small, high-pitched song; nest with fine grass/moss/hair lining |
The good news: House Sparrows and European Starlings are non-native, invasive species in North America and are not protected by the MBTA. This gives you more flexibility with timing for those species. All other wild birds are protected, and their active nests cannot be legally disturbed in the US. The UK offers no such exception: all wild birds including sparrows and starlings are protected under the Wildlife and Countryside Act 1981.
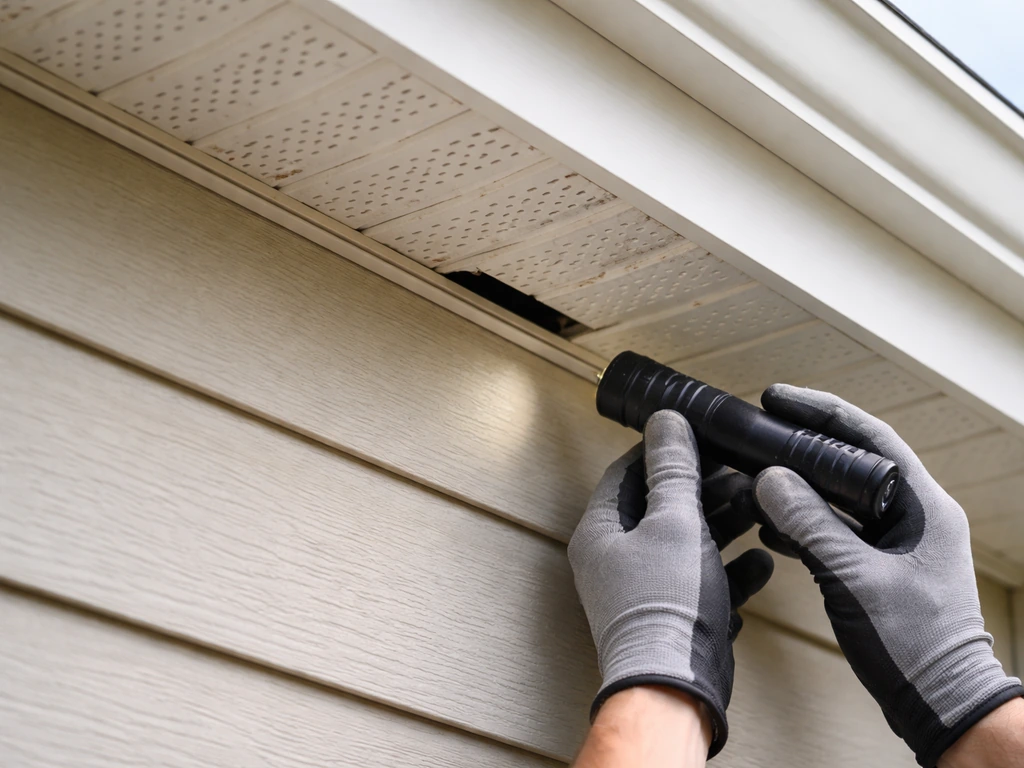
How to confirm whether the nest is active
- Listen at the wall at dawn and dusk when birds are most active. Persistent chirping or scratching strongly suggests an active nest with chicks.
- Watch the exterior entry point for 30 to 60 minutes. If adult birds are making regular trips in and out, the nest is active.
- If you can safely access the cavity without disturbing birds (e.g., a removable vent cover on the exterior), use a flashlight and mirror or a small inspection camera to look for eggs, chicks, or a brooding adult.
- If you cannot see inside and hear active sounds, treat the nest as active until proven otherwise. The U.S. Fish & Wildlife Service specifically notes it can be difficult to detect whether eggs or viable birds are present in cavities, which is exactly why consulting an expert matters in unclear cases.
If the nest is confirmed inactive (no eggs, no chicks, no adult birds returning), you are generally clear to proceed with removal. If it is active and contains eggs or dependent young, and the species is protected, you must wait until the birds have fledged and vacated on their own. Typical fledging timelines range from 2 to 3 weeks after hatching for most cavity-nesting species.
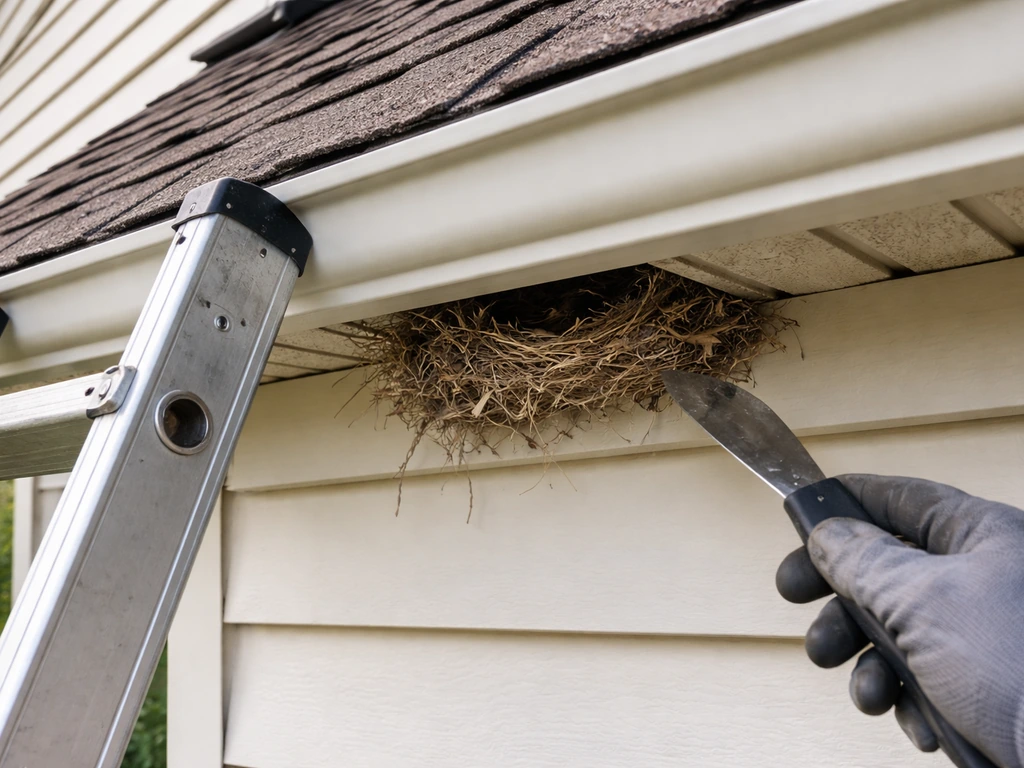
How to remove the nest: DIY steps and when to call a pro
For an inactive nest in a protected, non-HVAC wall cavity, a competent DIYer can handle removal safely. If you are dealing with a bird nest in a window area, focus on exclusion and sealing methods to prevent birds from returning remove the nest. For anything involving an active nest of a protected species, HVAC connections, asbestos-era construction, or a wall cavity you cannot see into, call a licensed wildlife removal professional before you start pulling things apart.
DIY removal (inactive nest, accessible cavity)
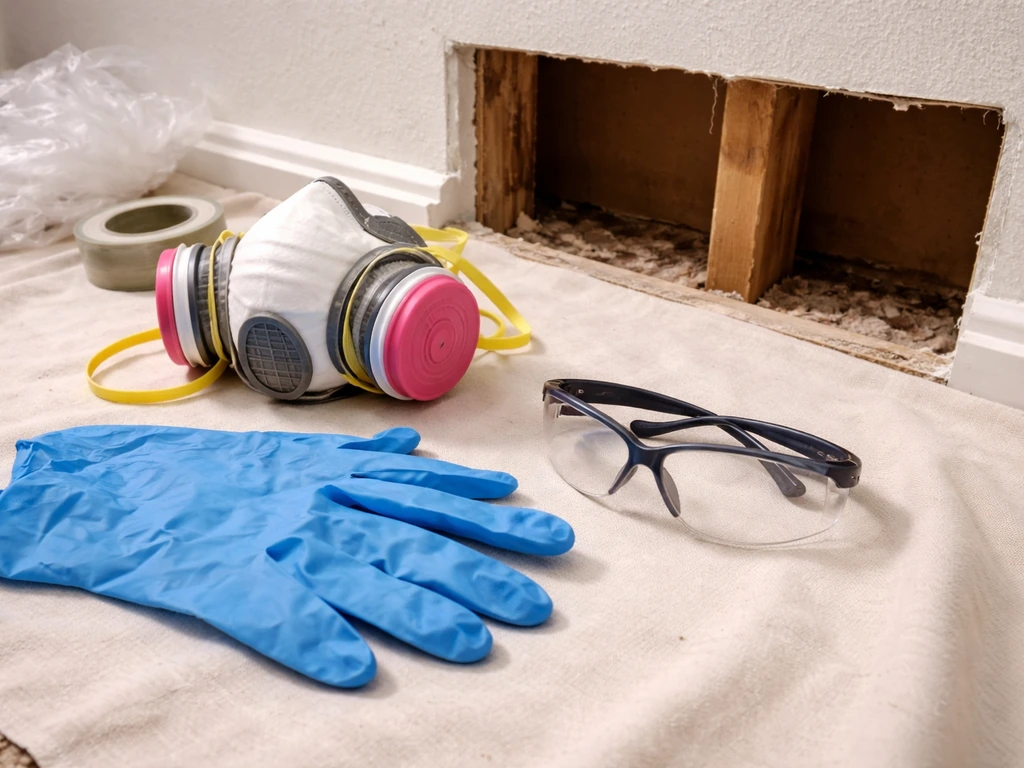
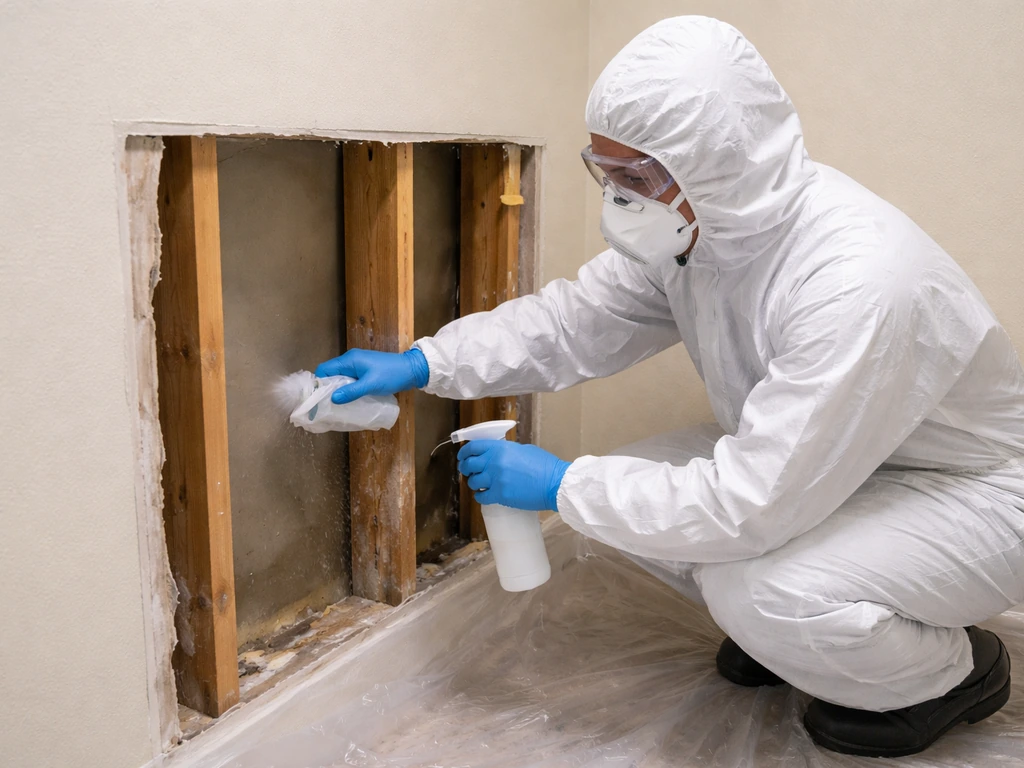
- Gear up before you touch anything. Wear an N95 or P100 respirator (not a basic dust mask), nitrile or rubber gloves, safety glasses, and old clothes you can bag and wash immediately. Bird nests can harbor mites, ticks, histoplasma fungal spores, and salmonella from droppings.
- Access the cavity from the most practical side, ideally the exterior. Remove the vent cover, access panel, or small section of siding rather than cutting drywall from the interior if you can avoid it.
- Dampen the nest material lightly with a water-and-disinfectant spray (a diluted bleach solution works: about 1 part bleach to 9 parts water) before disturbing it. This suppresses airborne dust and reduces spore dispersal.
- Remove the nest material with long tongs or gloved hands into a heavy-duty garbage bag. Seal the bag immediately. Do not shake or blow debris out of the cavity.
- Inspect the cavity for any remaining debris, feathers, droppings, or carcasses. Remove all organic material completely or odor and insects will return.
- Bag all contaminated tools, wipe down the surrounding surface with disinfectant, and wash your hands thoroughly before removing your respirator.
When to hire a wildlife removal professional instead
- The nest is active with eggs or chicks of a protected species and you need a timeline or permit guidance.
- You cannot confirm whether birds are still present inside the wall cavity (this is a common scenario and legally risky to get wrong).
- The cavity connects to your HVAC system or ductwork.
- You suspect the infestation is large, involves multiple entry points, or has been ongoing for more than one season.
- You discover a dead bird or multiple carcasses inside the wall.
- The wall construction involves older materials that may contain asbestos or lead paint, which require licensed abatement.
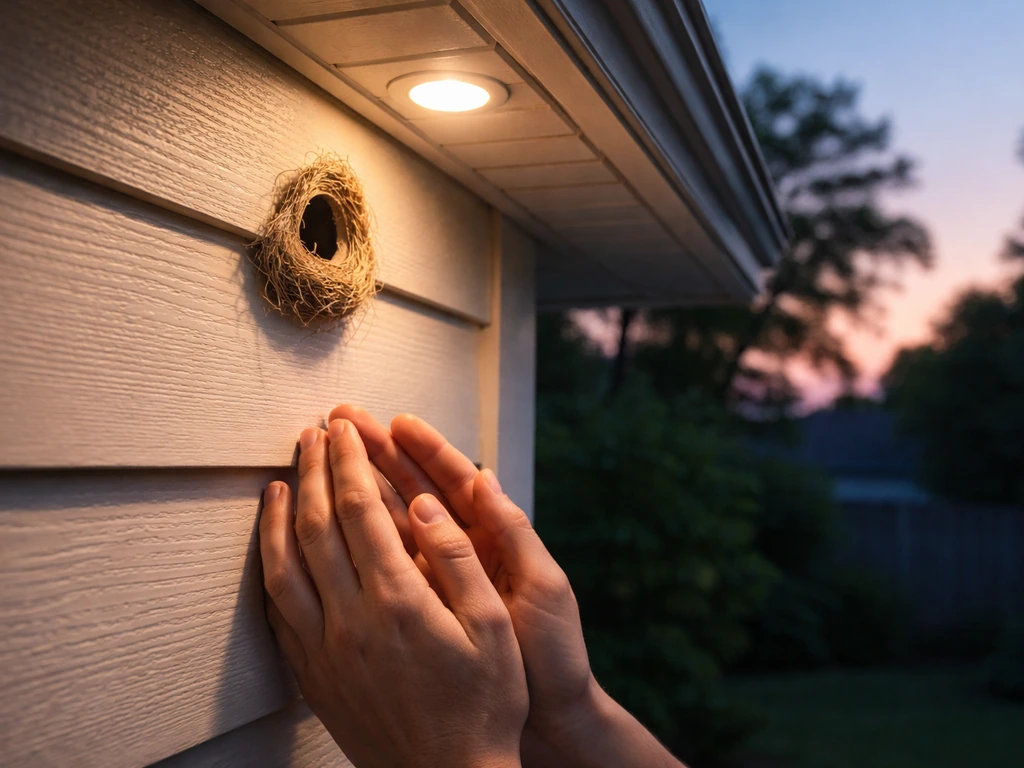
Humane exclusion: how to stop birds re-entering without trapping them
This is the step most homeowners get wrong, and it causes the most expensive mistakes. The rule is simple: never seal a wall opening while birds may still be inside. If you are dealing with a nest on a porch, the same safety and legal steps apply before you remove it or stop birds from returning how to get rid of bird nest on porch. If you seal too early, birds get trapped and die inside your wall. The smell and the secondary pest problem that follows are far worse than the original nest.
How one-way exclusion devices work
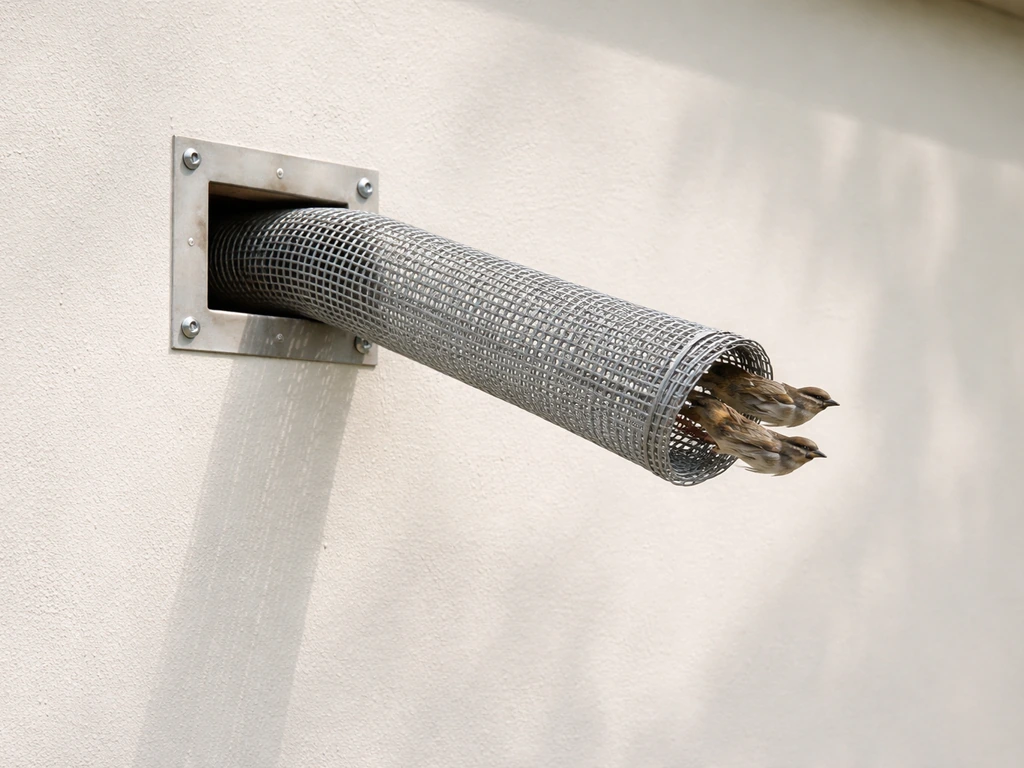
A one-way door or exclusion tube lets birds exit the cavity but prevents them from getting back in. You install it over the primary entry point and leave it in place for a minimum of 3 to 7 days to confirm all birds have left. Then you remove it and seal the opening permanently. Here is the proper sequence:
- Identify all entry points, not just the obvious one. Birds often have a primary entry and one or two secondary gaps. Seal all secondary gaps with temporary mesh or foam first, leaving only the main entry open.
- Install a commercial one-way exclusion device or create one using hardware cloth formed into a cone: wide end over the opening, narrow end pointing outward so birds can push through to exit but cannot navigate back in.
- Monitor the exterior entry point each morning and evening for at least 3 to 5 days. Watch for any bird trying to re-enter. If no birds return, they have all exited.
- Remove the exclusion device and permanently seal the main entry point with an appropriate material (see the next section for what to use).
- If you are dealing with an active nest of a protected species, do NOT install exclusion devices until chicks have fledged and all birds have naturally vacated. Sealing adults away from dependent young is illegal under the MBTA.
Timing your exclusion correctly
For House Sparrows and European Starlings in North America, you have flexibility year-round since they are not MBTA-protected. For all other species, late summer through early autumn (typically August to October) is the safest window to do exclusion work in the Northern Hemisphere, after nesting season has ended and before birds are scouting for winter roost sites. Avoid February through July for any protected cavity-nesting species if you are unsure of nest status.
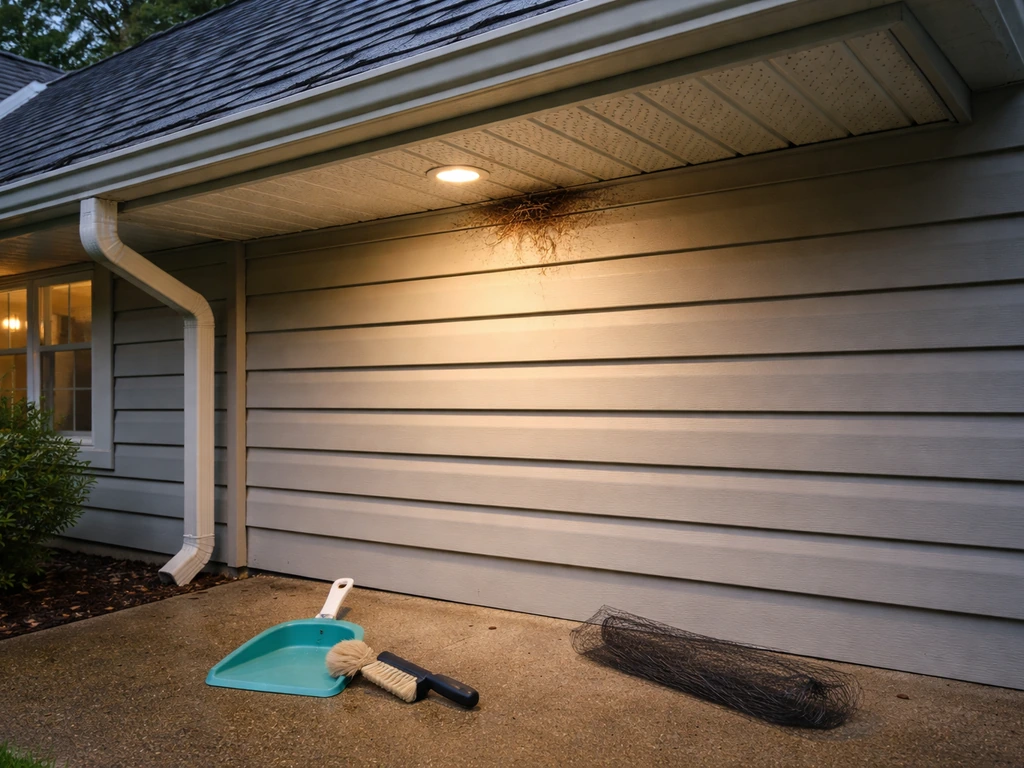
Seal it up: repairing the wall and proofing entry points
After the nest is out and you have confirmed no birds remain, the repair work is what actually solves your problem long-term. Every gap, crack, and unprotected vent is a future nest site, and birds will return to a familiar location season after season. Be thorough here because a missed 1.5-inch gap is all a sparrow needs.
What to seal with
| Location | Best sealing material | Notes |
|---|---|---|
| Small gaps in masonry or mortar joints | Portland cement mortar or exterior polyurethane caulk | Birds and rodents can chew through foam alone; back-fill with hardware cloth first for gaps over 1 inch |
| Gaps in wood siding or fascia boards | Galvanized hardware cloth (1/4 inch mesh) plus exterior caulk or wood filler | Screw the hardware cloth flush before applying filler; paint to match |
| Soffit gaps and eave openings | Aluminum or vinyl soffit repair panels, hardware cloth behind | Check for rot in surrounding wood before patching; repair rot first or the birds will just enlarge the gap |
| Utility and dryer vents | Purpose-made bird-proof vent covers with spring-loaded or weighted flap closures | Avoid simple louvered covers; birds easily push through fixed louvres. Replace with a cover rated for pest exclusion |
| Weep holes (brick construction) | Weep hole vents or bronze wool mesh inserts | Do not completely seal weep holes; they are structural drainage points. Use purpose-made vented inserts that allow moisture to escape but block birds |
After patching, walk the entire exterior of the wall and look at it from multiple angles, including from below soffits and from a ladder at eave height. A second pair of eyes helps because gaps that are obvious from a certain angle are invisible from the ground. For flat or low-slope rooflines, check where the wall meets the roof deck since this is one of the most commonly overlooked entry zones. Problems in this area overlap with what you might see when removing a bird nest in a roof, where the eave and soffit junctions are frequent weak points. If your issue is specifically how to get rid of bird nest under deck, use the same exclusion timing and sealing approach to prevent re-entry. If you are dealing with a bird nest in the roof eave or soffit area, the same legal and humane exclusion steps apply bird nest in a roof.
Cleaning the cavity: pathogens, odor, and doing it safely
Nests in wall cavities accumulate droppings, feather debris, nest material, dead insects, and sometimes carcasses over months or years. The health risks are real. Bird droppings can carry Histoplasma capsulatum (causes histoplasmosis, a respiratory fungal infection), Cryptococcus, Salmonella, and several ectoparasites including bird mites that will migrate into your living space once the birds are gone. Do not skip this step.
Cleaning and disinfection procedure
- Put on full PPE before opening the cavity: N95 or better respirator, gloves, eye protection, disposable coveralls or old clothes.
- Lightly mist all visible debris with a 10% bleach solution or an enzyme-based disinfectant spray. Wait 5 to 10 minutes. This kills fungal spores and reduces airborne contamination during cleanup.
- Remove all nest material, feathers, and debris as described in the removal section. Double-bag it for disposal in your regular household waste unless local regulations require special handling (check with your municipality for large volumes).
- Wipe all accessible hard surfaces in the cavity (wood framing, masonry, metal duct walls) with the disinfectant solution using disposable rags. Let surfaces air dry completely before sealing.
- If the cavity is large or has significant accumulation, consider renting a HEPA-filtered shop vacuum. Never use a regular shop vac without a HEPA filter for bird dropping cleanup as this aerosolizes spores.
- For lingering odor after cleaning, a light spray of an enzyme-based odor eliminator (the kind used for pet urine, which targets organic compounds) applied to wood surfaces inside the cavity works well. Do not use fragranced masking sprays; they do not address the source.
- After sealing the wall, monitor indoors for bird mites over the following two to three weeks. These tiny mites will leave the nest site and may appear on window sills or walls. A residual pyrethrin-based spray applied to the immediate area handles most infestations.
Your long-term prevention plan (and a seasonal schedule)
Removing one nest is only a win if you prevent the next one. Birds are creatures of habit and will return to the same building every spring if you do not make it inhospitable. The good news is that a solid annual inspection routine takes about two hours and eliminates most repeat infestations.
Seasonal maintenance schedule
| Season | Task |
|---|---|
| Late winter (February) | Inspect all soffit, eave, and vent cover integrity before birds begin scouting for nest sites. Replace any cracked or missing vent covers now. |
| Early spring (March to April) | Walk the full exterior perimeter and check every sealed repair from the previous year. Re-caulk any gaps that have opened due to seasonal movement in the building structure. |
| Late spring (May to June) | Listen for new activity at walls, soffits, and eaves. If you hear birds, start monitoring immediately and identify whether nesting has begun before it progresses. |
| Late summer (August to September) | Best window for exclusion work and sealing on previously occupied cavities. Nesting season is over for most species. Install physical deterrents (bird spikes, exclusion netting over eaves) now. |
| Autumn (October to November) | Final inspection before winter. Check that all patches, caulk, and vent covers are intact. Clear any debris from gutters near roof-wall junctions that might attract nesting material scouts in spring. |
Troubleshooting: common problems after cleanup
- Still hearing sounds in the wall after sealing: You may have sealed a bird inside. Open the repair immediately, re-install an exclusion device, and wait at least five days before re-sealing.
- Birds returning to the same spot each spring: A scent trace from the old nest remains. Re-clean the area with enzyme cleaner, then add a physical deterrent like bird spike strips or stainless steel mesh directly over the former entry area.
- New entry point appearing near the old one: Birds are highly motivated to return to a proven site. Do a full cavity inspection looking for secondary gaps you missed. Probe the surrounding siding and mortar for soft spots that birds may be actively enlarging.
- Mites appearing inside your home after removal: This is common and expected. Apply a residual insecticide to the immediate wall area and window sills. It resolves within two to three weeks as the mites cannot survive without their bird host.
The legal side: what you can and cannot do, and when you must call a professional
This section is not just bureaucratic fine print. Getting it wrong can result in federal fines or criminal charges in the US, or equivalent penalties in the UK and other jurisdictions. Here is the practical summary.
US rules under the Migratory Bird Treaty Act
The MBTA makes it illegal to destroy, remove, or disturb an active nest (containing eggs or dependent young) of any protected migratory bird species. This covers the vast majority of wild birds in the US, excluding non-native House Sparrows and European Starlings. Under 50 CFR § 21.14, there is a framework for authorizing certain actions when birds in or on a building are causing a genuine health or safety risk, but this requires compliance with federal, state, tribal, and territorial requirements. Practically speaking, you cannot just decide that the nest qualifies as a safety risk and remove it. You need documentation and, in most cases, professional involvement. Nest removal permits are issued only in very limited circumstances.
UK rules under the Wildlife and Countryside Act 1981
In England, Scotland, and Wales, ALL wild bird species are protected. There are no exceptions for non-native sparrows or starlings the way there are in the US. Intentionally taking, damaging, or destroying a wild bird's nest while it is being used or built, or disturbing birds near a nest containing young, is illegal. The RSPCA and RSPB both advise that timing removals to outside the nesting season (generally September through January in the UK) is the safest approach. Licenses for nest disturbance during the season are issued by the relevant statutory nature conservation body and are difficult to obtain for routine property maintenance purposes.
When you must call a licensed wildlife professional
- You cannot confirm whether birds, eggs, or dependent chicks are inside the cavity. As the US Fish & Wildlife Service notes, this is genuinely difficult in enclosed spaces, and the risk of getting it wrong falls entirely on the property owner.
- You have identified or suspect a protected cavity-nesting species such as Chimney Swifts, wrens, or any native songbird other than House Sparrow or European Starling (in the US).
- Any situation in the UK involving removal or exclusion during nesting season (roughly February to August).
- You need to document a health or safety justification to pursue authorization under 50 CFR § 21.14 in the US.
- The nest or infestation is large, long-established, or involves multiple interconnected cavities across a structure.
- You are managing a commercial or multi-unit residential property where liability exposure makes DIY approaches inadvisable.
When you call a wildlife professional, be ready to tell them the location of the entry points, what species you think is involved, how long the activity has been occurring, whether you have heard or seen chicks, and what structural access is available. The more specific you are, the faster they can assess whether a permit is needed and what the removal timeline looks like. If you are unsure whether to call a pest control company or a wildlife removal specialist, note that pest control firms handle the structural repairs and ongoing deterrents well, but for active nests of protected species, a licensed wildlife removal professional is the right first call. If you are wondering whether pest control can remove bird nest, the key limitation is whether the nest is active and whether the species is protected under local wildlife laws.
FAQ
What should I do if I suspect the bird nest is active but I cannot see inside the wall?
If you can hear chirping but cannot confirm eggs or chicks, treat it as potentially active and stop work until someone can verify activity status from a safe distance. For DIYers, the practical trigger to pause is any evidence of recent movement (fresh droppings right at the entry, a bird repeatedly flying in and out, or vocalizing inside the cavity).
How long should I confirm a wall nest is inactive before starting removal?
Do not rely on “no birds today” as proof the nest is inactive, because birds can leave briefly and return. Wait for clear signs of absence, such as no adult activity for several days, no begging calls, and no new droppings accumulation near the entry before you remove anything.
What if I already sealed a gap and now I’m worried birds were trapped inside?
If you accidentally sealed an opening while birds might still be inside, the safest next step is to stop further sealing, contact a wildlife removal professional, and prioritize humane extraction before repairing the wall. Keep indoor windows and HVAC running to a minimum, because trapped animals can increase odor and allergen exposure while they decompose.
What PPE and cleanup precautions should I take when removing droppings and debris from a wall cavity?
For health protection, plan for contaminated debris even if the birds seem gone. Use eye protection and a respirator rated for fine particulates (for example an N95 or better, depending on your conditions), and bag and seal all contaminated materials immediately to prevent spread into the rest of the home.
Does HVAC ductwork change the safe way to remove a bird nest in a wall?
If the wall is connected to forced air ducts, an attic exhaust path, or an HVAC return, you should not disturb the cavity as a DIY project unless you can fully isolate airflow. Many professionals use containment and negative-pressure methods to prevent aerosolized particles from traveling into living areas.
How do I handle a strong smell, stains, or possibly contaminated insulation after nest removal?
If you suspect moldy or ammonia-like odor from prolonged droppings, focus on source removal first, then disinfection only after drying and debris removal. If you see heavy staining, crumbling insulation, or persistent odor after cleaning, you likely have porous material contamination and may need partial removal of affected wall materials.
What are common weak points people miss when sealing after removing the nest?
Do not assume “covered” means “sealed well enough.” Use a physical barrier designed for pest exclusion (for example, metal flashing or mesh rated for birds) plus sealants only on cracks and joints, and verify there is no bypass route around vents, weep holes, and meter boxes.
What if I’m unsure of the nesting season in my area, can I just remove quickly and seal?
For timing, if you are unsure whether birds are currently nesting, choose a window that minimizes risk rather than trying to “race the season.” In protected species situations, the safest approach is to wait until nesting is complete and you have verified inactivity, then do exclusion and sealing the same day as removal.
What if I find empty-looking remains in the wall, can I proceed without checking activity?
If you find feathering or eggshell fragments but no living birds, you still need to treat it as potentially active history. In the US and UK, the nest status and protected species rules can depend on timing and presence of dependent young, so if there is any uncertainty, consult a wildlife professional before disturbing further.
Do bird repellents work better than physical exclusion for wall nests?
If you want to prevent return, focus on exclusion before habitat changes. Install or upgrade deterrents (properly sized mesh, sealed openings, and closing gaps under soffits) rather than relying only on noise or visual scares, because birds often habituate and will use the same sheltered cavity if it remains accessible.
How should I structure my yearly inspection so the same birds do not return?
Annual inspection is most effective when you pair it with an “entry-point map.” Photograph and mark every gap you find during repair, then re-check those exact points a few times each season, especially after storms, because new cracks can form even if the original opening was sealed well.