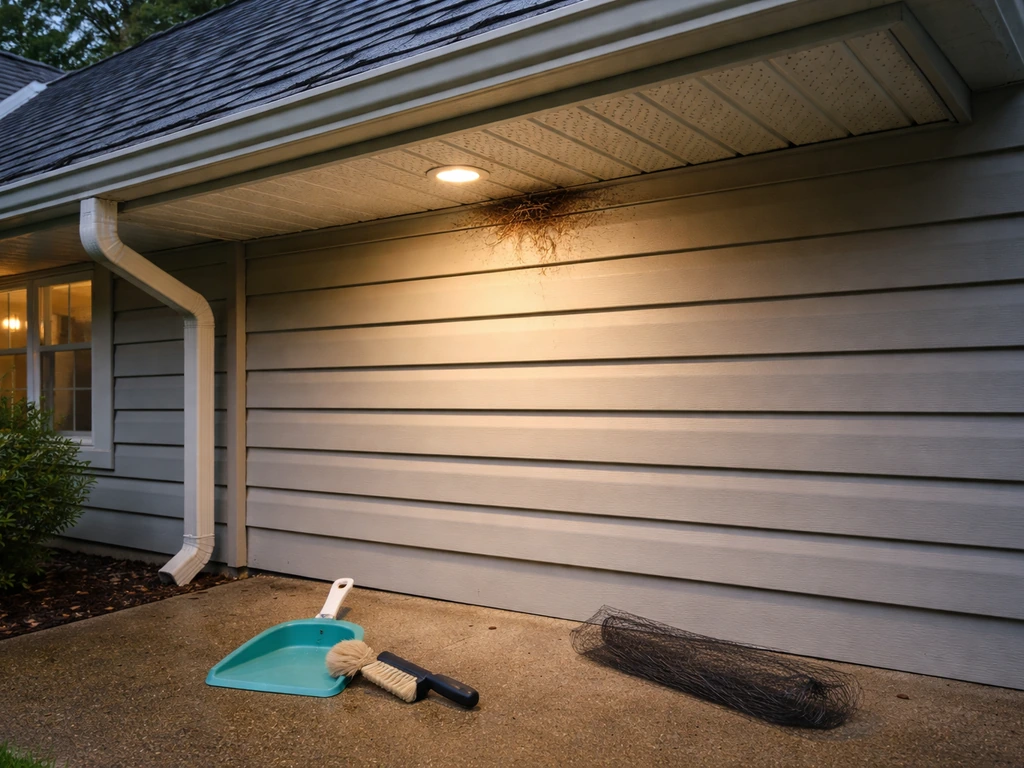
You can remove an inactive bird nest from your house yourself, but only after confirming it has no eggs, no chicks, and no adult bird actively using it. If the nest is active, federal law (the Migratory Bird Treaty Act) protects it, and you need to wait until the birds have fully fledged and left on their own. Once it is empty and the season is over, removal takes less than 15 minutes, but the cleanup, repair, and proofing work that follows is what actually keeps the birds from coming right back.
How to Remove a Bird Nest From Your House Safely

Maya Carver
28 Apr 2026
Quick safety steps and what to avoid right now
Before you touch anything, take a breath and run through this short checklist. Rushing into removal is the most common mistake, and it can get you in legal trouble or expose you to a real health hazard.
- Do not disturb the nest yet. Step back and watch from a distance for a few minutes to see whether a bird is present or returns.
- Do not reach into the nest, poke it, or try to knock it down while a bird is sitting on it. NestWatch is explicit: if a sitting bird does not leave on its own, do not force it off.
- Do not use a pressure washer, leaf blower, or anything that creates dust or aerosolizes droppings. Dried bird feces can carry Histoplasma capsulatum spores, which cause histoplasmosis, a respiratory infection.
- Do not climb onto the roof, lean out of an attic window, or stand on a ladder near an overhang without proper fall protection. Assess your access honestly before proceeding.
- Secure the area around the nest if it is in a high-traffic zone (above a doorway, near an HVAC intake, or over a walkway) to keep people from walking through dropping debris.
- If you see eggs or young chicks, stop. The nest is legally active and you must leave it alone until the birds fledge.
That last point matters more than most homeowners realize. The Migratory Bird Treaty Act (16 U.S.C. § 703) makes it unlawful to take, possess, or destroy migratory birds, their eggs, or their nests when active. "Active" under USFWS guidance means from the moment the first egg is laid until fledged young are no longer dependent on the nest. That covers roughly 1,100 native species according to Audubon. Violations can carry civil and criminal penalties. If you are not sure what species you are dealing with, that uncertainty is itself a reason to pause.
Identify nesting status and likely species before acting
Your whole plan hinges on one question: is this nest active or not? Getting that wrong is the single biggest mistake people make. Here is how to read the situation correctly.
How to tell if a nest is active
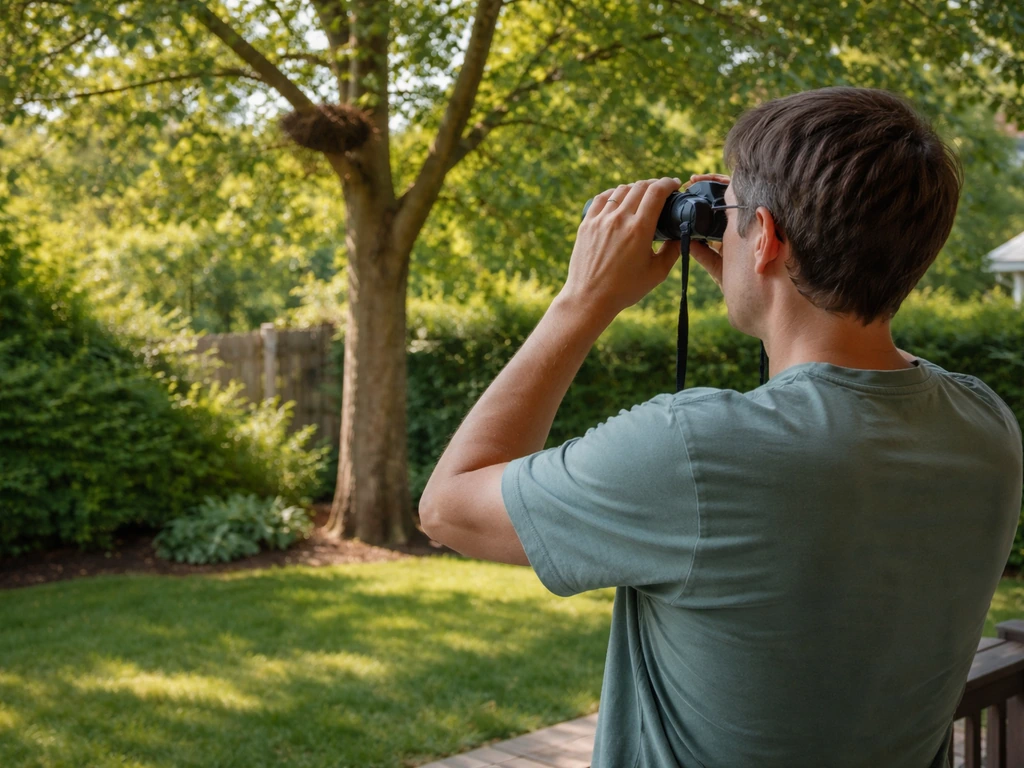
- Watch from a safe distance for 5 to 10 minutes without approaching. Do you see an adult bird flying in or out, or sitting on the nest?
- Look at the nest structure itself. Fresh nesting material, a neatly cupped center, or visible feathers lining the bowl are signs of recent use.
- If you can safely see into the nest without disturbing it (a small mirror on a pole works well), check for eggs or chicks. Even a single egg makes the nest legally active.
- Listen for chick sounds, especially at dawn and dusk.
- If the nest looks weathered, flattened, or decomposed, it is likely inactive and from a previous season.
Why species identification matters
Most backyard and house-nesting birds you will encounter (house sparrows, European starlings, pigeons, and rock doves) are non-native, invasive species that are not protected under the MBTA. That is a meaningful legal difference. However, a huge range of native species also nest on and in houses: swallows, wrens, robins, chimney swifts, and more, all of which are fully protected. Audubon notes it can be genuinely difficult for a non-expert to distinguish species or identify a nest by sight alone. When in doubt, treat the nest as protected and consult a wildlife professional or your state wildlife agency before acting. If you are wondering whether can pest control remove bird nest, the answer is that it depends on whether the nest is active and what the law in your area allows.
| Nest Status | What It Means | What You Can Do |
|---|---|---|
| Empty, no eggs, no chicks, no adult activity | Inactive | Remove it (see steps below) |
| Adult bird present or returning regularly | Active or about to be | Leave it alone; monitor |
| Eggs visible (any number) | Active — legally protected if MBTA species | Do not touch; wait for fledging |
| Chicks visible, not yet flying | Active — legally protected if MBTA species | Do not touch; wait for fledging |
| Fledglings gone, nest empty for several days | Inactive post-season | Safe to remove |
Humane removal options: DIY when appropriate, pro when needed
Once you have confirmed the nest is inactive, you can remove it yourself in most cases. If you need a clear plan for how to get rid of a bird nest in roof, start by confirming it is inactive and then follow a humane removal and exclusion workflow. If the nest is on a window, the process is similar: confirm it is inactive, remove it safely, then seal the entry point so birds cannot return how to get rid of bird nest in window. If the nest is under a deck, the same inactive-nest and exclusion rules apply, but the access and sealing details are different how to get rid of bird nest under deck. The job is straightforward. Where it gets complicated is access, location, or an infestation level that goes beyond a single nest.
DIY removal for an inactive nest
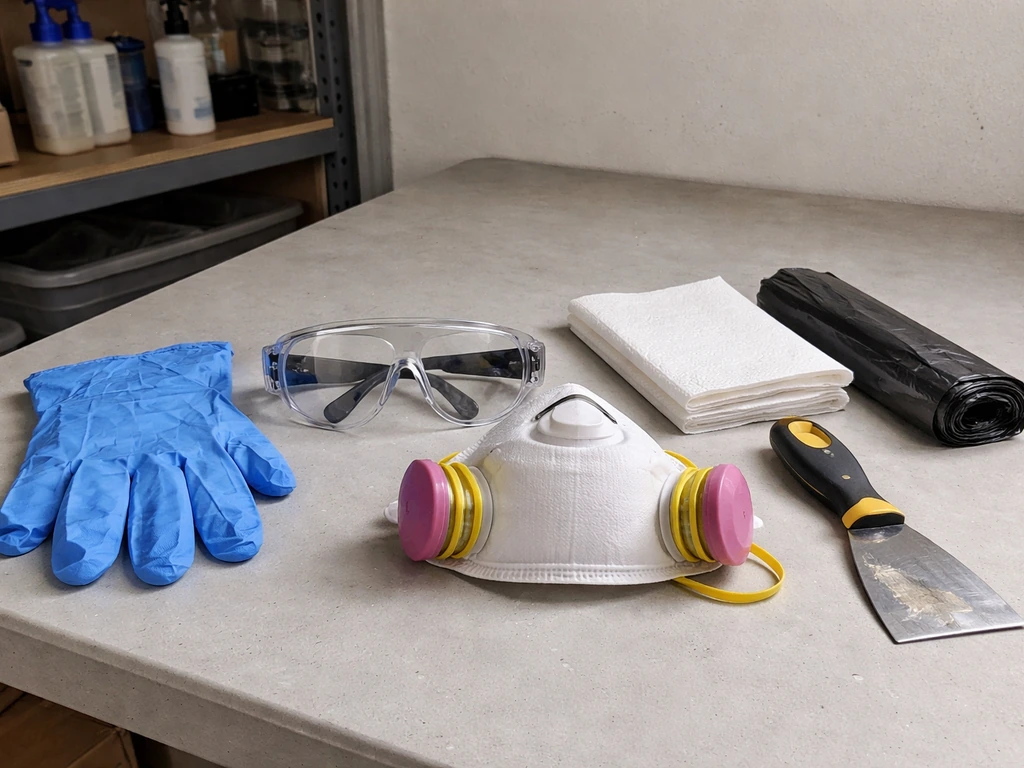
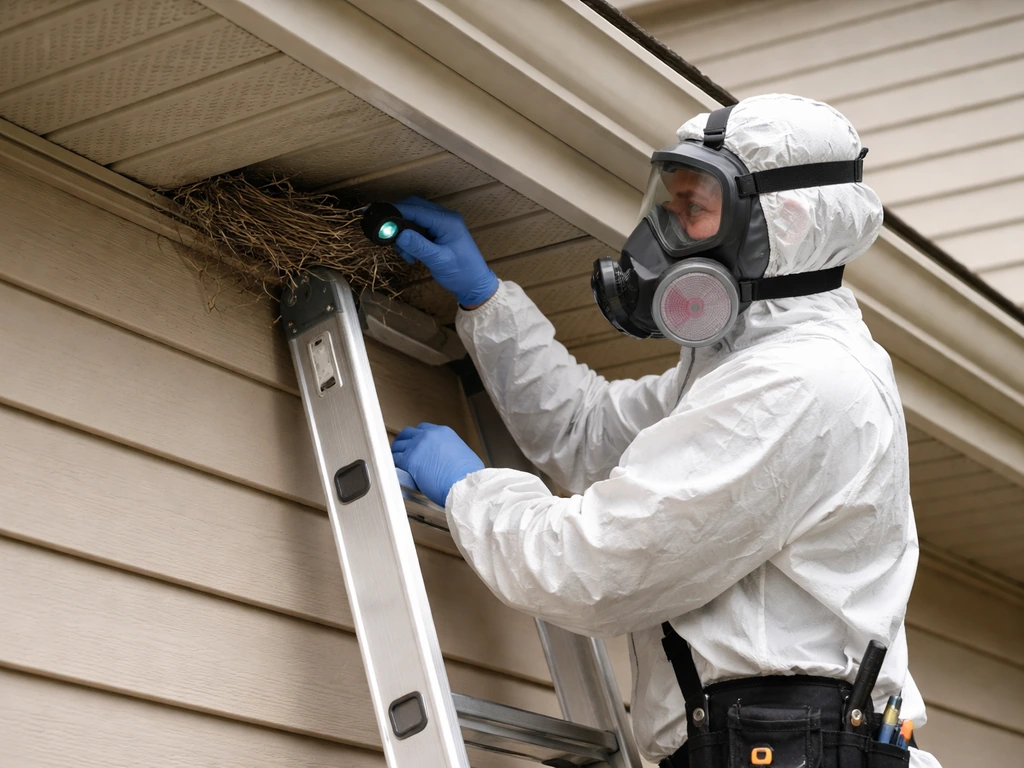
- Put on nitrile or rubber gloves, safety glasses, and an N95 or P100 respirator. Bird nests and droppings can carry bacteria, fungi, and mites. The respirator is not optional if the area shows significant dropping accumulation.
- Lightly mist the nest and surrounding droppings with water or a diluted disinfectant solution before handling. This reduces dust and prevents spores from becoming airborne.
- Lift or scrape the nest into a heavy-duty plastic bag. Seal the bag immediately. Do not shake it out or drop it.
- Double-bag it and dispose of it in an outdoor trash container.
- Wipe down the surface where the nest sat with a disinfectant-soaked cloth or sponge. Place used cleaning materials in a sealed bag as well.
- Inspect the mounting surface for damage (rotted wood, water staining, gaps, or entry points) before you close everything up.
When to call a wildlife professional instead
DIY is fine for a single nest in an accessible location. Call a licensed wildlife removal professional or contact your state wildlife agency when you face any of the following:
- The nest is inside a wall, soffit, attic, or chimney where you cannot safely reach or fully inspect it (these locations are covered more specifically in guides on nests in roofs, walls, and under decks).
- You are not sure of the species and cannot rule out a fully protected native bird.
- There are multiple nests or a recurring roosting colony (pigeons, starlings, or swallows in large numbers).
- The area shows heavy droppings accumulation of more than a few square feet. CDC/NIOSH guidance specifically recommends professional hazardous waste cleanup for large accumulations of bird droppings.
- The nest is in a location that requires roof access, scaffolding, or working at dangerous heights.
- You suspect chimney swifts, purple martins, or any cavity-nesting species you cannot identify confidently.
When you call, be ready to describe the location of the nest, the approximate number of birds you have seen, whether you can see eggs or chicks, and how long the activity has been going on. That information helps the professional bring the right equipment and assess the legal status quickly.
Post-removal cleanup and damage repair
Removing the nest is just the beginning. For shutters and other exterior fixtures, the same seal-and-proof approach can help prevent bird nests behind shutters next season how to prevent bird nests behind shutters. Once the nest is gone, seal and proof the porch area so you do not end up with another nest the next season. The real work is cleaning the site properly and fixing whatever let the birds get there in the first place. Before cleanup, soak or spray bird or bat droppings with a disinfectant to reduce risk from exposure created by disturbing contaminated areas, per WSU EHS guidance. Skip this part and you will be back to square one by next spring.
Cleaning the site safely

- Keep your PPE on (gloves, respirator, eye protection) throughout cleanup.
- Wet down all droppings thoroughly with a disinfectant solution before scrubbing. WSU Environmental Health and Safety recommends wetting first, then cleaning with a mop, sponge, or rag soaked in disinfectant, then sealing all contaminated material in a plastic bag.
- Scrub the surface to remove staining and organic residue. A stiff brush and an enzymatic cleaner or a dilute bleach solution (1 part bleach to 9 parts water) works well on wood, metal, and masonry.
- Rinse and let the area dry completely before applying any sealant or paint.
- Wash your hands thoroughly after removing gloves, even if you wore them the entire time.
Assessing and repairing structural damage
Bird nests trap moisture. After you clean the site, probe the surrounding wood for softness, check for water staining on paint or siding, and look for gaps that have widened from nest material packing into them. Common repair needs include repainting or resealing weathered wood, replacing rotted fascia or soffit boards, re-caulking gaps around window frames and utility penetrations, and patching holes in mortar or siding. If you find structural rot, get a contractor to assess it before you seal anything up. Trapping moisture behind a patch is worse than leaving the gap open.
Bird-proofing: exclusion, sealing, deterrents, and habitat changes
Birds return to the same spots year after year because the location worked for them. Your goal is to make every former nesting site physically impossible or unattractive to use again. Combine physical exclusion with deterrents and habitat changes for the best results.
Seal and exclude entry points
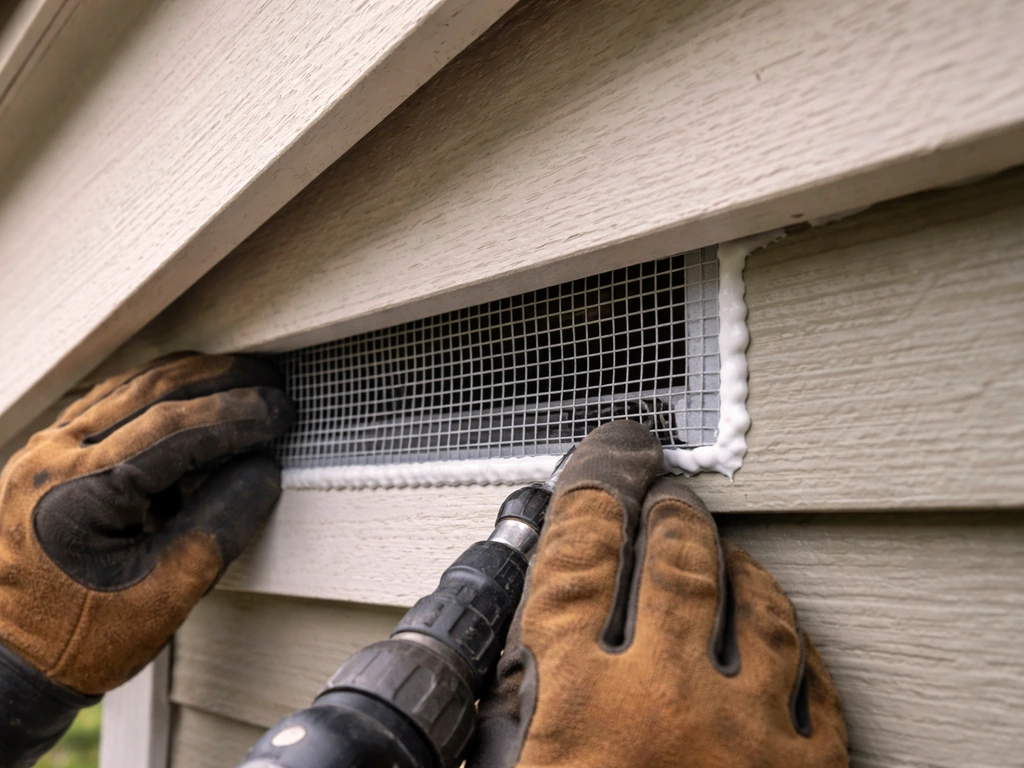
This is your most important step. A wildlife exclusion approach focuses on removing the nest and then sealing and treating entry points so birds cannot return. For each location, choose the right material:
| Location | Recommended Exclusion Method | Notes |
|---|---|---|
| Gaps under eaves and soffits | Hardware cloth (1/4-inch mesh) or aluminum flashing | Staple securely; paint to match if visible |
| Roof vents and attic louvers | Commercial vent covers or bird-proof mesh inserts | Check that covers are rated for airflow before installing |
| Chimney openings | Stainless steel chimney cap with mesh sides | Hire a chimney professional if you are not comfortable on the roof |
| Gaps behind shutters | Fill with expanding foam or caulk; add shutter locks | Detailed guidance available for shutter-specific situations |
| Porch rafters and beams | Bird netting draped or stapled to create a physical barrier | Use UV-resistant netting rated for outdoor use |
| Window sills and ledges | Anti-perch spikes (stainless steel or polycarbonate) | Space correctly per manufacturer specs; ineffective if ledge is wide enough to nest beside them |
| Under deck joists | Hardware cloth or bird netting stapled along the perimeter | Check for gaps at the house foundation connection |
| Wall voids and weep holes | Weep hole covers or stainless mesh inserts | Do not completely block weep holes in brick; use vented inserts |
Deterrents that actually work
Physical barriers are always more reliable than standalone deterrents, but deterrents help reinforce exclusion in open areas. The most effective options are bird netting for large open spaces (porches, carports, under balconies), stainless steel anti-perch spikes on ledges and beam tops, and optical gel deterrents on surfaces where spikes are not practical. Ultrasonic devices and reflective tape have mixed results and tend to lose effectiveness within a few weeks as birds habituate to them. Predator decoys (plastic owls, hawk silhouettes) work briefly but must be moved regularly to remain effective.
Habitat changes that reduce nesting pressure
- Remove bird feeders from within 20 to 30 feet of the house or relocate them to areas away from nesting surfaces.
- Keep gutters clear of leaf debris, which can become nesting material.
- Trim back tree branches that overhang or touch the roofline, giving birds a direct runway to the eaves.
- Remove standing water sources close to the house if you are dealing with species attracted to water.
- Store pet food indoors; outdoor food dishes left out attract pest bird species like house sparrows and pigeons.
Seasonal plan and prevention checklist for ongoing maintenance
The best time to do all of your exclusion and repair work is in late fall or early winter, after the nesting season ends and before birds start scouting new sites. In most of the continental US, nesting activity ramps up from March through August, with peak activity in April through June. If you are reading this in spring, act on the current situation first using the steps above, then schedule your full proofing for the fall window.
| Season | Action |
|---|---|
| Late fall (October to November) | Remove any inactive nests remaining from the season. Do full exterior inspection: soffits, eaves, vents, chimney caps, gaps behind shutters, and roof edges. |
| Early winter (December) | Complete all sealing, patching, and exclusion installations while birds are not actively nesting. Install vent covers, hardware cloth, and anti-perch hardware. |
| Late winter (February) | Walk the exterior again before nesting season begins. Look for anything that has shifted, cracked, or been dislodged over winter. Recheck chimney caps and vent covers. |
| Spring (March to April) | Monitor for early bird activity. If you spot a bird investigating a previous nest site, a deterrent placed now (before egg-laying) is legally and practically much easier than dealing with an active nest. |
| Summer (May to August) | Avoid disturbing any active nests. If new problem nests appear, document location and species for post-season action. Note gaps or entry points for your fall repair list. |
| Late summer to early fall (August to September) | Monitor for fledging. Once young are independent and nest is confirmed empty, remove promptly so the site is not used for late-season or winter roosting. |
Annual maintenance checklist
- Inspect all roof vents, soffit panels, and fascia boards for gaps or damage at least twice per year (fall and late winter).
- Check and clean gutters in fall to remove debris that attracts nesting birds.
- Confirm all exclusion hardware (vent caps, mesh, netting, spikes) is intact and has not been dislodged by weather.
- Walk the perimeter of the house and look up at overhangs, window ledges, porch ceilings, and chimney caps.
- Remove any partial or early-stage nest material you find before egg-laying begins (this is legal and far easier than waiting).
- Review any locations where birds nested the prior year and confirm exclusion is still effective.
If you are dealing with a nest in a specific location like a porch ceiling, under a deck, inside a wall cavity, or on a window sill, the removal and proofing steps for those spots have their own quirks worth reviewing in detail. If the nest is inside a wall cavity, use the same inactive-nest rules and focus on exclusion and sealing so birds cannot get back in. The fundamentals here apply everywhere, but the access and exclusion methods differ by location. When in doubt about species, legality, or safety, calling a licensed wildlife professional is always the right move. The nesting season is short, and a few weeks of patience now avoids a much bigger problem later.
FAQ
How can I tell if a bird nest is active when I cannot clearly see eggs or chicks?
Use behavior instead of appearance. If you see adults entering and exiting frequently, hear ongoing calling, or notice fresh droppings or nest material getting added, treat it as active. If there has been no adult activity for several days and the nest looks undisturbed (no new packing or debris), it is more likely inactive, but if you are unsure, pause and contact a local wildlife agency.
What if the nest belongs to a non-native species, can I remove it immediately?
Even when the species is often considered unprotected, your best practice is still to verify inactivity first. Some locations (like chimney swift roost areas or mixed-species nesting) can be tricky, and local rules may still restrict disturbance or require humane handling. If there is any chance of native species, treat it as protected and wait for full fledging.
Is it safe to remove a nest at night or early morning to avoid the birds?
Do not rely on timing. Birds can still be present in the nest or return quickly once disturbed. The safer decision rule is confirmation of inactivity, not a time-of-day workaround. If you disturb an active nest, you risk both legal exposure and safety issues.
What should I do if I find a nest with broken eggs or dead nestlings?
Handle it as potentially active until you confirm there are no eggs, no dependent chicks, and no adult birds using the site. Dead or broken eggs do not automatically mean the nest is over. If you do not have certainty, contact a wildlife professional to inspect and advise on legal status and cleanup.
Can I clean and repair the area right after removing the nest, or should I wait?
If the nest is confirmed inactive, you can begin cleanup soon, but do it in a controlled way to avoid stirring any remaining debris. After removal, remove droppings and nesting material, then sanitize and dry the area before sealing. If you suspect structural rot or moisture intrusion, assess and repair first, because sealing over wet or damaged wood can trap moisture and worsen rot.
What if the nest is inside a wall or another inaccessible cavity?
Do not try to remove the nest material inside walls yourself. Exclusion and sealing are the correct approach, but access often requires opening the right section without trapping birds or compromising insulation. A professional can confirm whether birds are still dependent, then install one-way exclusion and seal the entry after the cavity is clear.
How long should I wait after birds leave before I seal entry points?
Wait until you have clear evidence the nest is no longer being used, not just that birds are temporarily absent. A practical approach is to observe for continued inactivity over multiple days and ensure no adults are flying in and out. Then seal entry points promptly, because scouting starts quickly after fledging in many areas.
Will spikes, netting, or gel deter birds immediately, or do I need to remove the nest first?
In most cases, remove the nest (after confirming inactivity) before installing permanent barriers. If you apply deterrents while the nest is still active, you may cause additional disturbance and can create a messy, prolonged situation. Plan a sequence: confirm inactivity, remove nest, clean and repair, then install exclusion materials.
What are common DIY mistakes that lead to birds coming back?
The most common mistakes are skipping the sealing step, sealing with weak materials that birds can peck or pry loose, and failing to fix the underlying access point created by widened gaps or damaged siding. Another frequent issue is not cleaning thoroughly, because lingering materials and odors can encourage repeated nesting in the same area.
When should I stop DIY and call a wildlife removal professional?
Call when the nest is in a hard-to-access area (roof voids, wall cavities, chimneys), when you suspect multiple nesting spots, when there is extensive structural damage, or when you cannot confidently confirm inactivity. Also call if you are dealing with aggressive access points (heights, steep roofs) or any health risks from droppings or mold.