You can remove bird sounds from audio using frequency-based filtering, spectral editing, or noise profile subtraction depending on the tool you have and how badly the chirps overlap your important audio. The best approach is almost always to open the recording in a spectrogram view first, identify exactly which frequencies and time ranges the bird sounds occupy, then apply a targeted notch filter or spectral repair to those areas rather than hitting the whole file with broad noise reduction. Done right, you can cut most bird chirps and calls without touching the speech or other audio you want to keep. If the birds are still too noticeable after editing, use these tips on how to get rid of bird noises with smarter filtering and masking choices.
How to Remove Bird Sounds From Audio: Step-by-Step Guide

Step 1: Identify the bird sound type and where it's coming from
Before you touch any audio tool, you need to know what you're actually dealing with. Bird sounds are not all the same, and the cleaning method that works beautifully on a single repeating chirp will make a mess of a continuous warble or a dense trill. The two biggest questions to answer are: what kind of sound is it, and is it in the recording or coming from the room right now?
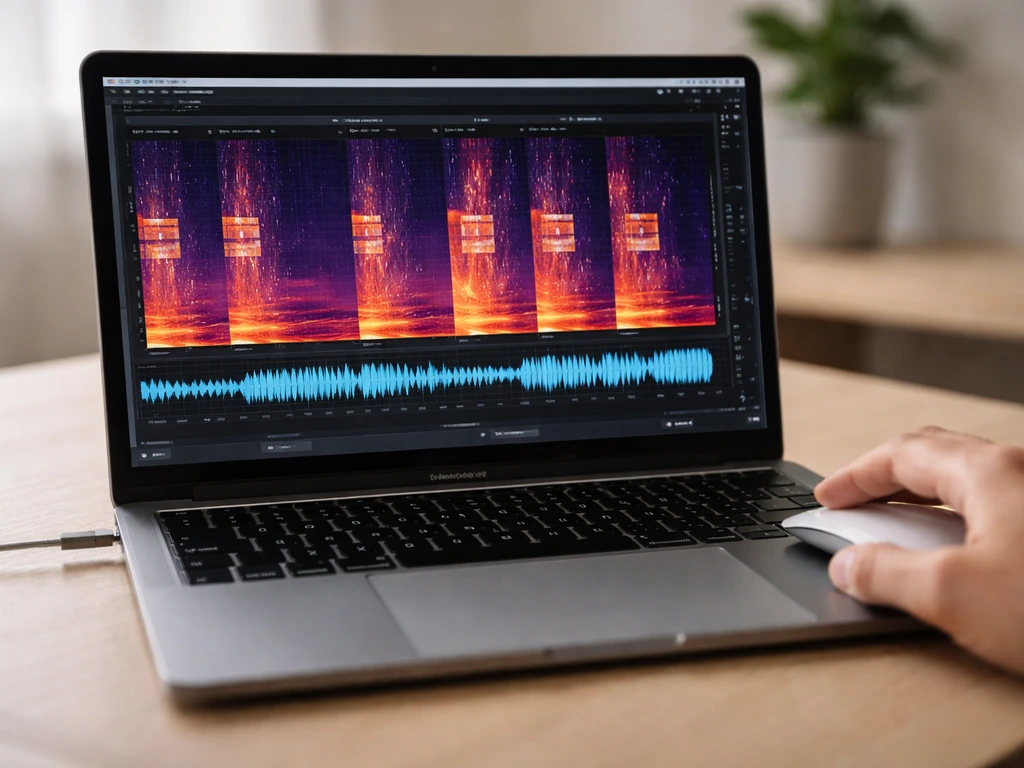
For recordings, open the file in any audio editor that shows a spectrogram (frequency vs. time display). Most songbird energy sits between 1 kHz and 8 kHz, peaking around 2 to 5 kHz. That range overlaps with human speech, which lives mostly between 300 Hz and 3,400 Hz, with important vowel formants around 2,800 to 3,400 Hz. If you see bright streaks in the spectrogram above roughly 4 kHz that are clearly separate from the speech lines below, you have a good shot at clean removal. If the bird energy is crammed into the same 1 to 3 kHz band as the voice you care about, removal will be harder and masking strategies (covered below) may be a better call.
On the spectrogram, look for the pattern of the sounds. Short, sharp vertical lines or clusters are isolated chirps and are the easiest to remove. Dense rapid patterns that look like a thick horizontal band are trills and require a different approach. Long, sweeping curves are melodic calls. Knowing which you have tells you whether to use a notch filter (great for repetitive tones at a fixed frequency), spectral repair (great for isolated chirps), or full noise reduction (better for continuous background calls).
If the problem is live audio in a room, such as a conference room with birds nesting outside a window or in a ceiling void, first figure out whether the birds are inside the building or outside. Inside birds are louder, more unpredictable, and a welfare concern. Outside birds can often be managed with acoustic room treatment or directional microphone technique while you handle the physical source. Check soffits, roof voids, open vents, and window ledges for signs of nesting or roosting activity. This matters because the right fix for a sparrow trapped in the HVAC plenum is very different from starlings singing outside a cracked window.
Quick emergency options to reduce bird noise in a recording or workspace
If you need a fast result right now, such as cleaning up surveillance footage, a meeting recording, or a phone call before sending it on, these are the fastest options that work without deep audio knowledge. If you are also dealing with bird noise on an audio track or call, the steps for how to reduce bird noise will help you choose the right approach and avoid artifacts. If you need more than quick cleanup, follow the steps for how to block out bird noise using targeted filtering and masking strategies.
- Open the file in Audacity (free) and zoom into the waveform to find a moment of pure bird noise with no speech. Select that section, go to Effect > Noise Reduction, click 'Get Noise Profile', then select the whole file and apply the effect. Audacity will suggest a threshold level. Start with the default settings before pushing them higher.
- If the bird sounds are only in certain moments, select just those time regions and apply Noise Reduction only there. This avoids degrading the clean sections.
- Use Audacity's Notch Filter (Effect > Filter Curve or the dedicated Notch Filter) to cut a narrow band at the dominant bird frequency. Find the frequency by clicking on a chirp in the spectrogram view and reading the frequency axis. Start with a Q of 10 to 20 to keep the notch narrow.
- For live audio during a meeting or recording session, physically move the microphone closer to the speaker (closer mic means better signal-to-noise ratio), close windows and doors, and hang a heavy blanket or acoustic panel on the side of the room facing the bird source.
- If the recording is already done and the birds are loud, consider muting the worst segments entirely rather than fighting to clean them. A one-second gap of silence is often less distracting to a listener than chirpy audio artifacts from over-processing.
DIY audio cleanup workflows to remove or attenuate bird chirps
Here are the main workflows in order of complexity. Start with the simplest one that fits your situation.
Workflow 1: Noise profile subtraction (Audacity)
This works best when the bird noise is fairly consistent throughout the recording, such as birds constantly calling in the background of an outdoor meeting. Find a moment where you hear only the bird noise and no speech, even a half-second will do. Select that region, go to Effect > Noise Reduction, and click 'Get Noise Profile.' Then select the entire clip, return to Noise Reduction, and run it. Keep the Reduction slider between 6 and 12 dB to start. Going above 15 to 18 dB risks introducing 'musical noise' artifacts, a watery, chirpy, almost robotic distortion that can be more annoying than the original birds.
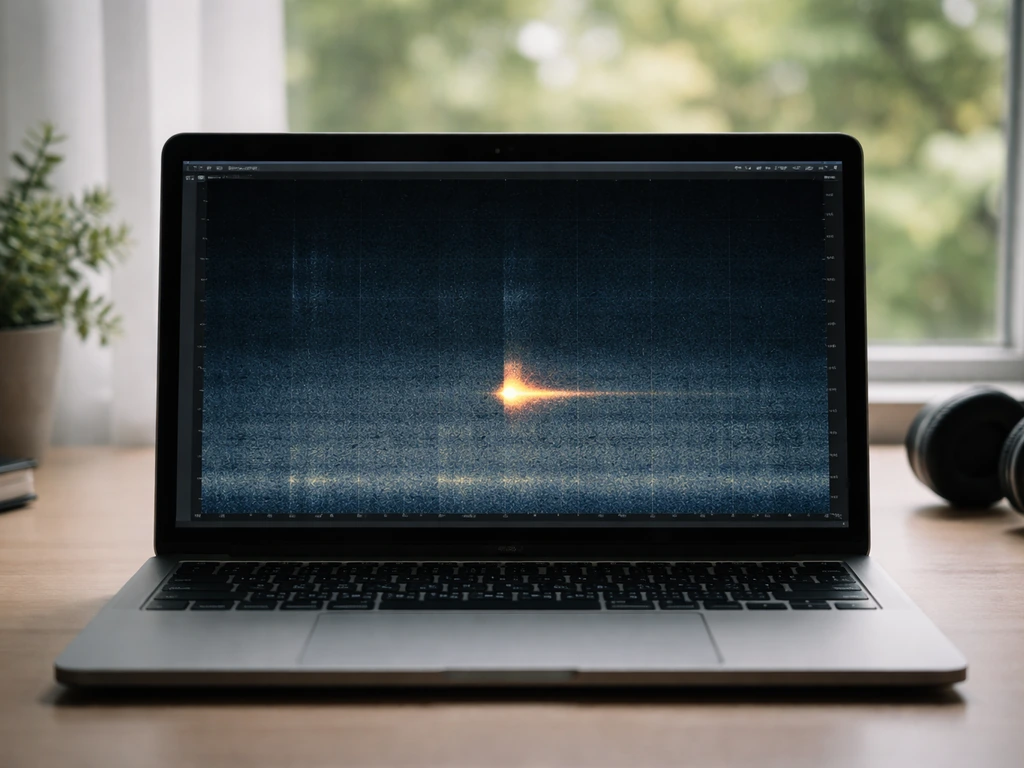
Workflow 2: Spectral editing (Audacity or Adobe Audition)
Switch your editor to the spectrogram view. In Audacity, switch the track view to Spectrogram. In Adobe Audition, use the Spectral Frequency Display. You will see the audio as a color-coded map: brighter areas have more energy. Bird chirps show up as bright streaks or blobs above the speech content. Use the selection tool to draw a box around a bird chirp region, then apply a notch or band-cut to just that selection. In Audacity, the Spectral edit multi-tool lets you do this directly. Repeat for each chirp. This is time-consuming for busy recordings but gives the cleanest results because you are not touching anything outside your selection.
Workflow 3: iZotope RX Spectral Repair (best results, paid tool)
If you have access to iZotope RX (the standard tool in professional audio repair), the Spectral Repair module is the most effective way to handle isolated bird calls. Select the time-frequency region of a bird chirp in the spectrogram display, then use Spectral Repair in Attenuate mode. This reduces the selected area to match the magnitude of surrounding audio, removing the sound without leaving a hard gap or silence hole. The result sounds natural because RX interpolates from the context around your selection rather than just cutting. For denser bird noise spread across many frequencies, use RX's Dialog Isolation or the Machine Denoiser module to separate the bird content from speech before deciding what to keep.
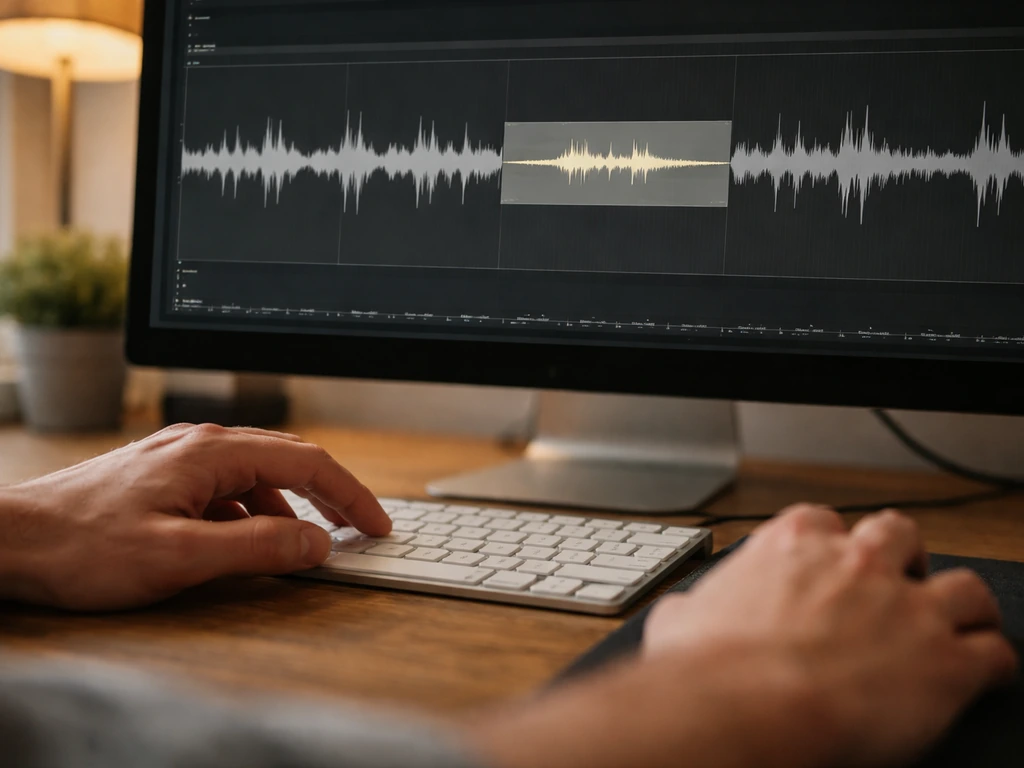
Workflow 4: Manual clip muting for isolated bursts
For recordings where birds only appear occasionally and there are clear quiet gaps between the speech and the chirp, the most reliable workflow is manual: zoom in at the waveform level, find each bird sound, select the exact region including a short fade in and out of about 10 to 20 milliseconds on each side, and reduce the volume of just that selection to near-zero or silence it completely. Apply a short fade-in and fade-out on the edges to avoid a click. This takes time but produces zero artifacts because you are not running any algorithmic processing.
How to avoid audio artifacts when cleaning bird noise
The most common mistake when removing bird sounds is pushing noise reduction too hard. FFT-based denoisers, including Audacity's Noise Reduction and most AI denoising tools, can introduce what iZotope's documentation calls 'musical noise': a watery, chirpy distortion that ironically sounds a bit like the birds you were trying to remove. The fix is to process in passes. Apply moderate reduction, listen back, then apply a second gentle pass only where needed rather than one aggressive pass across the whole file.
- Keep Audacity's Noise Reduction amount below 12 to 15 dB on the first pass. Listen for warbling or a metallic quality on consonants.
- If using iZotope RX, use the 'Best' quality setting when working offline rather than 'Fast', since Best mode minimizes artifacts at the cost of processing speed.
- Apply high-pass filtering below the bird frequency range only after your main reduction, not before. Doing it first can confuse the noise profile.
- Always compare the before and after on headphones, not just speakers. Artifacts often hide in the low-level stereo detail.
- If the result sounds worse than the original bird noise, undo everything and try a lighter touch or switch to a masking strategy instead.
Filtering, masking, and mix strategies when full removal isn't possible
Sometimes the bird sounds are so entangled with important audio that trying to remove them fully will damage what you care about. This is especially common when birds are calling in the same 1 to 3 kHz range as the speech in your recording. Intelligibility depends on which frequency parts are masked, so different speech sounds using different spectral regions can be affected differently by variable noise than by steady noise blank" rel="noopener noreferrer">same 1 to 3 kHz range. When that happens, shifting from removal to masking or rebalancing is the smarter move.
High-pass filtering to reduce lower-frequency bird calls
If the birds are contributing low-to-mid frequency rumble or cooing (pigeons and doves often produce energy between 300 and 800 Hz), apply a high-pass filter cutting below the speech-critical range. A gentle roll-off starting around 150 to 200 Hz removes rumble without hurting speech. For calls centered around 800 Hz to 1.5 kHz, be more careful since you are now near the lower edge of speech intelligibility.
Low-pass filtering to remove high-frequency chirps above speech
Many songbird chirps sit above 4 kHz, well above the telephone voice band of 300 to 3,400 Hz. If intelligibility of a voice recording is your goal and you don't care about audio fidelity above 4 kHz, apply a gentle low-pass filter rolling off at 4 to 5 kHz. This won't sound hi-fi, but it will clean most high-pitched chirps without touching the speech.
Level rebalancing and ambient replacement
If you are editing a video, podcast, or presentation recording and the bird sounds are simply too entangled to clean surgically, consider replacing the affected section. Find the cleanest take or a clean ambient room-noise bed without birds, duck or mute the problematic original audio, and lay the clean audio underneath. This is the approach professional video editors use when on-set audio is ruined. For public-announcement or surveillance recordings where replacement isn't an option, the 'good enough' standard is often just to reduce the bird noise by 6 to 10 dB so it stops being the dominant sound, rather than trying to eliminate it entirely.
Masking with background audio
In live recording environments, such as a building lobby or outdoor meeting area where birds are a constant problem, subtle broadband ambient sound (a gentle HVAC tone or very low-level music) can perceptually mask intermittent chirps by giving the ear a constant reference to focus on. This doesn't remove the birds from the recording, but it reduces how jarring they sound to listeners. It works best for background audio, not foreground speech recordings.
Tool comparison: which audio editor to use
| Tool | Best for | Spectral editing | Cost | Artifact risk at heavy settings |
|---|---|---|---|---|
| Audacity | Quick noise profile removal, notch filtering | Yes (Spectrogram view + Spectral edit multi-tool) | Free | Moderate: musical noise above 15 dB reduction |
| Adobe Audition | Visual spectral cleanup, targeted frequency brushing | Yes (Spectral Frequency Display) | Subscription (Creative Cloud) | Moderate: similar FFT artifact risk |
| iZotope RX (Elements or Standard) | Professional surgical repair of isolated chirps and calls | Yes (best-in-class Spectral Repair + Attenuate mode) | Paid (one-time or subscription) | Low when using Attenuate mode on isolated selections |
| Manual muting (any DAW) | Isolated burst chirps with clear gaps around speech | Not needed | Free with any editor | None: no processing artifacts possible |
Prevent birds from re-entering so the problem stops recurring
Cleaning up one recording is a short-term fix. If you want to get rid of a noisy bird for good, you also need to stop it from coming back to the same spot in your building or yard. If birds are consistently contaminating your audio because they are roosting in or around your building, the only permanent solution is to stop them from using those spots. This is exactly the kind of problem this site is built to help you solve.
Find and seal entry points
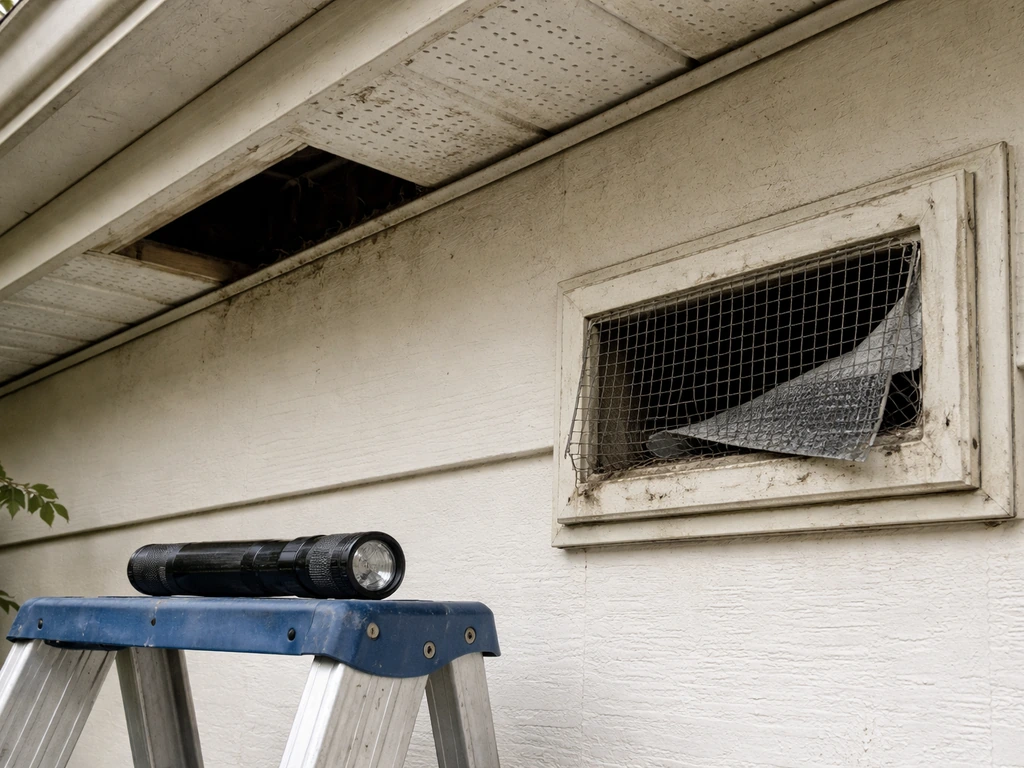
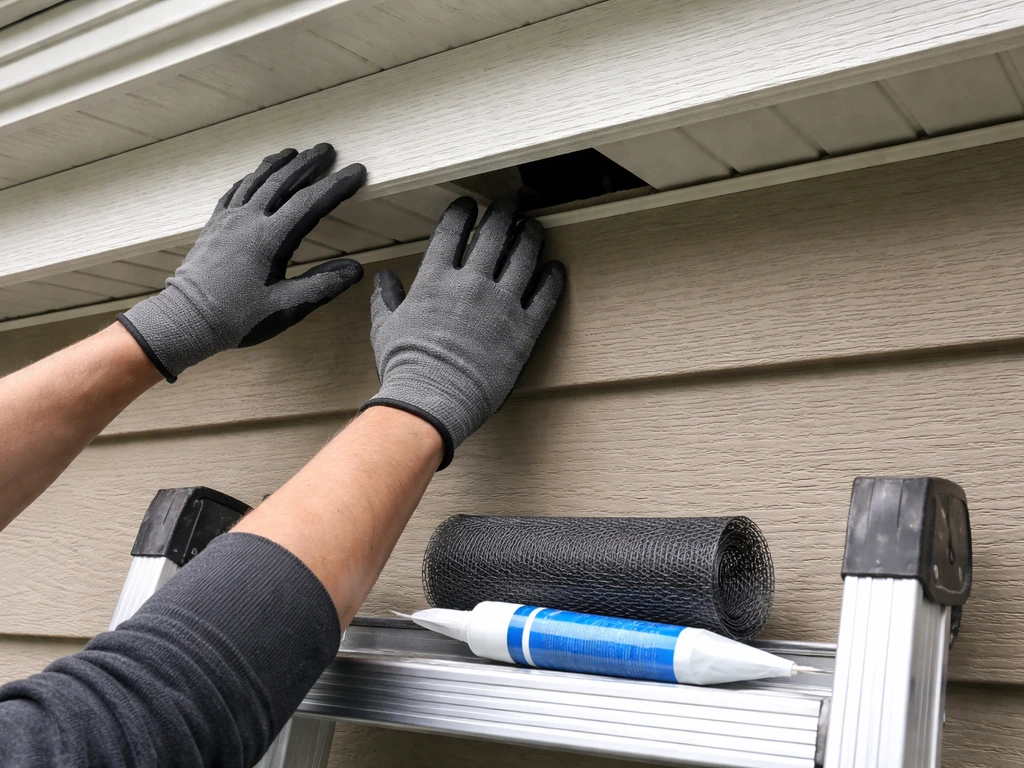
Walk the exterior of the building and look for gaps where birds are getting in or roosting: open soffits, broken vent screens, gaps around HVAC ducts, open eaves, and uncapped chimneys. Pay attention to vertical open pipes and vents, which can trap cavity-nesting birds that climb in and cannot get back out. Cap all open pipes with mesh or purpose-made vent covers. Check that all window and door seals are intact, especially on upper floors where pigeons and starlings like to roost.
Humane exclusion methods
Physical exclusion is the most effective long-term deterrent. Options include bird netting over soffits, ledges, and large open cavities; anti-roosting spikes on narrow ledges; and slope panels that prevent flat-surface roosting. If you use netting, installation matters enormously. Poorly installed or sagging netting can trap birds inside the excluded area, causing injury or death. Check all netting monthly and repair any gaps or sagging sections immediately. Visual deterrents such as reflective tape, predator silhouettes, and window decals can help with window strike problems near recording spaces.
Seasonal planning
Install exclusion measures before nesting season begins, which typically starts in late February to March in most of North America and the UK. Once birds start building a nest, your options narrow sharply. The best time to seal entry points, install netting, and place deterrents is in autumn after fledglings have left and before the following spring.
When to call in professionals (audio or wildlife) and what the law says
When to call an audio professional
If the recording is legally significant (court evidence, official PA announcement, medical documentation) or if your DIY attempts have introduced artifacts that are making the audio harder to understand than the original, stop and call a professional audio restoration service. Experienced audio forensics engineers have access to tools and techniques well beyond what's described here, and more importantly they can testify to the integrity of their process if needed.
When to call a wildlife professional
Call a licensed wildlife removal professional if birds are nesting inside your building and you cannot safely determine whether eggs or chicks are present, if you find an injured bird, if exclusion requires working at height without proper equipment, or if previous DIY exclusion attempts have failed. Provide the professional with the species if you know it, the location and access points you have found, and any history of previous exclusion attempts.
Legal and safety notes for protected species
In the United States, most wild bird species are protected under the Migratory Bird Treaty Act (MBTA). It is illegal to destroy, relocate, or damage an active nest containing eggs or dependent chicks without a federal permit, and permits are typically only issued when a nest poses a direct human health or safety risk.
This means that if you find an active nest while trying to seal an entry point, you must leave that nest alone until the birds have finished breeding and the young have fledged. The same protection principles apply in the UK under the Wildlife and Countryside Act, and similar laws exist across most of Europe and Canada.
If you are unsure about the species or whether a nest is active, stop work and consult your local wildlife agency or a licensed bird surveyor before proceeding. Do not assume a nest is inactive just because you don't see adult birds present during a brief inspection.
The physical exclusion work itself carries fall risks. Any exclusion work on roofs, soffits, or upper ledges should use appropriate fall protection. If you are not comfortable or equipped for working at height, this is a job for a professional wildlife proofer or pest management company experienced in bird work.
Your decision checklist: which approach to use
| Situation | Recommended approach |
|---|---|
| Bird chirps clearly above 4 kHz, speech below 3.5 kHz | Low-pass filter at 4–5 kHz or notch filter at chirp frequency |
| Isolated chirps with gaps around speech | Spectral edit in Audacity or RX Attenuate mode on each chirp |
| Constant background bird calls throughout recording | Noise profile subtraction (Audacity or RX Denoiser), light settings |
| Birds and speech share same 1–3 kHz band | Masking or ambient replacement; full removal will damage speech |
| Recording is legally significant or artifacts are introduced | Stop DIY, call audio forensics professional |
| Active nest found during exclusion work | Stop all exclusion work, contact wildlife agency, wait for fledging |
| Birds roosting inside building walls or ceiling void | Call licensed wildlife removal professional |
FAQ
Why do I still hear birds after I run noise reduction, even when the waveform looks cleaner?
Start by identifying whether the bird energy is narrowband (a fairly fixed tone, good for notch/band cuts) or broadband and dense (better handled with targeted time-frequency attenuation or dialog separation). If you apply a single notch across the entire bird range when the chirps overlap speech formants, you can remove parts of the voice instead.
How can I tell if my denoiser is creating “musical noise”?
Yes, especially with FFT-based denoisers. If you hear a watery, chirpy distortion that was not present originally, undo it and rerun with lower strength, then only process the sections that contain the birds. Doing it in two gentle passes is usually safer than one aggressive pass across the whole file.
What should I do about bird “tails” right after the chirp ends?
A good rule is to place the cut slightly wider than the visible chirp in the spectrogram, then fade the time-domain edges by about 10 to 20 ms to prevent clicks. If the bird leaves a sliver of energy tail, expand the selection rather than increasing reduction amount.
What’s the best approach when birds overlap with speech frequencies?
If the bird and speech overlap heavily (often around 1 to 3 kHz), aim to reduce audibility rather than remove completely. Lower the bird level by a few dB, or mask it by rebalancing EQ so voice clarity is prioritized, then compare intelligibility with and without the edit.
Can EQ or “rebalancing” help when full bird removal damages the voice?
Sometimes boosting the voice fundamentals and clarity (small, careful EQ moves) makes the birds feel quieter even if their absolute level is similar. Use a light speech-focused EQ, then redo only small targeted attenuation in the bird regions so you do not create an imbalance that makes the voice unnatural.
Should I use spectral editing or a notch filter for every bird sound?
For short isolated chirps, manual time selection with near-zero attenuation can be artifact-free. For repeating patterns, notch or band-cut works well, but only if the tone is stable across time. If the chirp shifts in pitch or wanders, notch filters can miss it, so time-frequency selection or spectral repair is usually more effective.
How do I choose cutoff frequencies without making the audio sound worse?
Avoid lowering the whole track too aggressively with a single high-pass or low-pass. Instead, set the cutoff based on what you want to keep, for example, gentle high-pass around the low end to reduce rumble, or low-pass around 4 to 5 kHz if high-frequency fidelity is not needed for intelligibility.
How do I verify that my edits did not harm speech intelligibility?
Yes. After any processing, listen at normal speed and also scan in short segments around the edits. If you hear gaps, pumping, or dullness around where birds were, revert and use narrower selections or lower reduction, then reapply only where needed.
What’s different about removing a trill compared to removing a single chirp?
Use the spectrogram to confirm the bird location in frequency and time, then choose a method that matches that shape. For dense trills that form thick bands, reduce in small time windows or use separation tools, because removing a single band can leave unnatural holes.
Is it ever better to reduce birds instead of fully removing them?
If the goal is quick cleanup for sharing, reduce the bird’s dominance by 6 to 10 dB rather than aiming for perfect elimination. If the recording is legally significant, artifacts from aggressive processing can be worse than the birds themselves, so stop sooner and consider a professional restoration workflow.
My building birds keep ruining recordings, should I keep editing the audio?
If you suspect the bird is inside the HVAC or a concealed cavity, the best next step is to prevent recurrence, then redo the audio cleanly. Audio edits can only help for the current recording, and persistent live birds will keep creating new artifacts and overlapping spectra.
What can I do before editing if the birds are coming from outside in a live recording?
For live recordings, switching to a more directional pickup, improving microphone placement, and reducing reflections can help so you get a cleaner source to start with. If birds are outside, directional technique often reduces them more effectively than trying to brute-force removal after the fact.
Identify bird noise type and entry points, then follow safe DIY steps to stop roosting now and prevent returns long term
Humane, safe steps to reduce bird noise: spot the source, use exclusion proofing, and plan DIY prevention.

Humane, step-by-step plan to stop chirping by finding entry roosts, sealing gaps, removing attractants, and reducing ind