Turn off the microwave and the vent fan at the circuit breaker right now, then step back and assess where the bird actually is before you touch anything. Most birds enter through the exterior vent hood and end up either just inside the hood flap, part way down the exhaust duct, or perched near the vent grille inside the kitchen. Once you know which zone the bird is in, you can guide it back out in under an hour using nothing more than a flashlight, a towel, and some patience. Here is exactly how to do that safely, clean up properly afterward, and make sure it never happens again.
How to Get a Bird Out of a Microwave Vent Safely

Maya Carver
9 Jun 2026
Stop everything: safety steps before you open anything
A panicked bird inside a live duct system is dangerous for both of you. Before you pull any covers or grilles, run through this list.
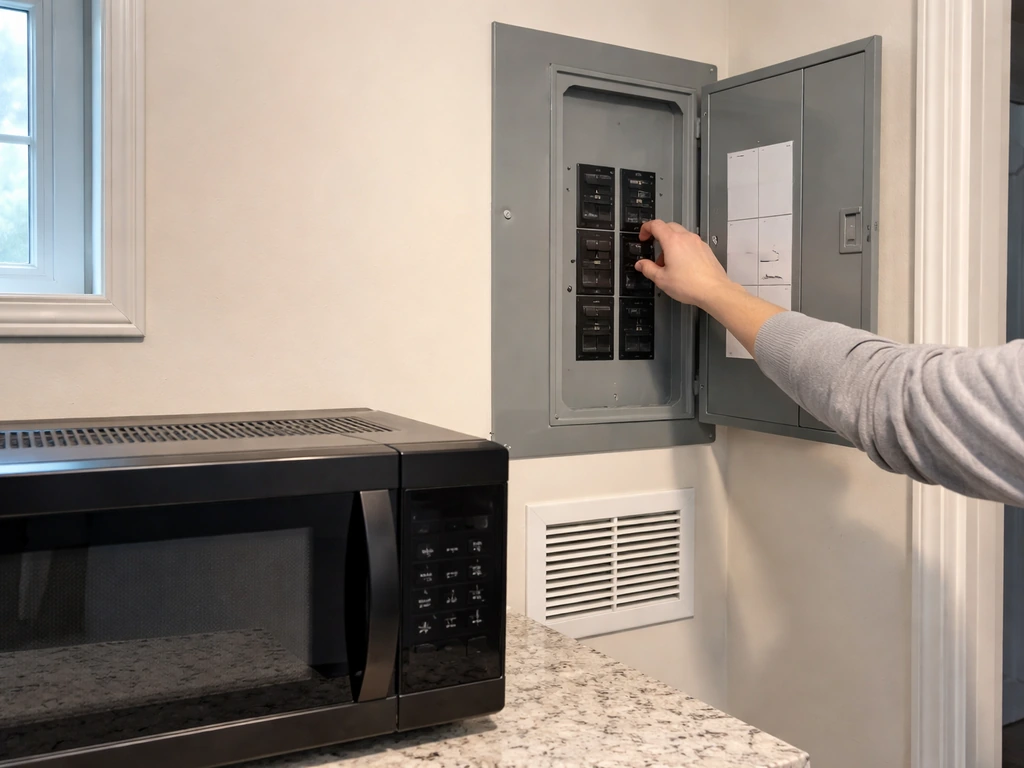
- Turn the microwave and vent fan completely off. Go to the breaker panel and flip the circuit for the microwave or kitchen range circuit rather than just using the control panel. This removes all power from the fan motor and the magnetron so the bird cannot be injured if it flutters near the blades.
- Do not run the exhaust fan at any point while the bird is inside. The fan blade can injure or kill a small bird instantly.
- Close the kitchen door to limit where the bird can fly if it escapes into the room. Open a window or exterior door nearby so the bird has an obvious exit route if it does get loose.
- Keep children and pets out of the kitchen.
- Put on basic PPE now, before you start inspecting: nitrile or non-latex rubber gloves, safety glasses or goggles, and ideally a dust mask or N95 respirator. Bird droppings can carry Histoplasma fungus and avian influenza pathogens, and even a small accumulation in a duct can release particles when disturbed.
- Do not poke anything into the duct until you have confirmed where the bird is. A probing tool can injure the bird and push it further into the duct system.
If you can hear frantic flapping, tapping, or distressed calls from inside the duct right now, that is a good sign the bird is still alive and relatively close to an opening. Slow, methodical movement on your part is what keeps it that way.
Figure out exactly where the bird is
Microwave vents can be ducted (exhausting outside through a wall or roof) or recirculating (filtering air back into the kitchen through a charcoal filter). A bird can only enter a ducted system from the outside. Recirculating models have no exterior opening, so if you have one and a bird somehow seems to be 'in' the microwave, it has almost certainly entered somewhere else in the room. Check the outside of your home near the microwave for a louvered vent cap: if you see one, you have a ducted system and that cap is the most likely entry point.
There are three main zones where a bird gets stuck in a ducted microwave vent setup.
| Zone | What you hear/see | What it usually means |
|---|---|---|
| Exterior vent hood | Bird visible at or just inside the louvered cap; scratching sounds right at the wall | Bird entered through a broken or missing flap and is right at the entry point — easiest to resolve |
| Duct run (wall or ceiling cavity) | Muffled tapping or scratching from inside the wall; no bird visible at either end | Bird is partway through the duct and cannot find its way out — needs a guided exit strategy |
| Interior vent grille / filter area | Bird visible behind the grille under the microwave or sounds come from just above the stovetop | Bird has traveled through most or all of the duct and is now near the kitchen end — remove grille carefully to release it |
Grab a flashlight and shine it into the exterior vent cap from outside first. Look carefully at the louvers and just inside the opening. Then go back inside and use the flashlight to inspect the interior grille or filter area under the microwave. If you can see the bird from either end, you know which zone it occupies. If you cannot see it but can hear it, assume it is in the duct run between the two ends.
How to get the bird out safely: DIY methods by zone
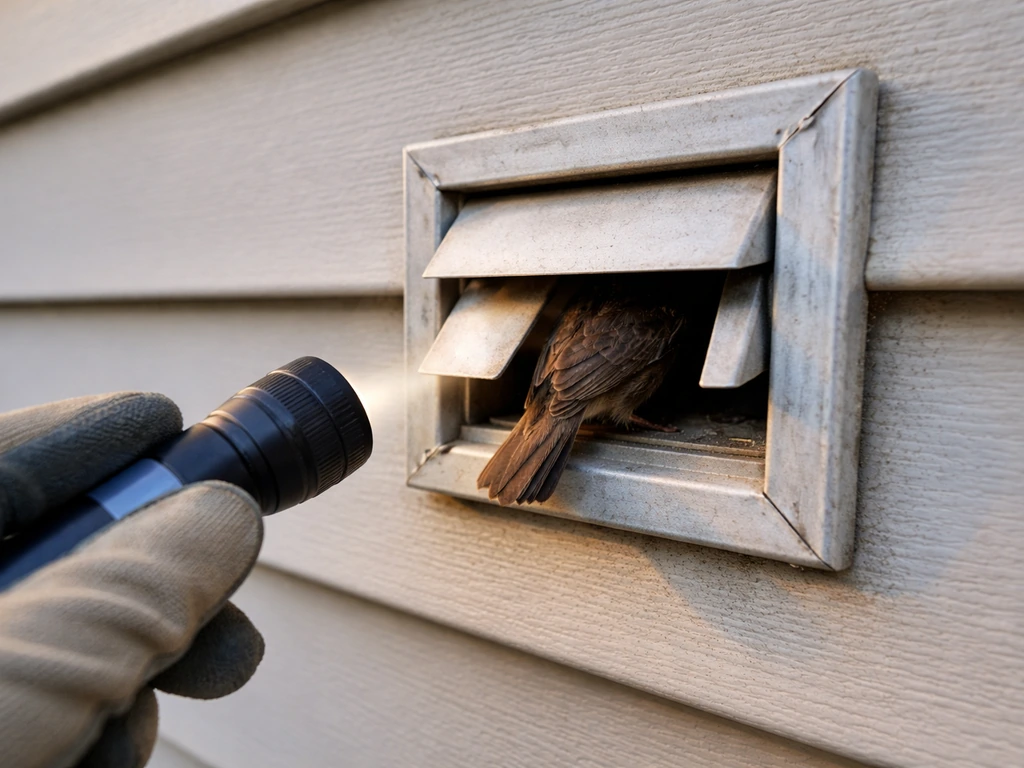
Bird at the exterior vent hood
This is the easiest scenario. Go outside, approach the vent cap slowly and quietly, and observe for a moment. If the bird is resting just inside the hood, it will often fly out on its own once you step back and give it space. If it seems stuck or the louvers are trapping it, gently open or remove the vent cap cover.
If you are dealing with a bird stuck in a microwave vent, follow the guidance for how to get bird out of vent below. Most exterior vent caps are held by two to four screws around the perimeter. With the cover removed, the bird usually exits immediately. Once it is out, step back and let it fly away before you start any repairs.
Bird in the duct run
This is the trickiest scenario. The goal is to make the exterior end as inviting as possible and the interior end unappealing, so the bird moves toward the outside. Open or remove the exterior vent cap fully to maximize the light and space at the exit. Then go inside and darken the kitchen as much as possible: close blinds, turn off lights.
Birds instinctively move toward light and open air, so reducing competing light inside helps. Some homeowners have success placing a battery-powered LED light just inside the exterior opening to draw the bird out. Give it 30 to 60 minutes. Do not bang on the walls or yell into the duct, as this just causes the bird to panic and dig in further.
If the bird is not moving after an hour, you can try a one-way exclusion approach: fit a soft mesh cone or a purpose-built one-way wildlife excluder loosely over the interior vent grille opening so the bird can push out toward the exterior end but cannot re-enter the kitchen. Frontier Trapper’s one-way door guide also emphasizes that exclusion works best and remains humane when the rest of the home is fully sealed so the wildlife cannot keep finding gaps to re-enter one-way exclusion approach. Make sure the exterior cap is fully open. Check every hour or two. Once you no longer hear movement, the bird has likely exited. Verify before you seal anything.
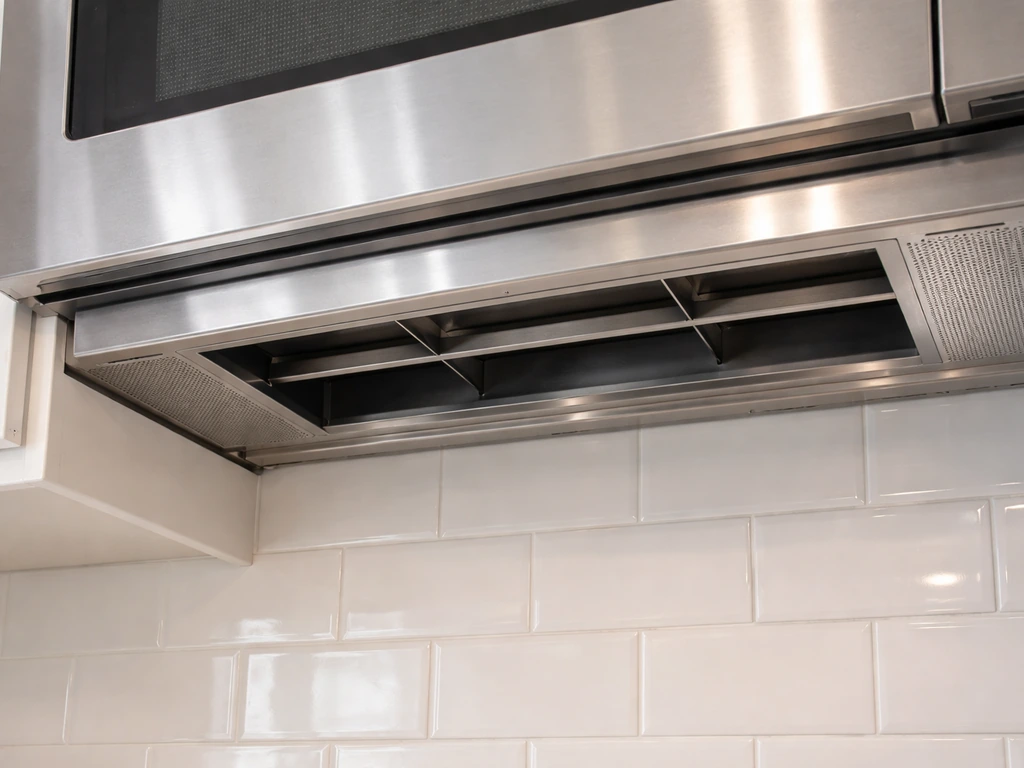
Bird at the interior grille or filter area
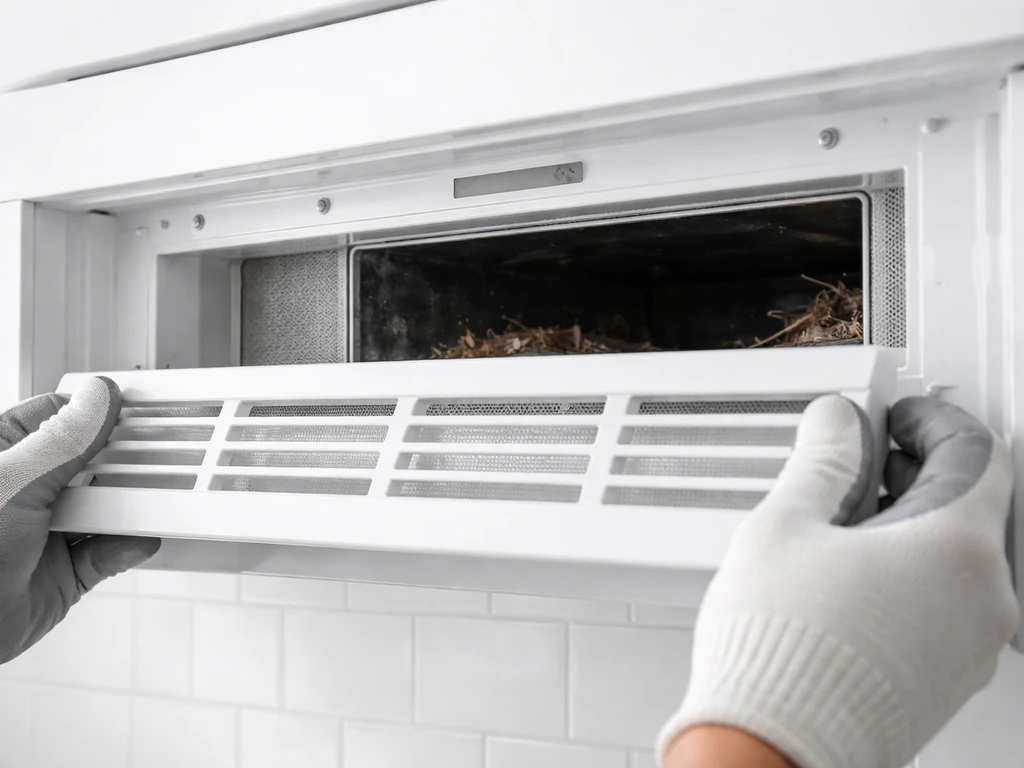
If the bird has made it all the way to the kitchen end, you need to remove the interior vent grille. On most over-the-range microwaves, the vent grille is a louvered panel along the top front of the unit, held in place by two clips or screws. Power is already off at the breaker, so it is safe to remove. Open a window directly in the bird's line of sight before you unclip the grille.
Work slowly. Once the grille is off, stand back. The bird will see the light from the window and typically fly straight toward it. If it does not move, drape a lightweight towel loosely over the opening and gently guide (do not grab) the bird toward the window.
Never grab a wild bird with bare hands: use a towel to cup it gently and release it outside.
If you find a nest with eggs or live chicks anywhere in the duct at any point during this process, stop immediately. Active nests are protected under the federal Migratory Bird Treaty Act. You cannot legally remove or destroy a nest containing eggs or live young without a permit. See the escalation section below.
Cleanup and hygiene after the bird is out
Do not skip this step. Bird droppings, feathers, and nesting debris in a duct can harbor Histoplasma capsulatum (the fungus that causes histoplasmosis), Cryptococcus, avian influenza, and Salmonella, among other pathogens. The main risk comes from aerosolizing dried droppings, so your entire approach should focus on wetting material before disturbing it.
Before you start cleanup, put on: a NIOSH-approved respirator (N95 minimum, P100 with HEPA cartridges preferred), non-latex rubber or nitrile gloves, safety goggles or glasses, and disposable coveralls or clothing you can wash immediately at high temperature. Shoe coverings are worth using if you are climbing into an attic or crawl space to access the duct.
- Prepare a disinfectant solution: a 10% bleach solution (roughly 1 part bleach to 9 parts water) works for most surfaces. Have it in a spray bottle.
- Spray all visible droppings, feathers, and nesting material thoroughly until wet. Wait five to ten minutes. Do not vacuum or sweep dry droppings: this aerosolizes particles and dramatically increases your inhalation risk.
- Use damp paper towels, a sponge, or a rag to wipe up the wetted material. Place everything directly into a sealed plastic bag.
- For heavier accumulations inside a duct (more than a small pile), use an industrial-grade vacuum fitted with a HEPA filter rather than a standard household vacuum. A standard vacuum recirculates contaminated air back into the room.
- After removing solids, wipe down all surfaces again with fresh disinfectant solution and let air dry.
- Remove your PPE carefully (peel gloves inside-out first), bag them with the other waste, and wash your hands and face thoroughly. Shower and change clothes if you had significant exposure.
- Reinstall any grilles or duct components only after everything is fully dry.
If you found a large accumulation of droppings (covering more than a few square feet) or if the duct has clearly been used as a nesting site for a long time, seriously consider calling a professional remediation service. Large-scale histoplasmosis exposure can cause serious respiratory illness, and professional contractors have truck-mounted HEPA vacuum systems and the training to do the job safely.
Fix the vent and keep birds out for good
Getting the bird out once is satisfying. Having to do it again in three weeks is not. The fixes below range from five-minute repairs to slightly more involved installations, but none require special skills.
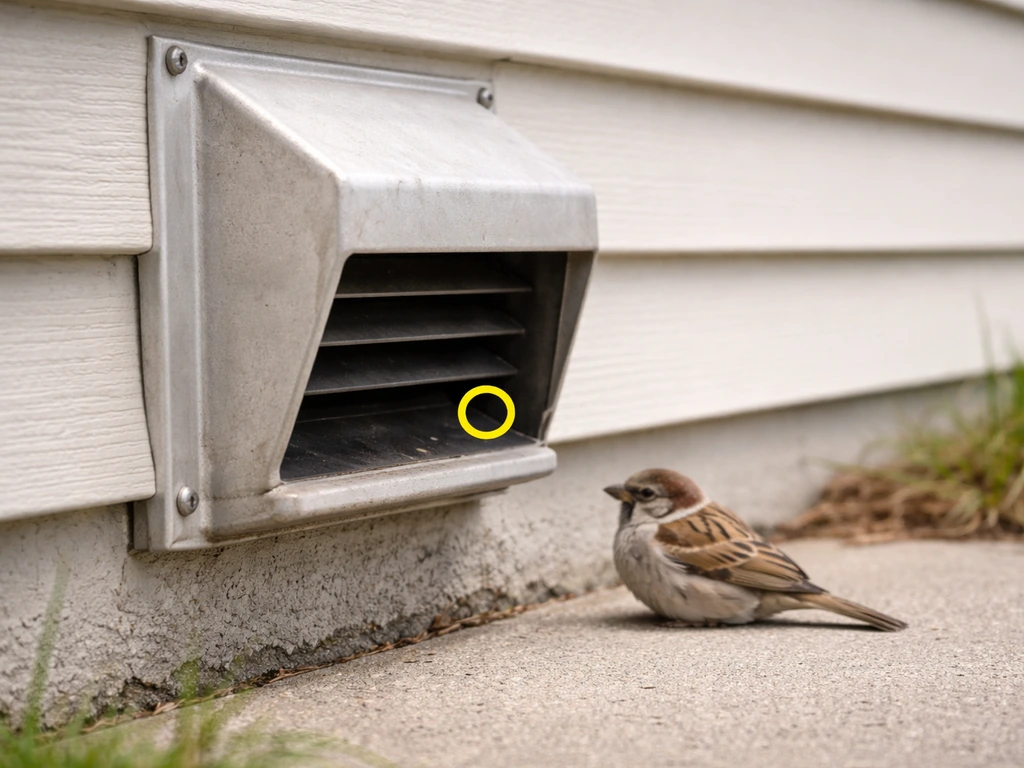
Inspect and replace the exterior vent cap
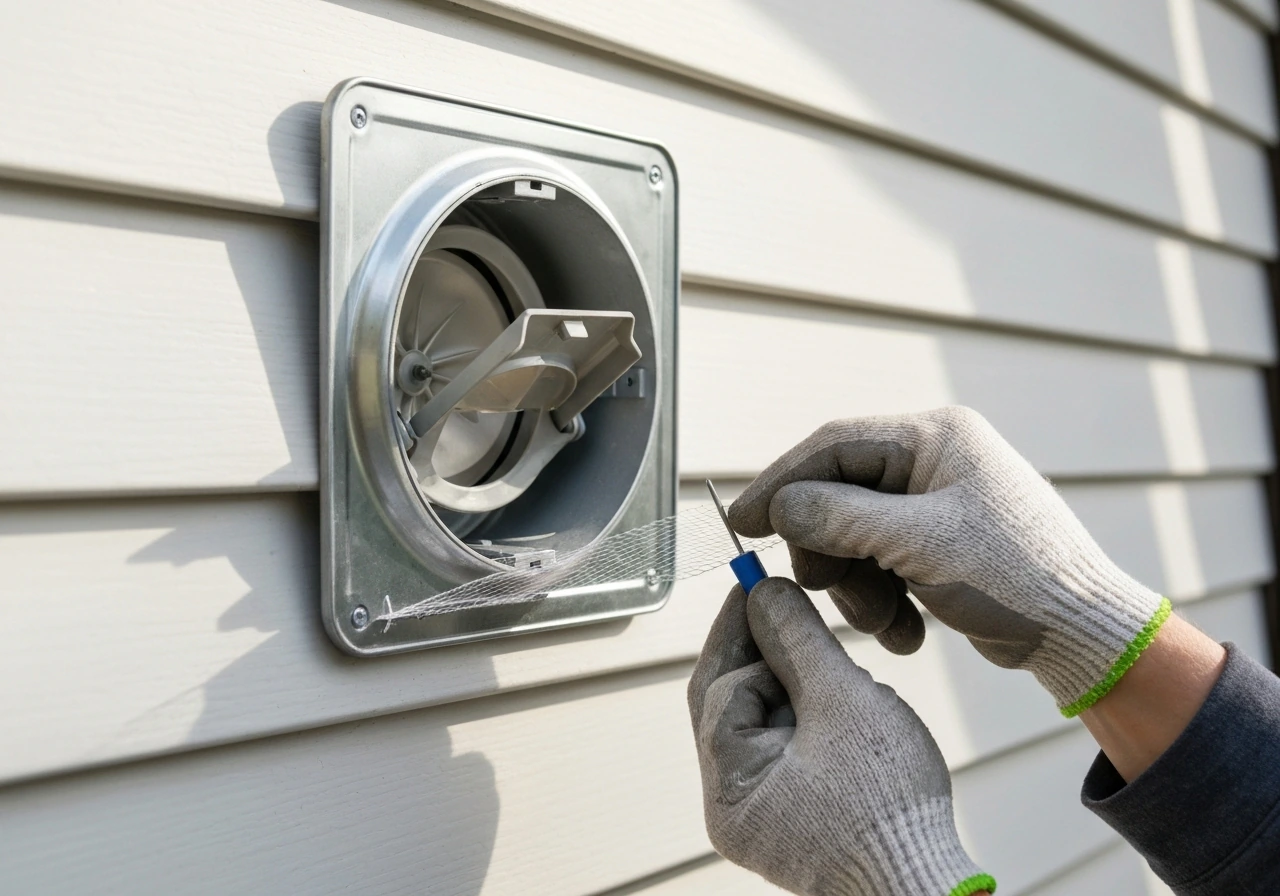
The single most common reason birds get into microwave vents is a failed or missing damper flap on the exterior cap. These plastic or metal flaps open when the fan runs and close by gravity or a spring when it stops. Over time they warp, crack, or get stuck open by rust or old grease. Inspect your cap from outside: the flaps should hang closed and move freely.
If they are stuck open, bent, or missing, replace the entire vent cap. Replacement caps are inexpensive and available at any hardware store. Choose a model rated for your duct diameter (typically 3. 25 x 10 inches for rectangular or 6 to 7 inches for round ducted microwave vents) and make sure the new cap has a functional spring-loaded or gravity damper.
Add a bird-proof mesh or guard
For persistent problems, install a fine stainless steel mesh (hardware cloth with 0.5-inch or smaller openings) over or behind the vent cap as a secondary barrier. The mesh must be positioned so it does not restrict airflow enough to back up grease or heat, and it must not impede the damper flaps. Some purpose-built vent guards include an integrated mesh panel. Do not use standard window screen: the openings are too small and will clog with grease and lint quickly, creating a fire hazard. Check and clean any mesh guard at least twice a year.
Seal gaps around the duct penetration
Birds often squeeze in not through the vent opening itself, but through gaps between the duct pipe and the wall or soffit opening it passes through. These gaps are common in older installations. Use galvanized sheet metal flashing or a foam backer rod combined with exterior-grade silicone caulk (not standard interior caulk) to seal any visible gap around the duct where it exits the building. This also improves your home's energy efficiency and stops insects.
Simple deterrents to reduce attraction
- Motion-activated lights near the exterior vent are counterproductive: they attract insects at night, which in turn attract birds. Swap to timed or sensor lights that are off at night if the vent is under an eave.
- Reflective tape or commercial bird deterrent tape strips hung near (not blocking) the vent cap can reduce interest from curious starlings and house sparrows.
- Keep gutters and ledges near the vent clear of old nesting material, as leftover nests signal safe territory to other birds.
Seasonal maintenance schedule
Spring (March through May) is the peak season for bird intrusions because that is when most species are actively looking for nesting sites. Do your inspection and any repairs in late February or early March before nesting activity begins. A quick fall check in October lets you repair any summer wear before winter, when birds occasionally shelter in vents during cold snaps.
| Season | Task |
|---|---|
| Late February / early March | Inspect exterior vent cap dampers and mesh; replace if worn; seal any new gaps around duct penetrations |
| April to May | Monitor for bird activity at the vent; listen for scratching or chirping inside |
| October | Clear any accumulated debris or nesting material; recheck caulk and mesh for summer wear |
| After any major storm | Check for wind-damaged vent caps or displaced mesh guards |
When to stop DIY and call a professional
Most single-bird situations are solvable without professional help. But there are specific scenarios where trying to handle things yourself can harm the bird, expose you to legal liability, or create a health hazard you are not equipped to manage.
Stop and call a wildlife professional if:
- You find a nest containing eggs or live chicks. Active nests are protected under the federal Migratory Bird Treaty Act, which prohibits any person from taking, possessing, or destroying migratory birds and their active nests without a permit. Removal permits are typically issued only when there is a documented human health or safety emergency. Contact your state wildlife agency or a licensed wildlife removal company who can assess whether a permit is needed.
- The bird has been in the duct for more than 24 hours and is not responding to light-guided exit methods. It may be injured, weak, or wedged. A professional has the tools and training to disassemble duct sections safely.
- You hear multiple birds or suspect a larger nesting colony. Starlings and house sparrows in particular can establish large groups in duct systems. This is a different scale of problem than a single lost bird.
- The bird is injured and cannot fly when it exits. A licensed wildlife rehabilitator can provide care. Contact your state wildlife agency to find a rehabilitator near you.
- You are not comfortable working at height. If the exterior vent cap is on a second-story wall or a roofline, the fall risk from ladder work is serious. Hire a contractor.
- You find large quantities of droppings (more than a few square feet of coverage) in the duct or surrounding cavity. This warrants professional remediation with HEPA-equipped equipment.
Legal notes worth knowing
The Migratory Bird Treaty Act covers the vast majority of native songbirds you are likely to encounter, including sparrows, starlings (in some contexts), robins, wrens, and swallows. The law prohibits harming, killing, or destroying their nests and eggs without authorization. This is federal law with real enforcement: the U.S. Fish and Wildlife Service maintains a reporting channel for suspected violations. The practical takeaway is simple: do not harm the bird, do not destroy an active nest, and if you are unsure whether a nest is active, treat it as protected until a professional tells you otherwise.
House sparrows and European starlings are actually not native species and are not protected under the MBTA, which means their nests and eggs can be legally removed in most states. However, species identification can be tricky if you are not experienced, and the safest default is always to treat any bird as protected until you are certain.
Quick decision checklist
- Is the microwave power off at the breaker? If no, stop and do that first.
- Is there an active nest with eggs or chicks? If yes, stop DIY and contact a licensed wildlife removal professional.
- Can you see or hear the bird within easy reach of an exterior or interior opening? If yes, follow the zone-specific exit steps above.
- Has the bird been stuck for more than 24 hours with no progress? If yes, call a wildlife professional.
- Is the vent cap damaged, missing flaps, or has open gaps around the duct? If yes, plan to replace or repair immediately after the bird is out.
- Did you find significant droppings accumulation? If yes, use full PPE and consider professional remediation for anything larger than a small pile.
If you are dealing with birds in other types of vents around the house, the same general principles apply: power down the fan, locate the bird, guide it toward an open exit, clean up with wet methods and proper PPE, then fix the entry point. If you are dealing with a bird in a dryer vent, the best next steps are similar: power down safely, locate the bird, guide it out, then clean and block the entry points.
Dryer vents are a particularly common problem because lint buildup makes the flaps stick open and the warm air attracts nesting birds, especially in spring. If the bird is in your dryer vent, the same safety and exclusion principles apply, so prioritize getting it out without spreading dust or debris. The cleanup and proofing steps for those situations follow essentially the same logic described here.
FAQ
Can I use the microwave light or turn the microwave back on to scare the bird out?
No. Keep the microwave and vent fan powered down at the breaker. Re-powering can stress the bird by causing the damper to move unexpectedly, and it increases the risk of pulling air and debris into the kitchen while the bird is still inside.
What if the bird is injured, or it falls into the duct instead of flying out?
Stop trying to force it. If it is clearly not capable of flying, call a local wildlife rescuer or professional vent removal service rather than removing further components yourself, because you may trigger nest or pathogen exposure while you are searching.
How do I tell whether my microwave vent is ducted or recirculating if I cannot find an exterior vent cap?
Look for a charcoal filter and a recirculation-style baffle inside the microwave canopy, and check whether there is any exterior louvered hood connected to the vent run. If there is no outside exhaust path, treat it as recirculating, meaning the bird is likely in the room rather than in a duct run behind the hood.
Is it safe to spray disinfectant to kill germs inside the duct while I am still trying to remove the bird?
Avoid dry spraying or misting while the bird is present. The priority is reducing aerosolization of droppings, so you should only start wetting and disinfecting once the bird is out and you can control what you wet and how you contain runoff.
How long should I wait before switching from “guide it out” to “exclusion cone” or grille removal?
Use the staged timing described in the article, but as a rule of thumb, if you cannot make progress after about an hour when the exit is fully open and conditions are favorable, switch to the next step. If you hear persistent frantic activity, you may need to adjust sooner because the bird can worsen the mess as it panics.
What if the bird keeps reappearing after I think it escaped once?
That usually means an opening lets it back in, a damper is not closing, or the bird exited temporarily but remains inside another duct section. Reconfirm the damper flap closes properly at the exterior cap, and re-run a careful flashlight check at both ends before sealing anything.
Can I use a strong vacuum to remove droppings from the duct?
Not with a standard household vacuum. Large droppings can be aerosolized and spread contamination. If cleanup involves substantial material, use professional HEPA extraction or follow the article’s wetting-first approach with appropriate PPE and containment.
Do I need to wear a respirator even for a tiny amount of droppings?
Yes, at least N95 minimum. Even small deposits can contain pathogens, and most people end up disturbing more material than they expect. Use goggles, gloves, and keep cleanup surfaces controlled.
What should I do if I see a nest or eggs, but the bird is already out?
Treat it as an active-nest situation until a professional confirms otherwise. The article’s legal point matters even after the adult bird is gone, because eggs or chicks can still be present and protected.
Which home repair fix is most important if I want to prevent this from happening again?
Check the exterior damper flap and replace the vent cap if it is missing, warped, or stuck. After that, consider a secondary barrier like properly sized stainless mesh, plus sealing gaps where the duct passes through the wall or soffit to stop entry through side openings.
Will installing a mesh guard reduce ventilation and increase fire or moisture risk?
It can, if the mesh is undersized, positioned incorrectly, or too restrictive. The article’s key caveat applies, use fine mesh that does not impede airflow enough to back up grease or heat, and ensure the damper flaps still move freely.
What proofing should I do immediately after cleanup before I replace the vent cap or grille?
Before fully reassembling, re-check that the damper closes completely and that there is no remaining nesting material in the duct run. Also verify the interior grille is reinstalled correctly so there are no new gaps that could become another entry path.
Next Article
There Is a Bird in My Dryer Vent: Safe Removal Steps
Step-by-step safe, humane removal when you find a bird in your dryer vent, plus cleanup and prevention repairs.