A bird stop on a roof is a barrier, strip, or mesh accessory installed at open roof edges, eave gaps, ridge lines, or vent openings to physically block birds from getting in, roosting, or nesting there. The term covers everything from a simple foam or mesh eave closure on a tile roof to spike strips along a parapet, wire systems across ledges, or stainless-steel mesh over soffit gaps. The core job is always the same: close the access point so birds cannot land in a spot long enough to call it home.
What Is a Bird Stop on a Roof? Types and Installation

Maya Carver
5 May 2026
What "bird stop" actually means on a roof
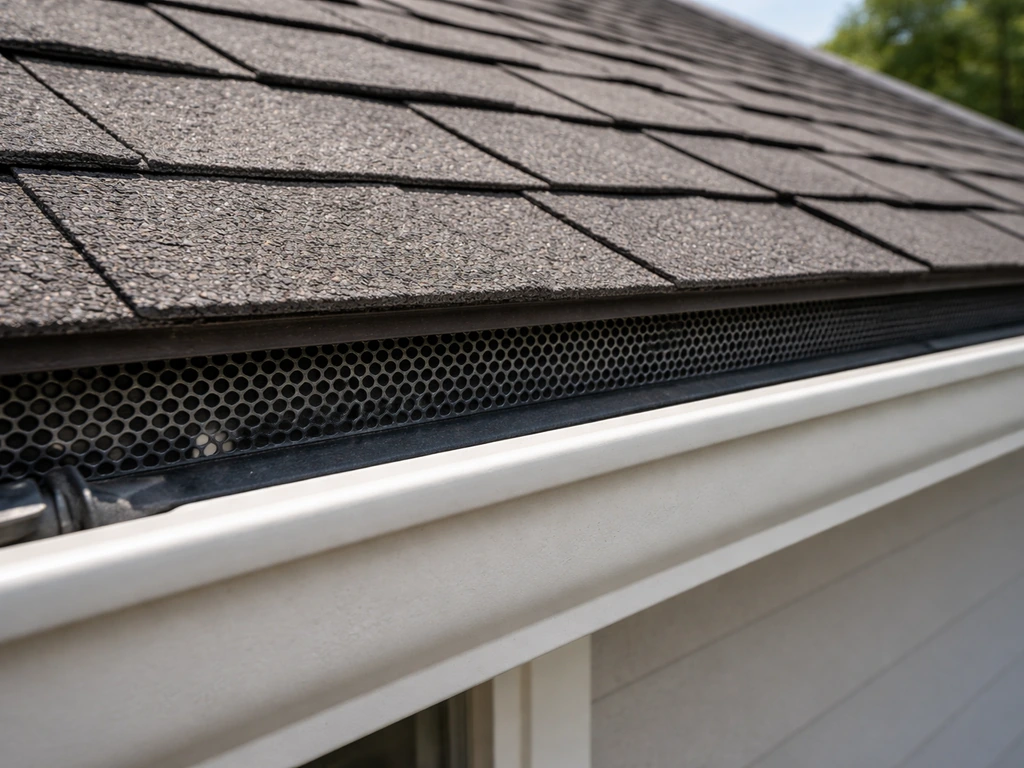
In roofing terminology, a bird stop (sometimes called bird blocking or eave closure) is a specialized barrier installed at roof openings, particularly along the lower eave edge of tile roofs, where the curved tile profile leaves a gap between the tile and the fascia. That gap is the perfect bird-sized entrance to your attic. Manufacturers like Interlock Roofing list the bird stop as a dedicated roofing accessory, not an afterthought, because those gaps are a design reality of profiled roofing systems.
The term also gets used more broadly to describe any perch-blocking or exclusion device along a roof: spike strips at the ridge, wire systems on a parapet wall, or mesh stapled over a louvered soffit vent. All of these are doing the same job. The Washington State government, for example, uses "bird stop" to describe a device that seals the open edges of a roof at both the ridge and the eave. So when you see the term, context matters, but the function is consistent: stop access.
One important distinction: a bird stop is an exclusion product, not a deterrent. Deterrents (reflective tape, fake owls, ultrasonic devices) try to scare birds away. Bird stops physically prevent landing or entry. Exclusion nearly always outperforms deterrence for persistent roosting problems, which is why it's the method professionals reach for first.
Where birds land and why your roof is so attractive
Before you choose a bird stop, it helps to understand exactly where birds are exploiting your roof. Bird problem solving starts by targeting the specific spots birds can land and nest, then blocking those access points with exclusion. Pigeons, sparrows, starlings, and swifts are the most common culprits, and they're looking for a handful of specific things: a sheltered ledge above ground level, warmth from the building, close access to food and water, and some protection from wind and predators. Your roof delivers all of that. A good bird-proofing plan for your barn pairs the right bird stop with sealing the main entry spots so birds cannot roost or nest again. A bird problem on rooflines like this is usually solved by blocking the specific entry points birds use to land, roost, and nest.
- Eave gaps on tile roofs: the curved profile of barrel or S-tiles leaves an open arch at the lower edge that birds fly straight into
- Ridge lines and hip ridges: elevated, warm, and exposed, they're a favorite perching strip for pigeons and gulls
- Parapet walls and flat roof edges: wide horizontal ledges that pigeons in particular treat as a hotel
- Soffit and fascia vents: louvered or open vents are direct entry points to the attic space
- Chimney tops and flue openings: wide, warm, and dark, attractive to jackdaws, starlings, and swifts
- Solar panel undersides: the gap between panel and roof creates a sheltered cavity
The consequences of birds getting into these spots go well beyond noise. Nesting material in vents restricts airflow and creates a genuine fire risk, especially in dryer vents and kitchen exhausts. Droppings introduce bacteria, fungi, and viruses and accelerate corrosion of roof components. The CDC/NIOSH notes that preventing accumulation of bird and bat droppings is the best way to prevent Histoplasma exposure, and engineering controls should focus on stopping droppings from building up Droppings introduce bacteria, fungi, and viruses and accelerate corrosion of roof components.. Parasites from nests (mites, lice, fleas) can migrate into the building. Blocked gutters from accumulated debris cause water damage. Once birds establish a nest site, they return to the same spot every season, which is exactly why exclusion rather than eviction is the right long-term answer.
Types of bird stops and how to pick the right one
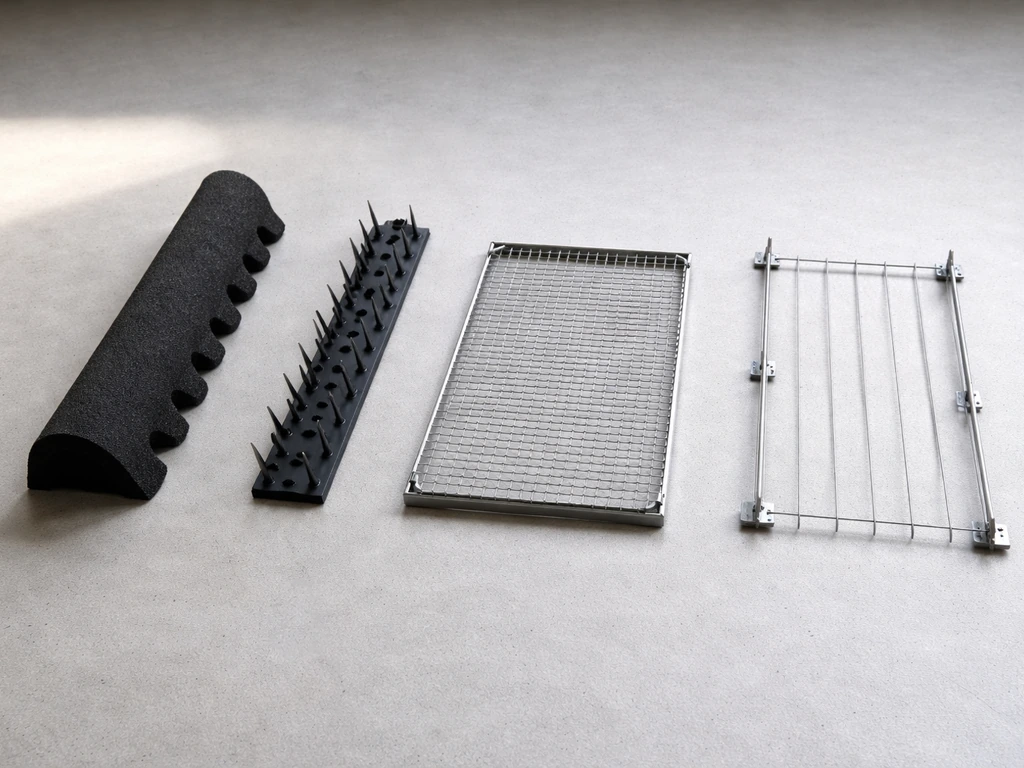
There is no single best bird stop. The right choice depends on the location, the bird species involved, the roof type, your budget, and how permanent you want the solution to be. Here is a straightforward comparison of the main options.
| Type | Best For | Key Advantage | Limitation |
|---|---|---|---|
| Eave/tile bird stop (foam or rigid) | Tile roof eave gaps | Purpose-built for tile profiles, low profile | Only works at eave edge, not for open ledges |
| Spike strips (stainless steel or polycarbonate) | Ridges, parapets, ledges, chimney tops | Durable, widely available, DIY-friendly | Needs full coverage or birds find the gaps |
| Bird wire / spring-tension wire system | Ledges, parapets, flat roof edges | Nearly invisible, handles large spans well | More complex to install correctly |
| Stainless-steel mesh / PermaMesh | Soffits, vents, panel gaps, eave openings | Durable, resists damage from rough edges, reversible | Requires cutting and fastening to irregular surfaces |
| Bird netting | Large open areas under canopies, solar arrays, or between roof sections | Covers large spans cost-effectively | Must be tensioned correctly or birds get tangled |
| Angled/hooded vent covers | Vent openings, chimney tops | Stops entry while maintaining airflow | Species-specific sizing required |
For a tile roof eave problem, start with a purpose-built eave closure strip (foam or rigid profile) designed to match your tile type. For a flat roof parapet or ridge perching problem with pigeons, spike strips or a bird wire system are your workhorses. For soffits and vents, stainless-steel mesh is almost always the right call because it can conform to irregular shapes without leaving gaps. For solar panel undersides, purpose-made mesh kits with clips designed not to penetrate the roof are the safest option. If your Bird Buddy is mounted over solar panel undersides, look specifically for solar-safe mesh kits made for that area.
Emergency actions you can take today to stop roosting
If birds are actively roosting or you suspect they have entered a vent or eave space right now, here is a triage sequence to follow before you get a permanent system installed. Work safely: stay off sloped roofs without fall arrest equipment, and wear an N95 or P100 respirator plus disposable gloves whenever you are near droppings or nesting material.
- Do a visual check from the ground or a safe ladder position: identify exactly where birds are getting in or roosting
- Check for active nests with eggs or chicks before touching anything (see the legal section below before proceeding)
- If a vent fan has a bird nest in or near it, do not run the appliance until the blockage is cleared, to avoid fire risk and injury to the birds
- Apply temporary physical deterrents at landing sites: a length of bird-spikes strip held with temporary adhesive, or hardware cloth stapled over a vent opening, buys time while you plan the permanent fix
- Seal any obvious gaps at eaves or soffits with hardware cloth (half-inch or quarter-inch galvanized mesh) using staples or screws, leaving no openings larger than half an inch for small species or one inch for larger birds
- Clear fresh droppings and loose nesting material from gutters and ledges using a damp method (never dry-sweep, which aerosolizes pathogens) with PPE on
- Document the locations with photos so you can measure accurately for permanent products
These steps interrupt the roosting habit while you source and install the right permanent bird stop. The faster you act, the less likely birds are to treat the spot as an established territory. Once a nest is built and a clutch is laid, your options narrow significantly under federal law.
How to install a bird stop: step-by-step with measurements
The installation process varies slightly by product type, but the core sequence is the same for most bird stops. These steps cover spike strips (the most common DIY option) with notes for mesh and wire systems where they differ.
Tools and materials checklist
- Tape measure and chalk line or pencil
- Wire cutters or tin snips (for trimming strip lengths)
- Drill with appropriate bit for the surface (masonry, wood, or metal)
- Screws or nails sized for the substrate (wood screws for fascia/decking, masonry anchors for concrete or brick)
- Manufacturer-recommended construction adhesive (e.g., Bird Barrier Bond or equivalent polyurethane adhesive) if using adhesive mounting
- Caulk gun if using adhesive
- Hardware cloth or stainless-steel mesh for vent and gap sealing
- Staple gun or self-tapping screws for mesh
- Disposable gloves, N95 or P100 respirator, safety glasses
- Fall protection equipment if working above ground level (harness, anchor, or work platform)
Spike strip installation (ridges, ledges, parapets)
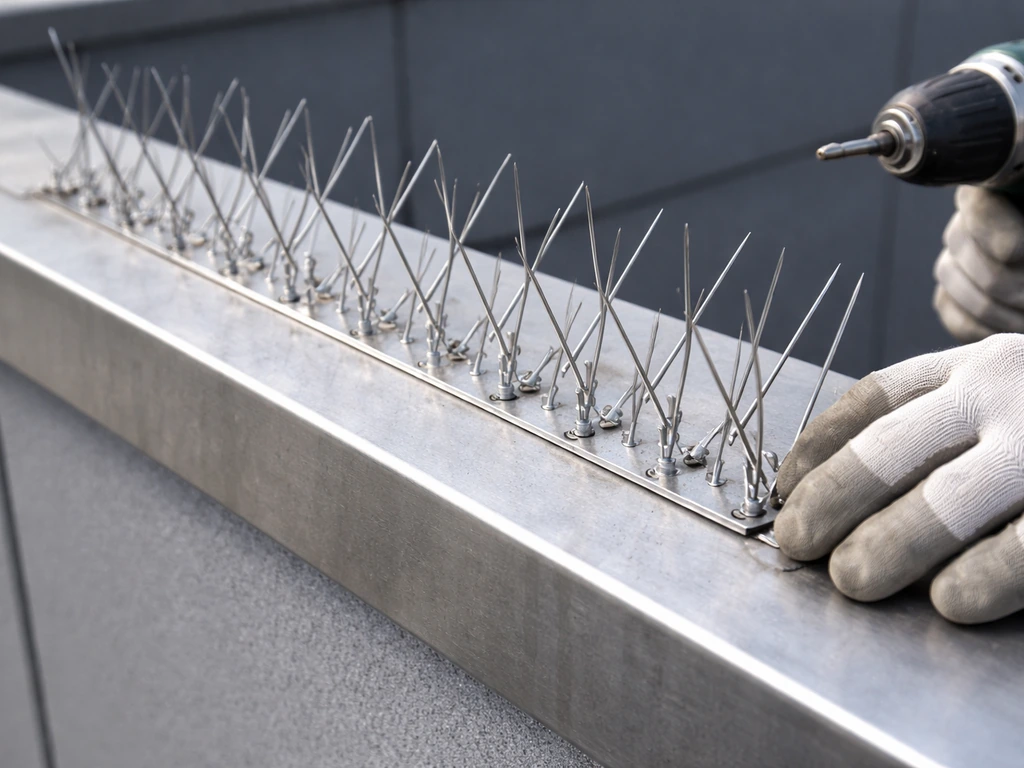
- Clean the surface thoroughly: scrape off droppings, scrub with a disinfectant solution, and let it dry completely. Adhesive will not bond to contaminated surfaces.
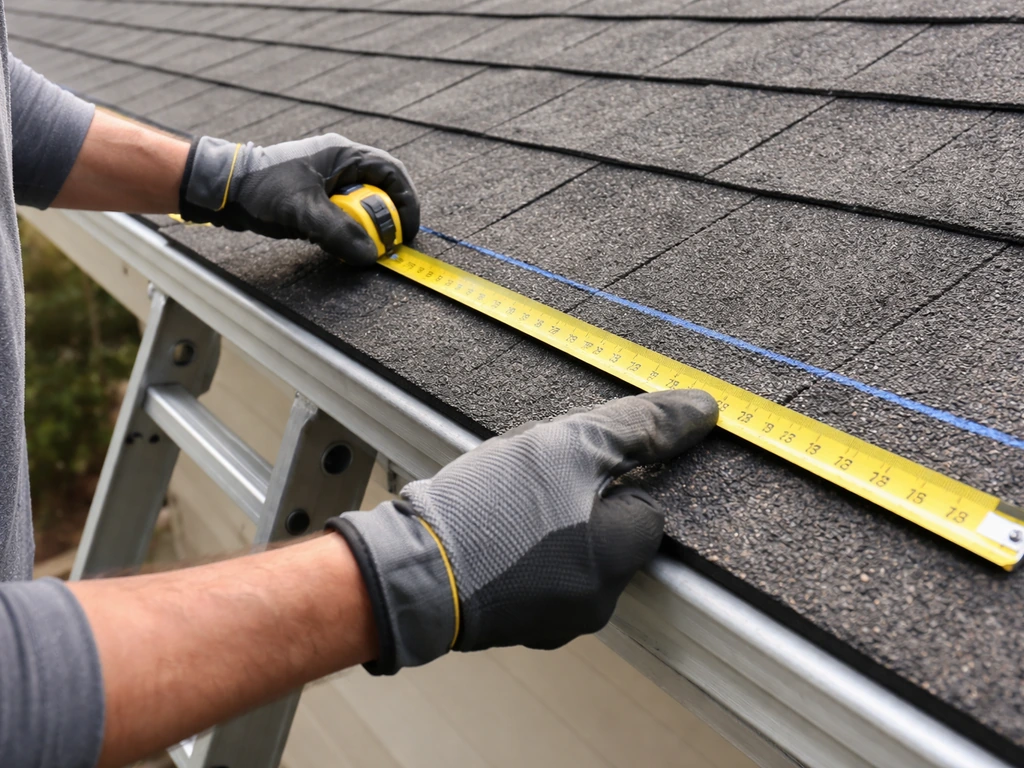
- Measure the total run of the area to be covered. Cut spike strips to length with tin snips so that the coverage is continuous with no gaps.
- If using adhesive: run a bead of construction adhesive along the base of the strip, press firmly, and follow the manufacturer's cure time before birds can disturb it. Many products specify a minimum 24-hour cure.
- If using screws: position the strip, then drive 3 or more wood or masonry screws through the pre-drilled base holes per 12-inch section, depending on the substrate.
- Cover the entire ledge width. If the ledge is wider than one strip, place a second row behind the first so there is no flat landing zone between or behind the strips.
- At corners and irregular shapes, miter-cut the base or use flexible spike strip sections designed to bend around curves.
- Stand back and look along the entire run at bird-eye level. Any flat section wider than about 3 inches that is not covered by spikes is a landing opportunity and will be found.
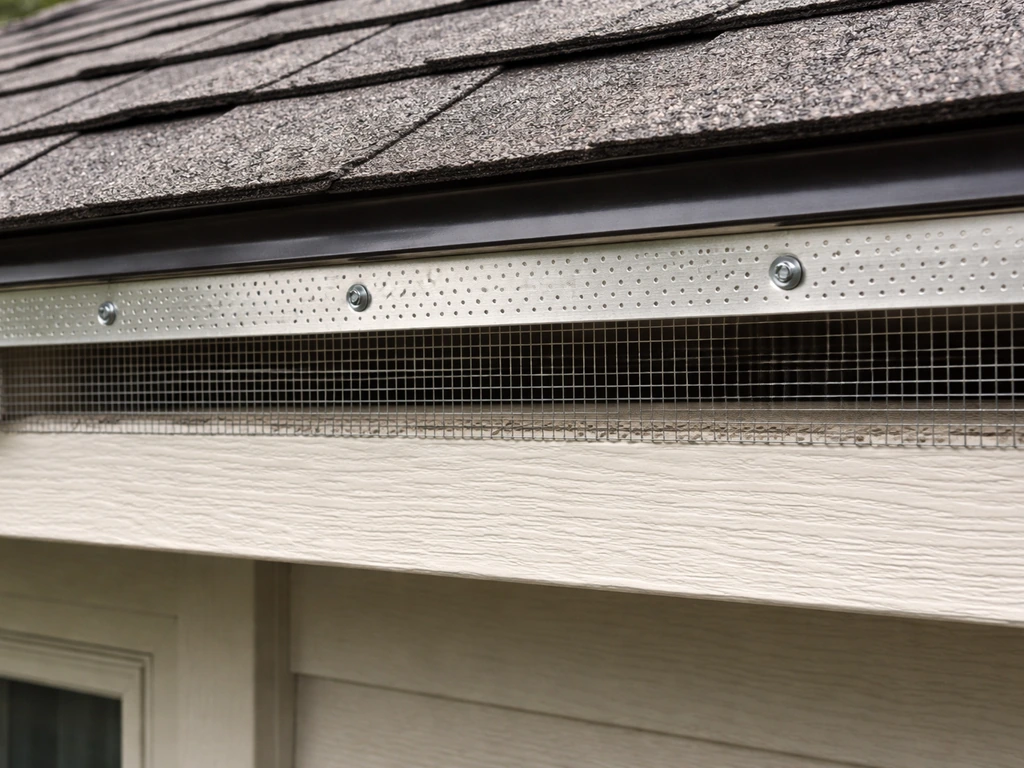
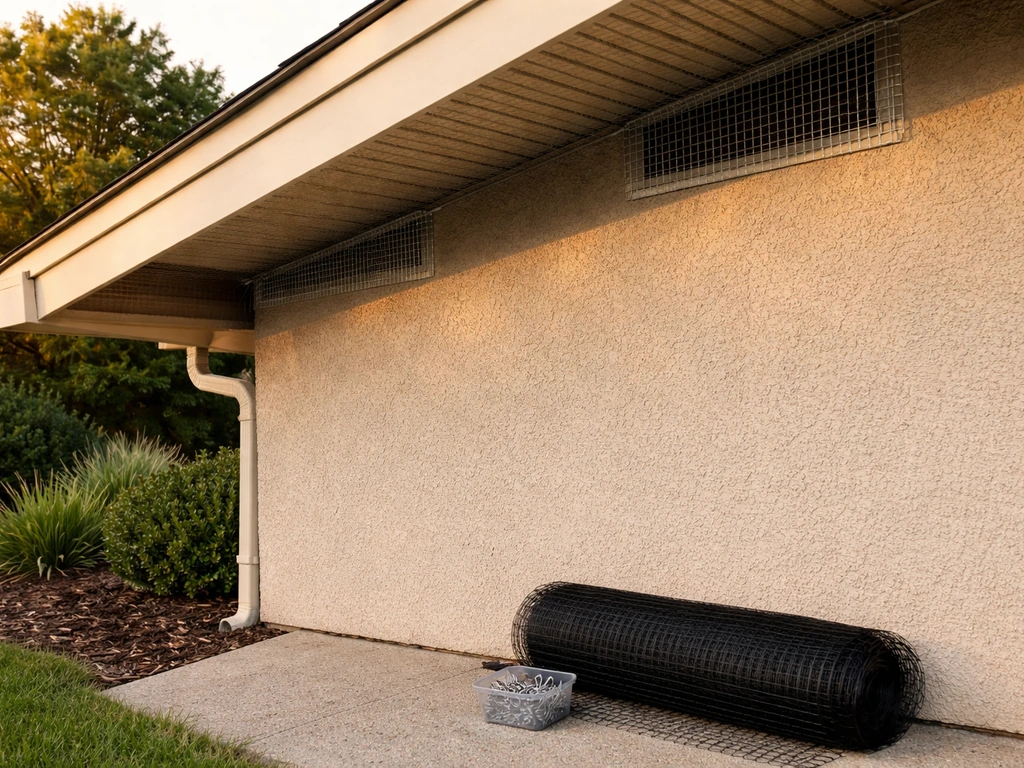
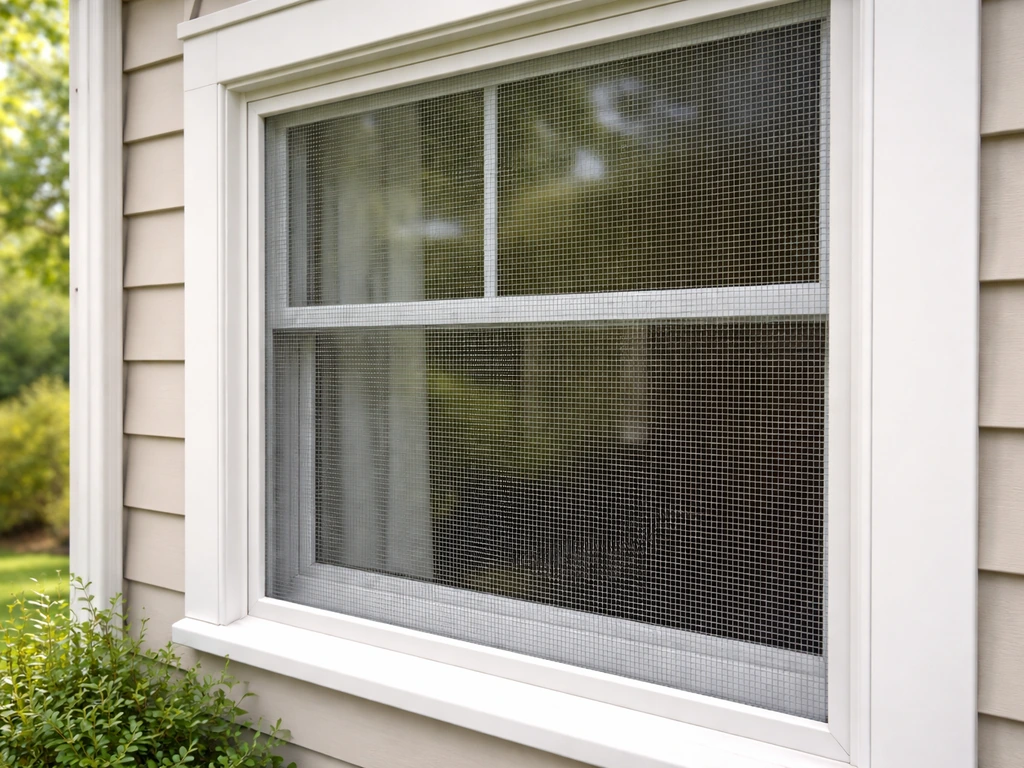
Mesh and hardware cloth installation (soffits, vents, eave gaps)
- Measure the opening accurately and cut mesh 1 to 2 inches larger on each side so you have material to fasten into solid wood or masonry rather than just the gap edge.
- Hold the mesh in place and mark fastener positions at 4 to 6 inch intervals around the perimeter.
- Drive screws or staples through the mesh into the substrate at each marked point. For masonry, use masonry anchors.
- Fold any exposed sharp cut edges back on themselves or cover with a bead of silicone caulk to prevent injury to birds, bats, or anyone working nearby.
- Check that there are no gaps at corners. Overlap mesh sections by at least 1 inch where pieces meet.
- For stainless-steel mesh systems on rough or uneven surfaces, a product like BirdMaster PermaMesh is designed to conform to irregular edges without tearing, which makes a better long-term seal.
Bird wire system installation (wider ledges and parapets)
Spring-tension wire systems involve setting posts at regular intervals along the ledge and stringing stainless-steel wire between them under tension so that birds cannot get a stable foothold. Post spacing is typically specified by the manufacturer (often every 3 to 5 feet, depending on the tension and bird species). Follow the manufacturer's template exactly: if posts are too far apart, the wire sags and birds land on it rather than being deterred by it. Wire systems are less visible than spike strips and work well on wide stone or concrete ledges where aesthetics matter.
Common installation mistakes to avoid
- Leaving gaps in coverage: even a 4-inch section without a spike or wire gives a pigeon room to land and work backward from there
- Not cleaning the surface before adhesive mounting: droppings or moisture will cause strips to fall off within weeks
- Using too few screws: the minimum is typically 3 screws per strip section; use more on windy or exposed locations
- Ignoring the area behind the strip: on a wide parapet or ledge, a single row of spikes at the front edge still leaves a landing zone at the rear
- Skipping cure time on adhesive: applying adhesive in cold or wet weather or not waiting the specified cure period is a common failure point
- Installing over active nests: this is both legally risky and will not work because the birds will push back against the barrier
Maintenance, inspections, and seasonal planning
A bird stop is not a set-and-forget fix. Physical systems degrade, get covered in debris, and can shift or detach over time. Building in a simple inspection routine makes the difference between a system that lasts a decade and one that fails quietly in year two.
Inspection schedule
- Spring (March to April, before nesting season): walk the perimeter and check every strip, mesh section, and wire for gaps, displacement, or debris accumulation. This is your most critical inspection window.
- Summer (July to August): mid-season check for any storm damage or sections that birds have worked loose
- Autumn (October to November): clear accumulated debris (leaves, twigs, feathers) from spike strips and mesh before winter; debris filling spike strips makes them flat landing platforms
- After any severe storm: inspect for dislodged strips, torn mesh, or broken wire tension
The seasonal timing matters for another reason: the typical migratory bird nesting window runs roughly May 15 through July 15, though this shifts by species and location. If you need to do any installation or modification work near potential nest sites, getting it done before mid-May is much simpler from both a legal and a practical standpoint. Nesting season is the wrong time to discover your bird stop has failed.
For long-term proofing, combine your bird stop installation with a broader approach to the building envelope: seal gaps in soffits, cap unused chimneys, install vent covers with fine-mesh guards, and check that roof-to-wall junctions are sealed. This is the same mindset as learning how to bird proof your roof, because fixing one entry point often isn’t enough bird stop installation. If you are wondering how to bird proof your house, start by sealing every likely entry point with the right bird stop for each roof area. For more on the key steps, see our guide on how to bird proof windows bird stop installation. Addressing just one entry point while others remain open means birds relocate rather than leave. This connects directly to the broader challenge of bird-proofing your house as a whole system, not just spot-treating individual locations.
Confirming the system is working
After installation, watch the previously affected areas for 2 to 4 weeks. A successful installation means no fresh droppings below the treated ledges, no birds perching in those spots, and no new nesting material appearing. If birds are still landing nearby or have shifted to an adjacent untreated spot, extend the coverage. As Bird-X's installation guidance puts it, if birds can still perch on any missed area, the entire program can fail and will need to be amended.
When to stop the DIY and call a professional
There are situations where doing this yourself is either too dangerous, legally complicated, or simply not going to work. Knowing the line before you cross it saves time, money, and potential legal trouble.
Safety situations that require a pro
- Any work on a pitched roof above single-story height without professional fall protection equipment and training
- Suspected structural damage from bird-related water intrusion or corrosion (get a roofer to assess before installing anything)
- Large infestations with heavy accumulations of droppings, which require professional biohazard clean-up before exclusion work
- Vents confirmed to have birds inside: as Critter Control notes, removal of birds from vents should be handled by a professional because of fire and health risks
Legal situations that require a wildlife professional
Under the Migratory Bird Treaty Act, it is illegal to destroy, move, or disturb a nest that contains eggs or chicks, or one that young birds are still dependent on, without a federal permit. The USFWS issues removal permits only in limited circumstances: when the nest is causing a direct human health or safety concern, or when the birds themselves are in immediate danger. This is not a technicality to ignore. If you disturb an active nest without authorization, you are taking on legal risk regardless of the inconvenience the nest is causing.
The guidance from the Wisconsin Humane Society adds another layer: even hazing techniques intended to encourage birds to relocate can cause parent birds to abandon nestlings, which may be inhumane and is potentially unlawful. The practical takeaway is this: if you find active eggs or chicks in a nest at your roof access point, stop, document the location, and call a licensed wildlife control professional. They can assess the situation, advise on timing, and if necessary, apply for the appropriate permit. Do not attempt to seal the entry point until you have confirmed the nest is empty and the young birds have fledged.
Decision framework: escalate or DIY?
| Situation | Recommended Action |
|---|---|
| Empty ledge or gap with no nest, eggs, or chicks | DIY bird stop installation is appropriate |
| Abandoned nest (no eggs, no activity for 2+ weeks) | Remove nest safely with PPE, then install bird stop |
| Active nest with eggs or chicks | Do not disturb. Call a wildlife professional. |
| Birds inside a vent or attic space | Call a wildlife professional before sealing |
| Work requires roof access above safe ladder height | Call a roofing or pest control professional |
| Heavy droppings accumulation (more than 1 inch depth) | Call a biohazard remediation service before any work |
| Unknown species (may be a protected or listed species) | Call your state wildlife agency or a licensed wildlife control operator |
When you do call a professional, give them as much detail as possible: the bird species if you can identify them, how long the problem has been active, which parts of the roof are affected, and whether you have seen any eggs or chicks. That information lets them prioritize the right approach immediately. For anything involving roof structural work alongside bird proofing, a roofer and a wildlife control operator working together is the most efficient path to a complete, legal, and durable solution.
FAQ
Can I install a bird stop if I see birds flying in and out of the roof right now?
Yes, but only once the area is confirmed safe. If birds are actively nesting, you need to wait until the nest is empty (eggs have hatched and chicks have fledged) or get professional help with permits. Sealing over an active nest can be both harmful and potentially illegal under federal rules.
Why do birds keep coming back even after I installed a bird stop?
A common mistake is leaving “near misses” untreated. Birds will often switch to an adjacent ledge, soffit gap, or vent until every landing and foothold point in the same zone is blocked. After installation, recheck within 2 to 4 weeks for droppings and any new nesting material along the treated and neighboring lines.
How often should I inspect and maintain a bird stop?
It depends on species and roof layout, but most systems are designed to stay in place through seasonal weather and debris cycles. For many installs, a practical check schedule is every 3 to 6 months for first-year performance, then at least once per year (after storms and before peak nesting season) to confirm it has not shifted, detached, or been buried by debris.
How do I know the bird stop I bought actually fits my roof’s specific gap?
You should treat a bird stop as a physical barrier, not a cover for a still-open entry. For example, on tile roofs, foam or rigid eave closure must match the tile profile and close the specific fascia gap. If the closure does not fit the curvature or leaves micro-gaps, birds can still wedge in and perch.
What causes wire bird systems to fail, and what’s the right fix?
If the wires are too loose or posts are spaced too far apart, birds can land on the wire instead of being prevented from getting footing. That is why manufacturers specify post spacing and tension. If you already installed one and see birds perching on the line, the fix is almost always to re-tension, adjust post spacing, or add additional coverage points, not to add deterrents on top.
Can I use the same bird stop products on solar panel undersides, or do I need solar-specific kits?
Not always. Spike strips, wire systems, and mesh can be effective on many rooflines, but solar panel undersides require solar-safe, non-penetrating kits designed for that specific setup. Improvised attachments near panels can damage components or create leaks, and some materials will not conform without leaving openings.
Do I need exclusion (bird stops), or are deterrents like tape and spikes always enough?
Deterrents can work temporarily, but they often fail when birds acclimate, especially for species that roost and return seasonally. Exclusion products prevent landing or entry physically, and that is usually more reliable for persistent roosting because it removes the “comfortable landing spot” rather than trying to scare it away.
Should I block only the exact spot where I see droppings, or check other roof areas too?
Generally, do not assume the problem is only at the eave. Birds commonly exploit multiple access points that align in height and shelter, like ridge areas, soffit gaps, louvered vents, and parapet ledges. A faster path to success is mapping all likely landing zones first, then blocking every access point in that same area so they cannot relocate.
What are the best signs that the bird stop installation worked?
After installation, you should not see fresh droppings directly under treated ledges, and you should not see birds perching in those same spots. Also watch for new nesting material appearing nearby, which is a sign of coverage gaps rather than a complete solution. If activity shifts to an adjacent untreated edge, extend coverage to that landing point.
When is the safest and easiest time of year to install a bird stop?
Yes, but plan your timeline. Installation or modifications should happen before the nesting window (often before mid-May, depending on location). Doing it during nesting season can trigger legal restrictions and complicate the process if birds are already using the site.
What should I do if I find an active nest in the area where the bird stop would go?
The safest approach is to stop work that could disturb a nest, document what you see, and contact a licensed wildlife control professional if there are eggs, chicks, or a nest being actively used at the access point. Professionals can advise on timing and, if necessary, obtain permits under limited health or safety circumstances.
Do bird stops work alone, or should I also seal other parts of the roof and walls?
A bird stop should be paired with building envelope sealing so you are not just preventing entry at one point. Focus on roof-to-wall junctions, soffit and vent openings, and capped chimneys, because birds often “relocate” to other unsealed entry gaps when one spot is blocked.
Next Articles
How to Bird Proof Your House: Step-by-Step Plan
Step-by-step, humane plan to bird proof your house, stop roosting fast, and prevent future entry with an inspection chec
How to Bird Proof Windows: DIY Steps and Long-Term Fixes
Humane DIY steps to stop birds hitting windows, seal gaps, block ledges, add screens and long-term fixes safely.
How to Bird Proof a Room: Humane Steps for Bedrooms and Indoors
Humane, step-by-step bird proofing for bedrooms: emergency steps, sealing entry points, cleanup, deterrents, and mainten