A bird stuck inside a wall cavity needs you to act quickly but calmly. The safest approach is to locate the entry point, seal off every other gap first, then use light and sound cues to guide the bird toward the one open exit you leave for it. If you can hear scratching or chirping but not see the bird, do not start tearing out drywall yet. Work the problem from the outside in, and you can usually resolve this within a day or two without harming the bird or wrecking your wall.
How to Get a Bird Out of a Wall: Safe Steps Today

Maya Carver
27 Apr 2026
Quick safety and assessment: what to do right now
Before anything else, take two minutes to assess the situation so you do not make things worse. Listen carefully to pinpoint where the sound is loudest. Scratching or fluttering that moves around suggests the bird is alive and active. Silence may mean it has found a way out already, or it is exhausted or injured.
- Stay calm and keep household pets and children away from the affected wall area.
- Put on gloves and a dust mask before opening any vents or access panels, especially in older homes where wall cavities can harbor debris or droppings.
- Use a flashlight and press your ear against the wall to narrow down the exact location.
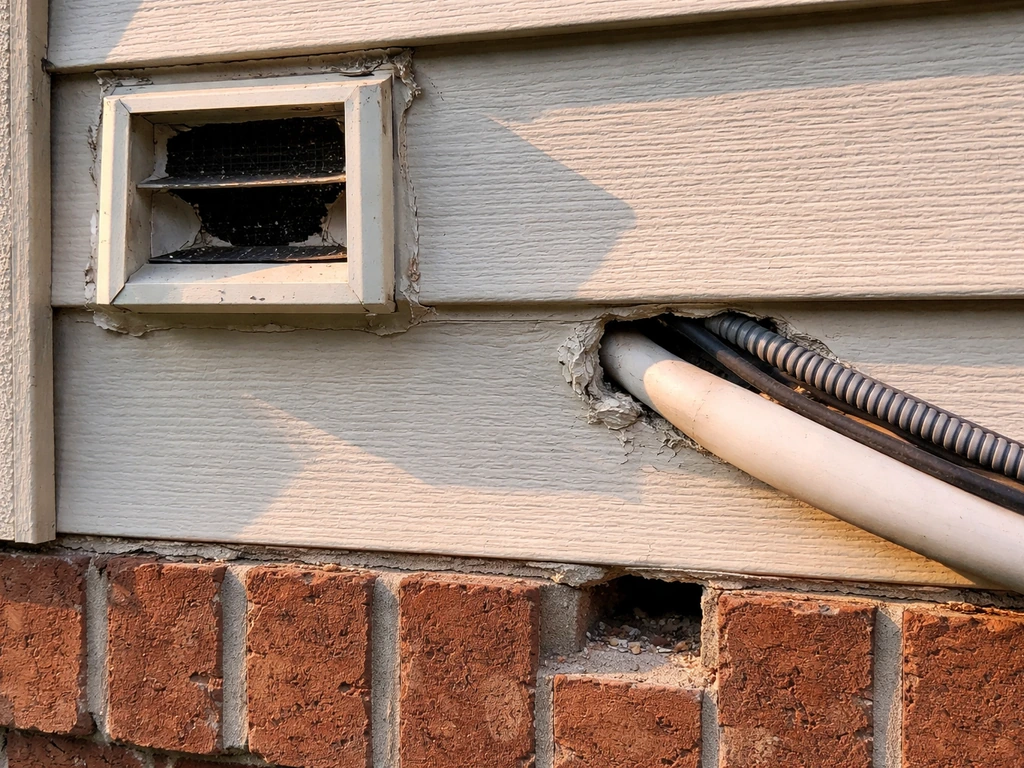
- Check the exterior of your home immediately for obvious gaps: open soffit vents, broken vent covers, gaps around pipes or conduit, loose siding, or open weep holes in brick.
- Photograph every potential entry point on your phone so you have a record to work from.
- Do not use smoke, chemical repellents, or poison. These are inhumane, often illegal, and will make the situation far worse if the bird dies inside the wall.
One critical question to answer before you do anything else: is it nesting season? In spring and early summer (roughly March through July in most of North America), there is a real chance the bird is not trapped but is actively nesting, and may have young inside. If you hear multiple birds or softer peeping sounds alongside adult chirps, stop and go straight to the legal and safety section below before proceeding.
Humane ways to encourage the bird out of the wall
Birds move toward light and away from enclosed darkness. That instinct is your best tool. The RSPCA recommends using a flashlight to attract a trapped bird toward an exit, which works just as well for wall cavities as it does for chimneys. The goal is to make the wall void feel hostile (dark and cramped) while making the exit path feel inviting (lit and open).
The light-guided exit method
- Identify the active entry point on the exterior (the gap the bird came through).
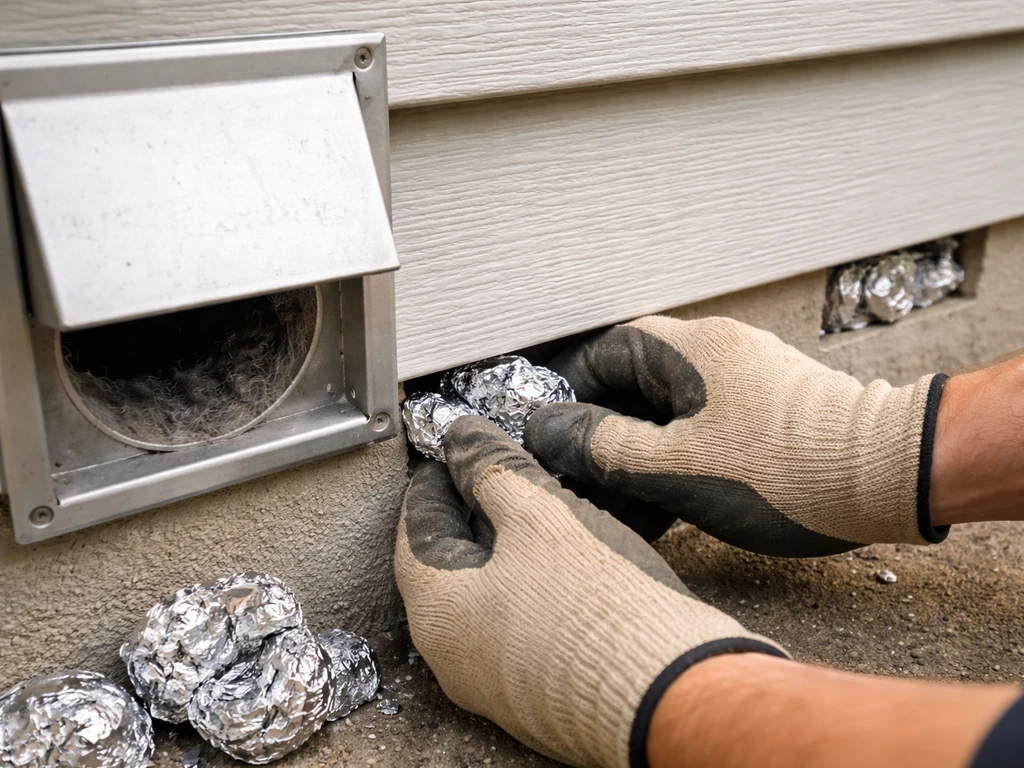
- Seal every other gap you can find on that wall section with temporary materials like crumpled newspaper stuffed loosely into openings or duct tape over vent covers.
- Leave the active entry hole as the only open path.
- Shine a bright flashlight directly into the entry hole from outside, angled so the beam lights the interior cavity. This signals to the bird that there is an open, lit escape route.
- Reduce interior light and noise near the wall to remove competing signals. Close blinds, turn off nearby TVs, and ask everyone to stay quiet.
- Wait. Give the bird at least a few hours undisturbed. Check from outside for signs of exit (feathers near the opening, no more sound from inside).
If the entry point is a vent or accessible opening
Dryer vents, bathroom exhaust vents, and weep holes in brick are the most common bird entry points into wall cavities. If the opening is accessible and the bird is near it, you can try carefully removing the vent cover and holding a dark towel over the hole except for one small lit gap at the edge. The bird will often move toward the light and can be gently guided outside. Never reach in and grab the bird unless it is clearly incapacitated and you are wearing gloves. Handling a live, panicked bird risks injury to you and the bird.
Tools, temporary barriers, and stopping re-entry
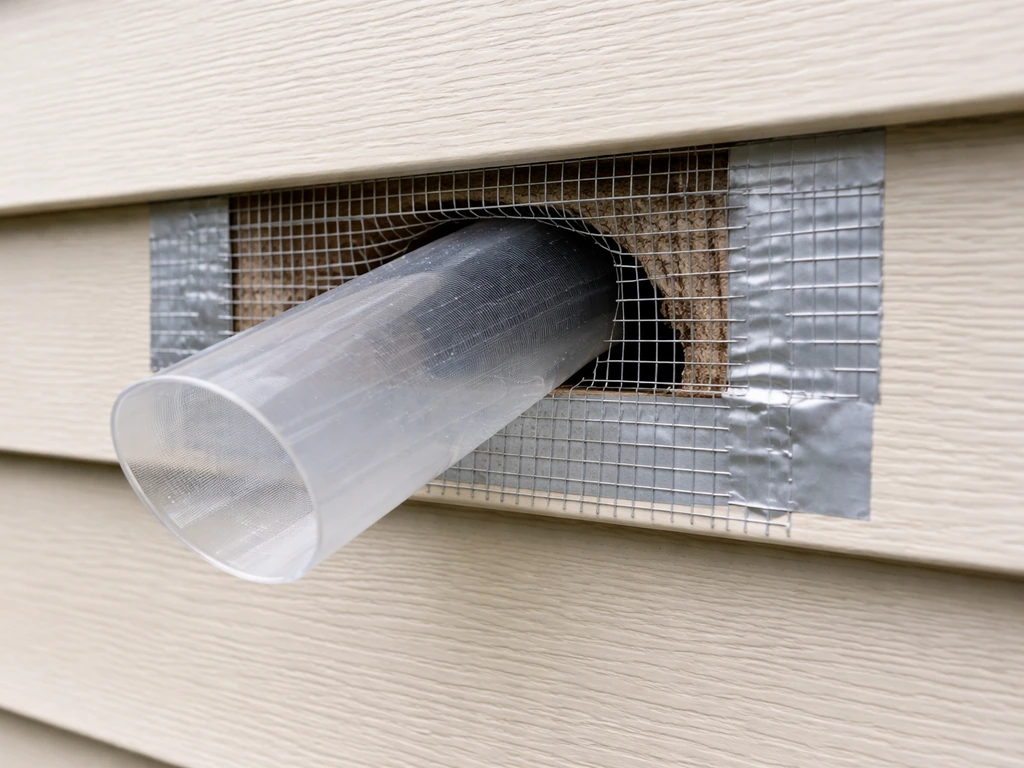
Once you have confirmed the active entry point and sealed the others temporarily, your most effective tool for getting the bird out and keeping it out is a one-way exclusion door. This is a simple device (you can buy pre-made versions or build a cone from hardware cloth) that fits over the entry hole and allows the bird to push through from the inside but not return from the outside.
According to wildlife management guidance from both the Washington Department of Fish and Wildlife and Maine Inland Fisheries and Wildlife, a one-way door should stay in place for at least seven days, and longer during cold or rainy weather when birds move less. Do not remove it after one day just because things seem quiet. After seven days with no sound from inside, check for external signs of activity like scratch marks or fresh droppings near the door. When you are confident the bird has exited, remove the device and immediately seal the opening permanently.
What you'll need
- Flashlight or headlamp
- Heavy-duty gloves and N95 dust mask
- One-way exclusion funnel or hardware cloth cone (1/4-inch or 1/2-inch mesh)
- Crumpled newspaper or burlap for temporary gap stuffing
- Duct tape or painter's tape for temporary vent covers
- Wire mesh or galvanized hardware cloth for permanent sealing later
- Exterior-grade caulk or expanding foam for small gaps
- A ladder rated for your roof or wall height, with a spotter if working above ground level
A practical verification trick from Maine IFW: before installing the one-way door, lightly stuff the entry hole with wadded newspaper or loose burlap and check it daily. If the stuffing is displaced, the entry is active. Once you confirm activity, swap the stuffing for the one-way door. This saves you from installing exclusion hardware on a hole the bird is not actually using.
If the bird won't leave: troubleshooting and when to escalate
Most birds will exit within 24 to 48 hours if you give them a clear, lit escape route and remove competing exits. If the bird seems to be stuck, use the same approach for getting it out of rafters by creating a clear, lit path and removing competing exits clear, lit escape route. But several things can stall the process.
| Situation | What it likely means | What to do |
|---|---|---|
| No sound for 24+ hours after sealing | Bird may have exited already, or is dead | Wait one more day, then check outside for the bird. If no bird found and smell develops within days, the bird likely died inside. |
| Continuous loud scratching and flapping | Bird is alive but panicked and trapped | Recheck that the exit is truly open and lit. A single blocked inch of the exit path can stop the bird. |
| Soft peeping in addition to adult sounds | Nestlings are present | Stop all exclusion work immediately. Do not seal or install one-way doors. Contact a licensed wildlife rehabilitator. |
| Multiple birds heard in different spots | A colony or multiple entry points | Do a full exterior inspection. Seal secondary holes first, identify all active entries, and consider calling a professional for multi-entry situations. |
| Bird visible but won't approach the exit | Exhausted, injured, or disoriented | Give it more time in quiet darkness. If no movement after 12 hours, call a local wildlife rehabilitator for handling guidance. |
| Unpleasant smell from wall but no sound | Bird has died inside the wall | You may need to open the wall to remove the carcass to prevent fly infestation and odor damage. Call a pest professional or wildlife removal service. |
Clear signs it's time to call a professional
- You hear or see nestlings (baby birds) in the wall cavity.
- The bird has been silent for more than 24 hours and you cannot confirm it has exited.
- The entry point is at roof height, near electrical wiring, or adjacent to a gas appliance where DIY access creates a safety risk.
- You have more than one active entry point and multiple birds involved.
- You suspect the bird is a protected species (see the legal section below).
- A smell is developing, indicating the bird may have died inside.
When you call a wildlife professional or licensed pest control operator, give them the location of the entry point, what sounds you heard and when they stopped, whether it is nesting season, and the species if you can identify it. That information helps them arrive prepared and saves time.
Find and seal the entry points: DIY vs. professional exclusion
Once the bird is out, your job is to make sure no bird can get back in through that same hole or any gap near it. The Washington Department of Fish and Wildlife's eviction protocol is clear on this: seal all secondary entry points first, then deal with the active one last. Do not close the primary entry while the bird is still inside.
Where birds most commonly enter wall cavities
- Unscreened or broken dryer, bathroom, and kitchen exhaust vents
- Gaps where pipes, conduit, or cables pass through exterior walls
- Open or damaged weep holes in brick veneer
- Gaps at roofline where fascia boards have pulled away from soffit
- Loose or missing J-channel on vinyl siding corners
- Gaps around window and door frames where caulk has failed
- Open foundation vents near ground level
DIY sealing: what works
For gaps under half an inch, exterior-grade silicone caulk is fine. For gaps between half an inch and two inches, use galvanized hardware cloth cut to size and secured with roofing screws or staples, then caulked around the edges. For larger openings like vents, replace the vent cover with a bird-proof louvered or spring-loaded cover specifically rated to exclude birds. These are available at most hardware stores and are a worthwhile investment for any exhaust vent on an exterior wall.
DIY exclusion is practical for ground-level and reachable second-story gaps. If the entry is at the roofline, near a chimney, or requires working on a steep pitch, hire a professional. The fall risk from roofwork is not worth managing alone. A wildlife exclusion contractor or roofer can seal those areas safely and often spot additional gaps you would miss from the ground.
What to avoid when sealing
- Do not use expanding foam alone as the only barrier on vent openings. Birds and rodents can chew through it.
- Do not seal active vents (dryer, bathroom exhaust) completely. You need airflow. Install a proper bird-proof vent cover instead.
- Do not seal while the bird is still inside the cavity. Confirm exit first.
- Avoid sealing during very cold or wet weather when the bird is less likely to have exited.
Seasonal prevention and long-term proofing plan
Birds explore nesting sites starting in late winter, often as early as February in warmer climates. That is the best window to do a full exterior inspection and seal any gaps before they become occupied nests. Once a nest is active, your options narrow significantly for legal and humane reasons.
| Season | Priority task | Notes |
|---|---|---|
| Late winter (Feb–Mar) | Full exterior inspection and gap sealing | Best time to act. No active nests yet. Seal all openings before birds scout. |
| Spring (Apr–Jun) | Monitor only. Do not disturb active nests. | Nesting season. Check vent covers visually. Do not seal occupied entries. |
| Summer (Jul–Aug) | Post-nesting inspection after fledglings leave | Once young have fledged, seal entry points before fall migration birds seek roost sites. |
| Fall (Sep–Nov) | Second gap inspection and sealing pass | Migratory birds and starlings seek winter roost sites in walls. Good window for exclusion. |
| Winter (Dec–Jan) | Check and maintain vent covers and mesh | Verify previous seals are intact after freeze/thaw cycles. Replace any cracked caulk. |
A simple annual maintenance schedule goes a long way. Walk the exterior perimeter in late February and late August each year with a flashlight and your phone camera. Look at every vent, every pipe penetration, every soffit joint, and every point where two different wall materials meet. It takes about 30 minutes for an average home and can prevent hours of bird-in-wall problems. If you manage a larger facility, assign this check to your maintenance calendar twice a year.
Birds entering wall cavities often share entry routes with birds that find their way into attics or basements. If you have dealt with a bird in the wall, do a pass through your attic space and check your basement vents at the same time. If you also have a bird trapped in the attic, use the same humane, one-way escape approach and then seal the entry points afterward how to get a bird out of the attic. If you are dealing with a bird in your basement, the key steps are the same: assess first, confirm the entry point, then guide it out safely. If you are dealing with a bird in the wall, the key steps are the same, including when you need to know how to get a bird out of your basement, assess first, confirm the entry point, then guide it out safely. Catching all the gaps in one inspection saves repeat trips.
Legal and safety considerations for protected or nesting birds
This is not optional reading. Mishandling a protected bird or destroying an active nest can result in federal or local fines, and the rules are more protective than most homeowners realize.
In the United States
The Migratory Bird Treaty Act (MBTA) protects the vast majority of wild bird species found in the US, including common ones like house sparrows (actually not covered), European starlings (not covered), and rock pigeons (not covered), but also nearly every native songbird, woodpecker, swift, and swallow you are likely to encounter in a wall cavity. Under U.S. Fish and Wildlife Service guidelines, you can remove a migratory bird from inside a building without a permit when the bird is disrupting normal use, creating a health or safety risk, damaging property, or is at risk of injury from being trapped. This covers most standard bird-in-wall situations. However, if you find an active nest with eggs or live nestlings, the protections become much stricter. The FWS 2025 nest memorandum reinforces that active nests are protected under the take prohibition, meaning you generally cannot destroy an occupied nest without specific authorization. When in doubt, call your regional USFWS office or a licensed wildlife rehabilitator before taking action.
In Canada and the UK/EU
Canada's Migratory Birds Convention Act provides similar protections for migratory birds and their nests. In the UK, the Wildlife and Countryside Act 1981 protects all wild birds, their eggs, and active nests. Species on Schedule 1 (such as peregrine falcons or barn owls) receive enhanced protection, and disturbing them even unintentionally near an active nest can require an individual licence from Natural England or the relevant devolved authority. In the EU, the Birds Directive prohibits deliberate significant disturbance of wild birds, particularly during breeding and rearing periods. If you are in the UK or EU and think the bird in your wall might be a Schedule 1 or similarly protected species, stop all exclusion work and contact your national wildlife authority.
Practical rules to keep yourself on the right side of the law
- Never destroy an active nest that contains eggs or live young, regardless of where it is located.
- Never use poison, glue traps, or lethal methods on wild birds without a specific permit.
- If you cannot identify the species and it is nesting season, treat the bird as protected until you confirm otherwise.
- Document your situation with photos and dates in case questions arise later.
- When calling a wildlife professional, confirm they are licensed to handle the specific species involved.
- If the bird is injured, contact a licensed wildlife rehabilitator rather than handling it yourself. The RSPCA (UK), your local Humane Society (US), or a rehabilitator directory can point you to the right contact.
The bottom line is that you have real legal authority to remove a trapped, non-nesting bird from inside your wall in most jurisdictions, and the humane exclusion methods described in this guide align with what wildlife agencies recommend. Where the law gets complicated is around active nests and Schedule 1 or federally listed species. When there is any doubt, a five-minute call to a local wildlife rehabilitator or your state wildlife agency will give you a clear answer and keep you protected.
FAQ
What should I do if I stop hearing the bird before I find the entry hole?
If you hear no movement or chirping for several hours, do not assume the bird is gone. It may have already exited, but it can also be quiet due to stress, cold, or being injured. Re-check the loudest sounding area with your ear and a flashlight, then verify at the likely entry point by using the one-time newspaper or burlap “stuffing” test before you install a one-way door.
Can I grab the bird if it is inside the wall but seems weak or panicked?
Use gloves and avoid direct contact if the bird is not clearly incapacitated. If it looks stunned, bleeding, or cannot perch, place a clean towel over your hands and pick it up gently, then put it in a ventilated box. Regardless of condition, you should switch to wildlife professional help promptly, because an “apparently okay” bird may still be injured and require rehabilitation.
Do I need to identify the bird species before I call for help?
Even if you do not see the species, you can still call a wildlife professional using sound details. Describe the timing, whether you heard scratching, fluttering, or repeated chirps, and whether there were multiple birds. If you can safely photograph droppings or note the size and color range from any brief glimpses near vents, include that too to speed up correct identification and exclusion planning.
Is it safe to seal the wall opening as soon as I think the bird is gone?
Do not run sealing or exclusion work from the inside wall. When you seal the main entry while the bird is still active, you can trap it deeper in the cavity, causing death, odor, and additional damage. Follow the same logic as the guide: seal secondary gaps first, leave the primary route open using a one-way door, then permanently seal only after you confirm exit.
How long should I wait during cold or rainy weather before removing the exclusion?
Winter and rainy stretches can slow movement, so quiet does not always mean “cleared.” Keep the one-way exclusion in place longer than the baseline when temperatures are cold, storms are frequent, or the cavity is hard to heat with indoor air. If you are unsure, extend the waiting period rather than removing the device early, then verify with external signs and your stuffing test.
Can I clean up droppings and nesting material right away?
Bird droppings are a health issue and can carry pathogens. Avoid sweeping dry waste and avoid blowing dust. Use damp paper towels or a vacuum with a HEPA filter after the bird is out and the cavity is confirmed empty, then dispose of materials securely. If you find heavy debris or nesting material, consider professional cleanup.
Can I patch the drywall or repair the vent after installing the one-way door?
Yes, but only after you confirm the bird has left. For example, you can install the one-way door, then wait the recommended period, verify with external signs, and only then seal permanently. If you need to access the area for safety reasons while the bird is still inside, do temporary protection that does not block the exit path.
What if the bird is gone from the original hole, but I see signs near a different gap?
A “false alarm” can happen if the bird used a different route than you expected, or if it moved into another cavity. If there is no sound after the waiting period but you find fresh scratch marks, new droppings, or displaced stuffing at an adjacent gap, assume there may be more than one entry. Re-locate and re-test, then exclude all active points in the correct order.
What should I do if the entry point is near the roofline or chimney?
If the entry is at a roof edge or chimney chase, it is often unsafe and can disturb protected birds if a nest is present. Instead, focus on safe indoor actions like lighting cues if accessible, then call a wildlife exclusion contractor or roofer for safe, targeted sealing. This avoids falls and reduces the chance of opening up hidden areas that you cannot fully check.
How exactly should I run the newspaper or burlap stuffing verification test?
For the stuffing test, use loose wadded newspaper or burlap that you can remove easily. Check daily and stop once you see displacement, that confirms activity. Do not compress stuffing tightly, because you want clear evidence of movement rather than accidentally creating an airtight block that changes bird behavior.