If birds are roosting, nesting, or perching on your building and you want them gone safely and legally, here is exactly what to do. The process has a clear order: confirm where and why they are using your building, stop access humanely, clean up safely, and then seal things up so they do not come back. Skipping steps, especially cleaning before sealing or sealing before birds have left, creates bigger problems. This guide walks you through the whole thing from today's quick actions to a seasonal prevention plan.
How to Get Rid of Bird Roosting Around Your Building

Maya Carver
21 Apr 2026
Why birds pick your building and keep coming back
Birds are not random. When they choose a spot on your building, it is because that spot offers something useful: shelter from wind and rain, warmth from sun or exhaust vents, a safe perch above predators, or easy access to food nearby. Once a bird uses a spot a few times, it becomes a habit. Other birds notice and join in. That is how a single pigeon on a parapet turns into a colony under a solar panel within a season.
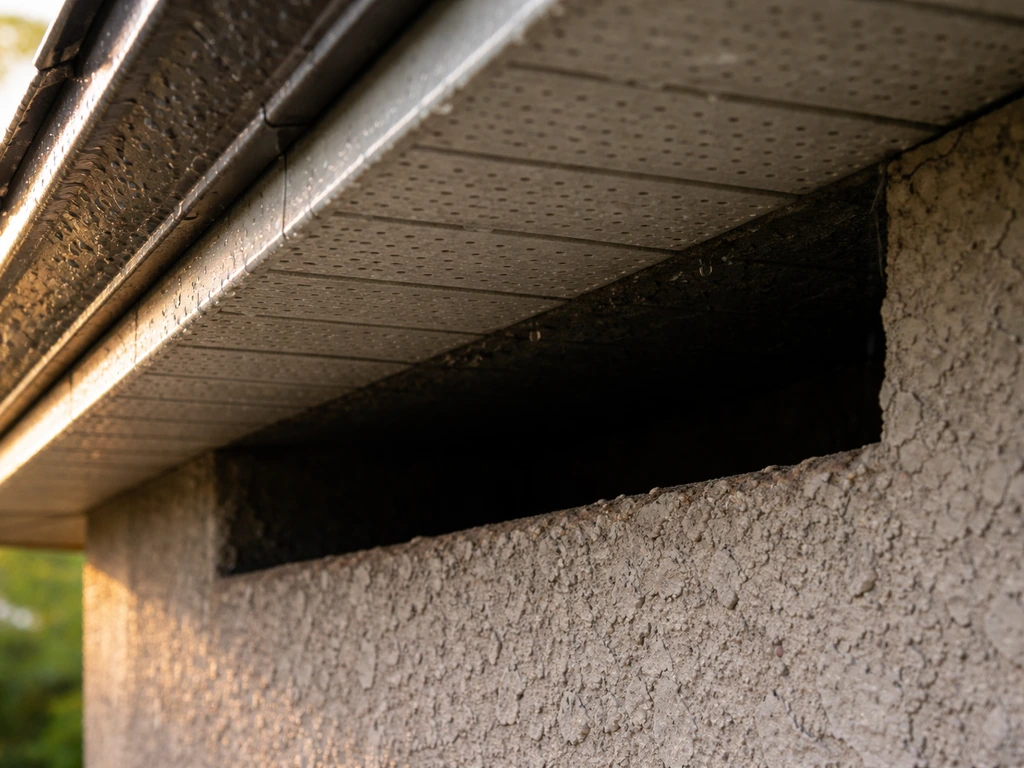
The most common roosting and nesting spots on buildings include: open soffit gaps, ridge vents, gable vents, HVAC intake openings, spaces behind gutters, under eaves, inside open pipe ends, behind signs or utility boxes, and in attic spaces accessed through broken fascia or damaged screens. Flat rooftops with parapet ledges are especially popular for pigeons and gulls because they mimic natural cliff faces.
Signs that birds have established a regular pattern on your building include repeated droppings on roof edges, parapets, windowsills, or signage. White or grey staining that looks like a splash pattern directly below a ledge or vent is a reliable indicator. You may also notice nesting debris (twigs, feathers, plant material), unusual smells coming from a vent or attic, or audible chirping/fluttering inside a wall or ceiling cavity. Surface damage to rooflines and gutters, including blocked downspouts from nest material, is another tell.
What to do right now, today
Before you touch anything, check whether an active nest is present. An active nest is one that contains eggs or live chicks. Under the U.S. Migratory Bird Treaty Act (MBTA), it is illegal to disturb an active nest of a protected migratory bird without a federal permit. Most common birds, including swallows, sparrows, starlings, and pigeons (with some exceptions), fall under MBTA jurisdiction. If you see eggs or chicks, stop, mark the area, do not touch anything, and skip to the professional section at the bottom of this article.
If there is no active nest and birds are simply roosting or perching, here are your immediate actions:
- Put on gloves and an N95 respirator before getting close to any droppings or nesting material.
- Photograph the roosting area from a safe distance to document droppings patterns and entry points before disturbing anything.
- Remove any food sources nearby: unsecured trash, open compost, spilled bird seed, or pet food left outside.
- Use visual deterrents immediately: hang reflective tape, install predator decoys (owl or hawk silhouettes), or use bird distress call speakers in the area to interrupt the habit while you plan next steps.
- If birds are accessing an opening like a vent or gap, do NOT seal it yet. First confirm no birds are inside, then install a one-way exclusion door or temporary mesh that allows birds out but not back in.
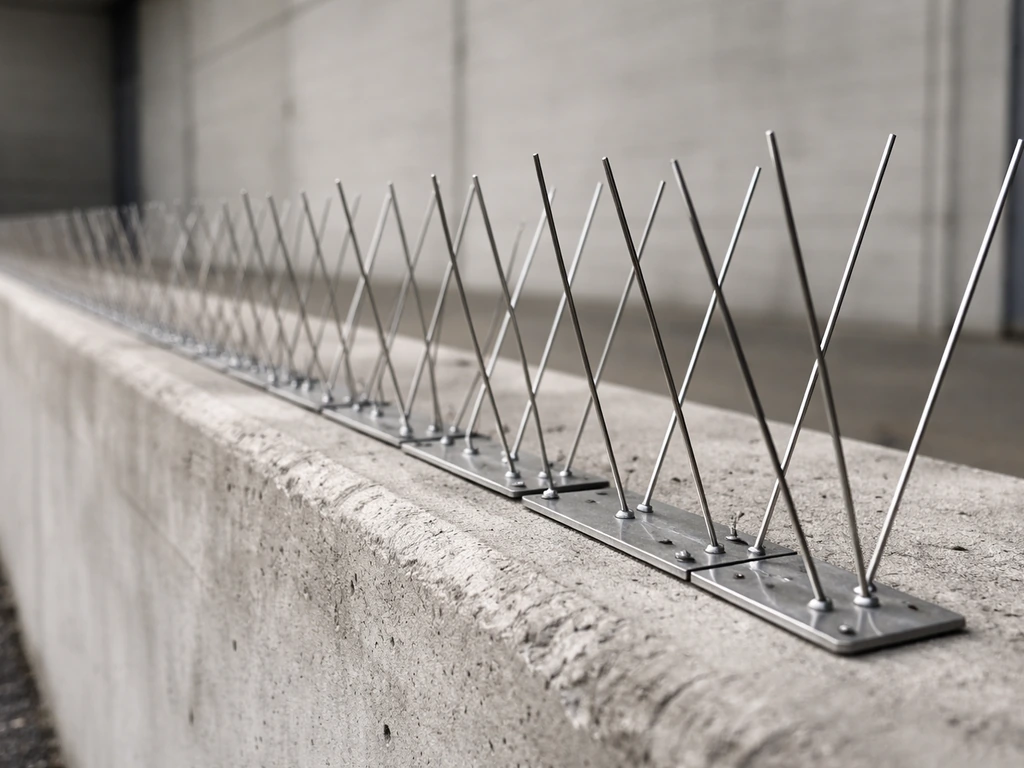
- Block off perching surfaces temporarily using physical barriers like plastic spike strips (available at hardware stores) on ledges and sills to discourage landing while you arrange permanent solutions.
The goal today is to disrupt the habit and prevent re-entry without trapping birds inside and without touching active nests. Everything else is a longer-term fix.
Finding every access point: your inspection checklist
A thorough inspection is the most important step most people skip. Blocking one gap while three others remain open wastes time and money. Walk the entire perimeter of the building at ground level first, then inspect from a ladder or rooftop if it is safe to do so. Always use proper fall protection on rooftops.
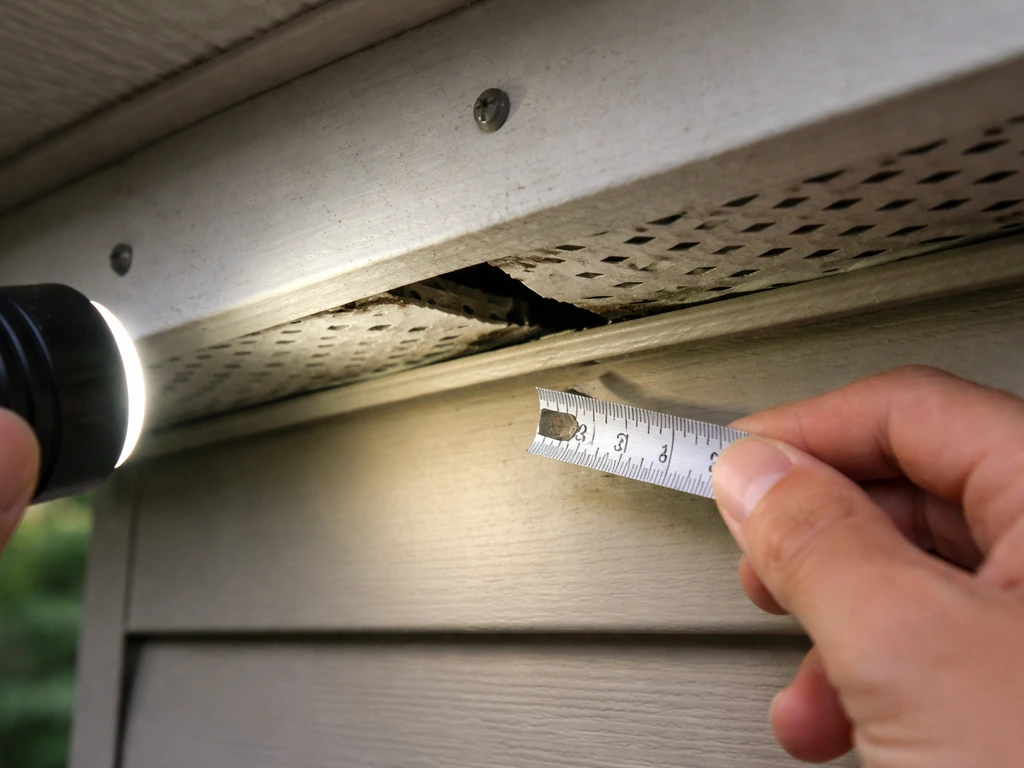
- Soffit panels: look for gaps, loose sections, or holes larger than half an inch
- Fascia boards: check for rot, cracks, or separations where fascia meets roofline
- Ridge vents and gable vents: confirm that screens are intact with no tears or missing sections
- HVAC and dryer vents: verify that vent covers have functional flaps and no damage
- Pipe openings: check open ends of conduit, downspouts, and utility pipes that are not capped
- Behind signs, utility meters, and junction boxes: birds nest in these cavities regularly
- Solar panel gaps: the underside of solar arrays is a prime nesting site
- Roof drains and gutters: check for nesting material blocking drains and for gaps at gutter hangers
- Eave gaps: any space wider than half an inch where a roof meets a wall can be an entry point
- Chimney openings: unscreened chimney flues are common nesting sites for chimney swifts and starlings
Mark every gap and opening on your photograph or a simple building sketch. Prioritize active access points, the ones with fresh droppings below them or visible nesting material, because these are being used right now. For each gap, note whether it is an entry point birds are going through or just a perching/ledge spot they land on. The fix is different for each.
Humane exclusion: what to do before and after birds leave
The number one mistake in bird exclusion is sealing an opening while birds are still inside. A trapped bird will die, create a significant odor and pest problem, and may lead to legal liability if it is a protected species. The right sequence is: encourage birds to leave, verify they have, then seal permanently.
One-way exclusion doors
For openings birds are actively using to get inside the building (attic spaces, wall cavities, under eaves), install a one-way exclusion device over the opening. These are simple funnel or flap devices that allow a bird to push out but not push back in. Leave the device in place for at least seven days to ensure all birds have exited. In colder months or periods of low activity, leave it longer. After seven or more days with no observed bird movement through the device, remove it and seal the opening permanently with hardware cloth (half-inch galvanized mesh) or a purpose-made vent cover.
Exclusion netting
For large open areas like the underside of rafters, loading dock ceilings, or open warehouse bays, exclusion netting is the most effective long-term solution. Heavy-duty polyethylene netting in 19mm to 50mm mesh sizes (depending on the target bird species) is installed taut across the space so birds cannot access roosting surfaces. Netting should be inspected every six months for tears or sagging sections where birds can push through.
Physical deterrents for ledges and flat surfaces
For perching and roosting on ledges, sills, parapets, and signs, physical spike strips are the most durable option. They do not harm birds but make landing uncomfortable. Stainless steel spikes outlast plastic versions significantly in outdoor conditions. Bird wire systems (stainless wire strung on spring-loaded posts) are a less visible alternative that works well on narrow ledges. Gel repellents also exist but tend to collect debris and feathers and need frequent reapplication, so they are a short-term tool at best.
Visual and audio deterrents
Visual deterrents like reflective tape, predator decoys, and laser systems work better when combined with physical barriers, not used alone. Birds habituate to static deterrents quickly, sometimes within days. Move decoys frequently (every two to three days) and use multiple deterrent types together. Automated distress call speakers or predator call speakers are more effective than static decoys for larger open areas like flat rooftops, but neighbors and noise ordinances may limit their use.
| Method | Best For | Durability | Cost Range | Key Limitation |
|---|---|---|---|---|
| One-way exclusion door | Active entry points into building | Temporary (remove after 7+ days) | Low ($10–$40) | Must be monitored; not a permanent seal |
| Hardware cloth / mesh sealing | Permanently closing gaps after exclusion | High (10+ years) | Low ($0.50–$2 per sq ft) | Requires proper installation to stay secure |
| Exclusion netting | Large open areas, rafters, dock ceilings | High (5–10 years) | Moderate ($1–$4 per sq ft) | Installation can require scaffolding |
| Spike strips (stainless steel) | Ledges, parapets, sills, signage tops | High (10+ years) | Low–Moderate ($20–$60 per 10 ft) | Ineffective on wide flat surfaces |
| Bird wire systems | Narrow ledges, low-visibility installs | High (8–12 years) | Moderate ($3–$7 per linear ft) | Requires tensioned posts; professional install recommended |
| Visual/audio deterrents | Large open areas, short-term disruption | Low (birds habituate quickly) | Low ($15–$200) | Must be rotated; not a standalone solution |
The most effective approach combines physical exclusion at entry points with physical deterrents on perching surfaces and removes all food and water attractants from the area at the same time. Using multiple methods at once significantly reduces habituation.
Cleaning up droppings and nesting material safely
Bird droppings are a genuine health hazard. blank" rel="noopener noreferrer">Large accumulations of dried droppings can harbor Histoplasma capsulatum, the fungal pathogen responsible for histoplasmosis, a respiratory infection that can be serious. Droppings also carry avian influenza risk and a range of other pathogens. The danger is greatest when droppings are disturbed and dry particles become airborne, so how you clean matters as much as whether you clean. CDC/NIOSH also emphasizes that cleanup or disruption of large accumulations of bird or bat droppings can create an aerosol exposure pathway, so respiratory protection may be needed for dust exposure scenarios blank" rel="noopener noreferrer">when droppings are disturbed and dry particles become airborne.
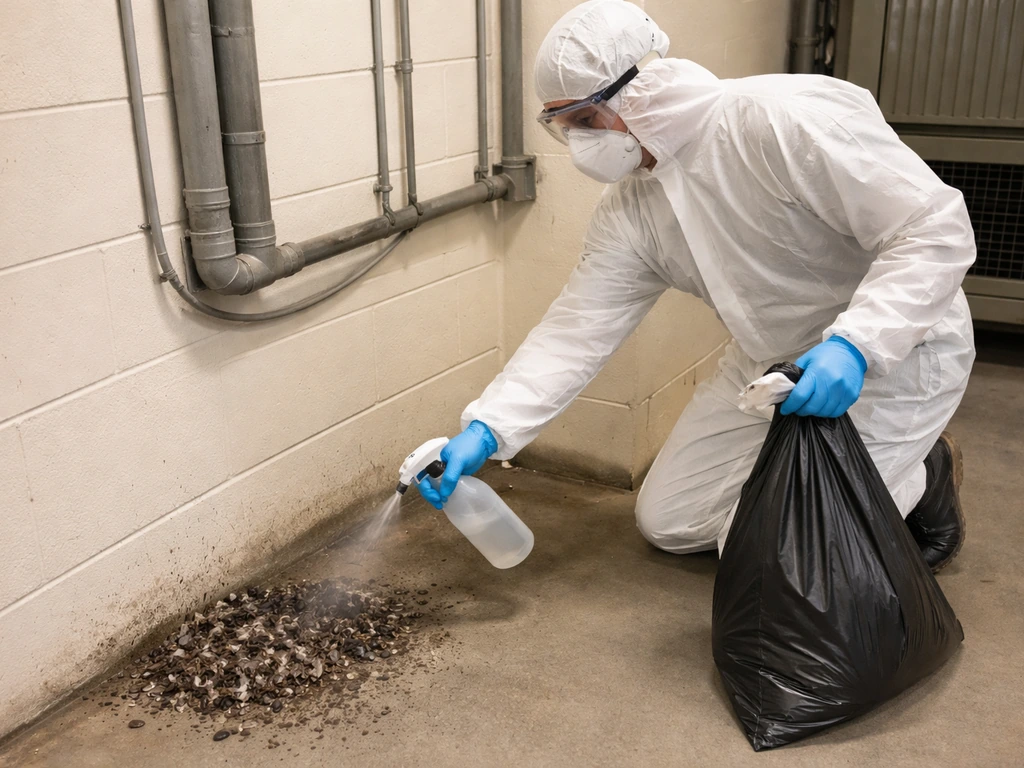
PPE you need before you start
- N95 respirator at minimum; for large accumulations (more than one cubic foot of material), upgrade to a half-face respirator with P100 filters
- Safety goggles or full face shield
- Disposable coveralls or clothes you can immediately bag and wash at high temperature
- Nitrile or rubber gloves
- Disposable boot covers or rubber boots you can disinfect afterward
Step-by-step cleanup process
- Ventilate the area: open windows and doors or set up a fan exhausting outward before you start. Never dry sweep or use a leaf blower on droppings.
- Wet the material first: lightly mist droppings and nesting debris with a 10% bleach solution or an EPA-registered disinfectant before disturbing them. This prevents dry particles from becoming airborne.
- Scoop and bag: use a damp cloth, damp mop, or damp paper towels to collect material and place it directly into heavy-duty plastic bags. Double-bag everything.
- Disinfect surfaces: apply disinfectant to all contaminated surfaces and allow dwell time as specified on the product label.
- Dispose of bags in sealed outdoor trash immediately.
- Remove and bag disposable PPE before leaving the cleanup area.
- Wash hands and any exposed skin thoroughly with soap and water.
For very large accumulations (attics, warehouses, or long-term roost sites with deep deposits), professional remediation is the safer choice. The labor cost is worth it given the respiratory disease risk involved. Do not tackle large-scale attic contamination as a DIY project.
Your DIY prevention plan by season
Timing matters a lot with bird control. The worst thing you can do is start a prevention project in spring when nesting is already underway. The best time to do exclusion work is late summer through early winter, after nesting season has ended and before the next one begins. Here is a simple seasonal schedule to follow every year.
| Season | What Birds Are Doing | What You Should Do |
|---|---|---|
| Late Summer (Aug–Sep) | Fledglings leaving nests; breeding season winding down | Best time for exclusion: install one-way doors, seal gaps, install netting and spikes after confirming nests are empty |
| Fall (Oct–Nov) | Birds seeking warm winter roost sites | Complete all sealing and exclusion work; inspect and repair any deterrents installed earlier in the year |
| Winter (Dec–Feb) | Roosting activity highest in sheltered spots; no active nests | Inspect for new access points opened by winter weather damage; maintain and clear gutters of debris |
| Early Spring (Mar–Apr) | Nesting season begins; birds scouting and building nests | Do NOT start new exclusion projects near potential nest sites; add visual deterrents in open areas to discourage scouting; document activity for post-nesting work |
| Late Spring/Summer (May–Jul) | Active nesting; eggs and chicks present | Avoid any disturbance near nests; focus on areas with no active nests only; plan your fall exclusion project |
If you are a facility manager handling a large building, build an annual bird control inspection into your fall maintenance schedule alongside gutter cleaning and roof inspections. That one habit will prevent most bird infestations before they start. For related problems like birds on specific building features or targeted species, some of the same seasonal timing rules apply, so it is worth reviewing guidance on specific bird types when dealing with a persistent species.
When to stop DIY and call a professional
There are situations where DIY is not the right call, and pushing ahead can create legal exposure or make the problem significantly worse. Here is when to pick up the phone instead of the caulk gun.
Active nests with eggs or chicks
If you find an active nest, stop all work in that area immediately. Under the MBTA, removing or disturbing an active nest of a protected migratory bird without a federal permit is a federal offense. A licensed wildlife control professional or a USDA Wildlife Services agent can assess whether a depredation permit applies to your situation or whether the nest qualifies for removal under the MBTA's limited no-permit exceptions (which generally apply only in narrow circumstances involving health and safety inside occupied structures). Do not assume you qualify for an exception without professional confirmation.
Protected or unusual species
Chimney swifts, barn swallows, and purple martins are common building-nesting birds that are fully protected under the MBTA and cannot be removed without a permit under virtually any circumstance during nesting season. If you are dealing with a swallow bird problem, learn the safest way to get rid of them using humane exclusion and prevention steps swallows.
If you are unsure what species you are dealing with, a wildlife professional or your state's fish and wildlife agency can identify them. For reference, house sparrows and European starlings are non-native invasive species and are not protected under the MBTA, so they can be managed more aggressively. Pigeons (rock doves) are also not protected under the MBTA in most contexts. Knowing your species changes what you can legally do.
Hard-to-reach roosts and large infestations
If the roosting area requires working at significant height, inside confined attic spaces, or involves large accumulations of droppings (more than a few square feet of deep material), bring in professionals. The combination of fall risk, respiratory hazard, and legal complexity in these situations makes DIY the wrong choice. When you call a professional, be ready to tell them: what species you think is involved, where exactly the access points are, how long the problem has been present, and whether you have seen any eggs or chicks.
When DIY deterrents have failed
If you have installed spikes, netting, and exclusion devices, removed food sources, and birds are still using the building after two to four weeks, the issue is likely a gap or entry point you have missed, or a deterrent that has been compromised. A professional pest or wildlife control company can do a full building envelope inspection with tools and access equipment you may not have. Persistent bird problems usually have a persistent physical reason that a thorough inspection will find.
Your next steps to keep birds from coming back
Here is a straight summary of what to do, in order, to solve this problem and keep it solved:
- Check for active nests today before doing anything else. If present, stop and call a professional or your state wildlife agency.
- Remove food and water attractants from the building and surrounding area immediately.
- Install temporary visual deterrents (reflective tape, predator decoys) while you plan your permanent fix.
- Do a full building inspection and photograph every gap, vent, and opening larger than half an inch.
- Install one-way exclusion devices on active entry points and leave them in place for at least seven days.
- After confirming birds have exited, permanently seal all identified gaps with hardware cloth, caulk, or purpose-made vent covers.
- Install physical deterrents (spike strips or bird wire) on all active perching and roosting ledges.
- Clean up droppings using proper PPE and the wet-wipe method, never dry sweeping.
- Schedule your annual building inspection for late summer or early fall, after nesting season ends.
- If anything involves active nests, protected species, significant height, or large droppings accumulations, call a licensed wildlife control professional.
The most important thing to understand is that deterrents alone never solve a bird problem permanently. For a practical, step-by-step approach to getting birds out and sealing the right openings, see our guide on how to remove a card from a bird how to remove card from bird. Physical exclusion, sealing the actual entry points and perching spots, is what keeps birds off your building long term. Combine that with removing attractants and a consistent annual inspection, and you will not be dealing with this problem again next season.
FAQ
Can I just use bird spikes or bird tape to immediately stop birds from landing on ledges?
Spikes and wire systems work best only after you confirm there is no active nest and after you identify and seal the actual entry access points. If birds are still getting into an attic or wall cavity, they may continue using the building even if landing is uncomfortable. Plan for a full perimeter inspection, then pair perching deterrents with one-way exclusion on any active entry gaps.
What should I do if I see droppings but never see any birds?
Droppings can indicate past use or infrequent roosting, but you still need to verify whether birds are currently present before sealing. Use a brief, low-disruption check at different times of day, look for fresh staining or new debris, and confirm whether any openings show recent activity. If you cannot confirm birds have left, use one-way devices instead of sealing so you do not trap an unseen bird.
How long should I leave a one-way exclusion device in place?
At minimum, leave it at least seven days. Extend the wait during colder months, heavy rain periods, or if you see limited activity, and do not remove and seal until you have clear confirmation there has been no bird movement back through the device for several consecutive days. If you remove it too early, you risk birds re-entering before the building is sealed.
Is it safe to clean droppings before I seal openings?
It depends on the contamination size and bird activity, but generally you should not seal while birds could still be inside. Cleaning is still risky because disturbing dried droppings can aerosolize pathogens, so use proper respiratory protection and wet methods (or have a professional handle large areas). For unknown occupancy, focus on confirming exit first with exclusion devices, then schedule cleanup right before sealing.
How do I clean bird droppings without making them airborne?
Avoid dry sweeping or high-pressure rinsing. Use a controlled approach like misting to keep material damp before removal, wear an appropriate respirator and eye protection, and bag waste promptly. For deep attic or warehouse deposits, the article recommends professional remediation because the quantity increases airborne exposure risk.
Are gel repellents a good long-term solution for bird roosting?
Gel repellents are usually short-term because they collect debris and feathers and require frequent reapplication, which makes them easy to “fail” in real-world conditions. They also do not address the cause, such as an entry gap into an attic or wall cavity. If you use them at all, treat them as temporary while you install physical barriers and seal access points.
What if birds keep coming back after two to four weeks even though I sealed gaps and installed spikes?
That usually means you missed an access point, you sealed the wrong opening, or a physical barrier is compromised (sagging netting, a loose spike strip section, gaps around a vent cover). Re-inspect the full building envelope and specifically re-check roofline interfaces, utility penetrations, and behind signs or utility boxes. For persistent cases, a professional envelope inspection is the most reliable next step.
Do I need to worry about legal protection if the birds are pigeons or sparrows?
Yes, because legality depends on the species and whether there is an active nest. Many common birds can be protected under federal law, and disturbing an active nest can trigger serious penalties. If you are unsure what species is involved or you suspect eggs or chicks, stop work in that area and get identification from a wildlife professional or your state agency before taking any exclusion or removal actions.
Can I use traps or block off areas to force birds out faster?
Avoid trapping unless you are using an approved, species-appropriate method under proper guidance. Trapping or sealing can confine birds inside and lead to death, strong odor, and pest attraction, which also increases health risks. The safer decision aid is to use one-way exclusion devices at active entry points and only seal permanently after you confirm birds have left.
What should I tell a wildlife control professional when I call?
Provide the suspected species, the exact locations of openings and perching surfaces, how long the problem has been ongoing, and whether you have seen eggs or live chicks. If possible, include photos of droppings, staining, and any nesting debris. This helps them determine whether permits apply and which exclusion approach matches the bird behavior at your building.